Contents
- Original / Generic tool comparison
- Why to not solder contacts
- Mini-PV – Amphenol, M20 – Harwin (and other “DuPont” clones)
- Common JST Connectors
- Molex KK 254 / KK .100
- SL (Molex), AMPMODU MTE (TE Connectivity)
- M22 (Harwin), Milli-Grid (Molex)
- Tiger Eye 2.0mm (Samtec)
- CGrid III (Molex)
- AMPMODU MOD IV (TE Connectivity)
- Molex KK 396 / KK .156
- Molex Mini-Fit Sr
- Molex Mini-Fit Jr
- Universal Mate-n-Lok (6.35mm pitch) – TE Connectivity
- Commercial Mate-n-Lok (5.08mm pitch) – TE, Formerly Tyco, Formerly AMP
- Molex Micro-Fit
- .250 FASTON, .187 FASTON – TE Connectivity
- AMP E.I.
- Molex 90331/8619 series
- AMPLIMITE (TE Connectivity)
- Molex Picoblade
- The only budget tools I use
- Other types
Introduction

As someone who builds a lot of electrical things, one of the perhaps most unexciting yet fundamental subject areas is connectors. The range of connectors available and in-use today is trully astonishing. Big sellers like Digi-key/Farnell/Mouser literally have tens of thousands of product lines in their connectors category!
With so many different types of connectors available, it’s often difficult to know what to buy, especially when you’re buying for general use and/or personal stock. On this page I’ll cover some of the most common connectors in use today, and detail crimping/tooling considerations.
Every connector system ever conceived has its own official crimp tool, in most cases the cost of these is over and above what any hobbyist could and would want to pay for a crimp tool.

I personally own many of the official tools but for cost reasons don’t necessarily recommend them.

For the past 5 years this page has been focused on comparisons with the above tools. Note that I do not recommend buying these. They are expensive, poorly finished, causing contacts to stick in the jaw, and the scissor type action makes it difficult to get sufficient force on the conductor part.
My recommended budget tools
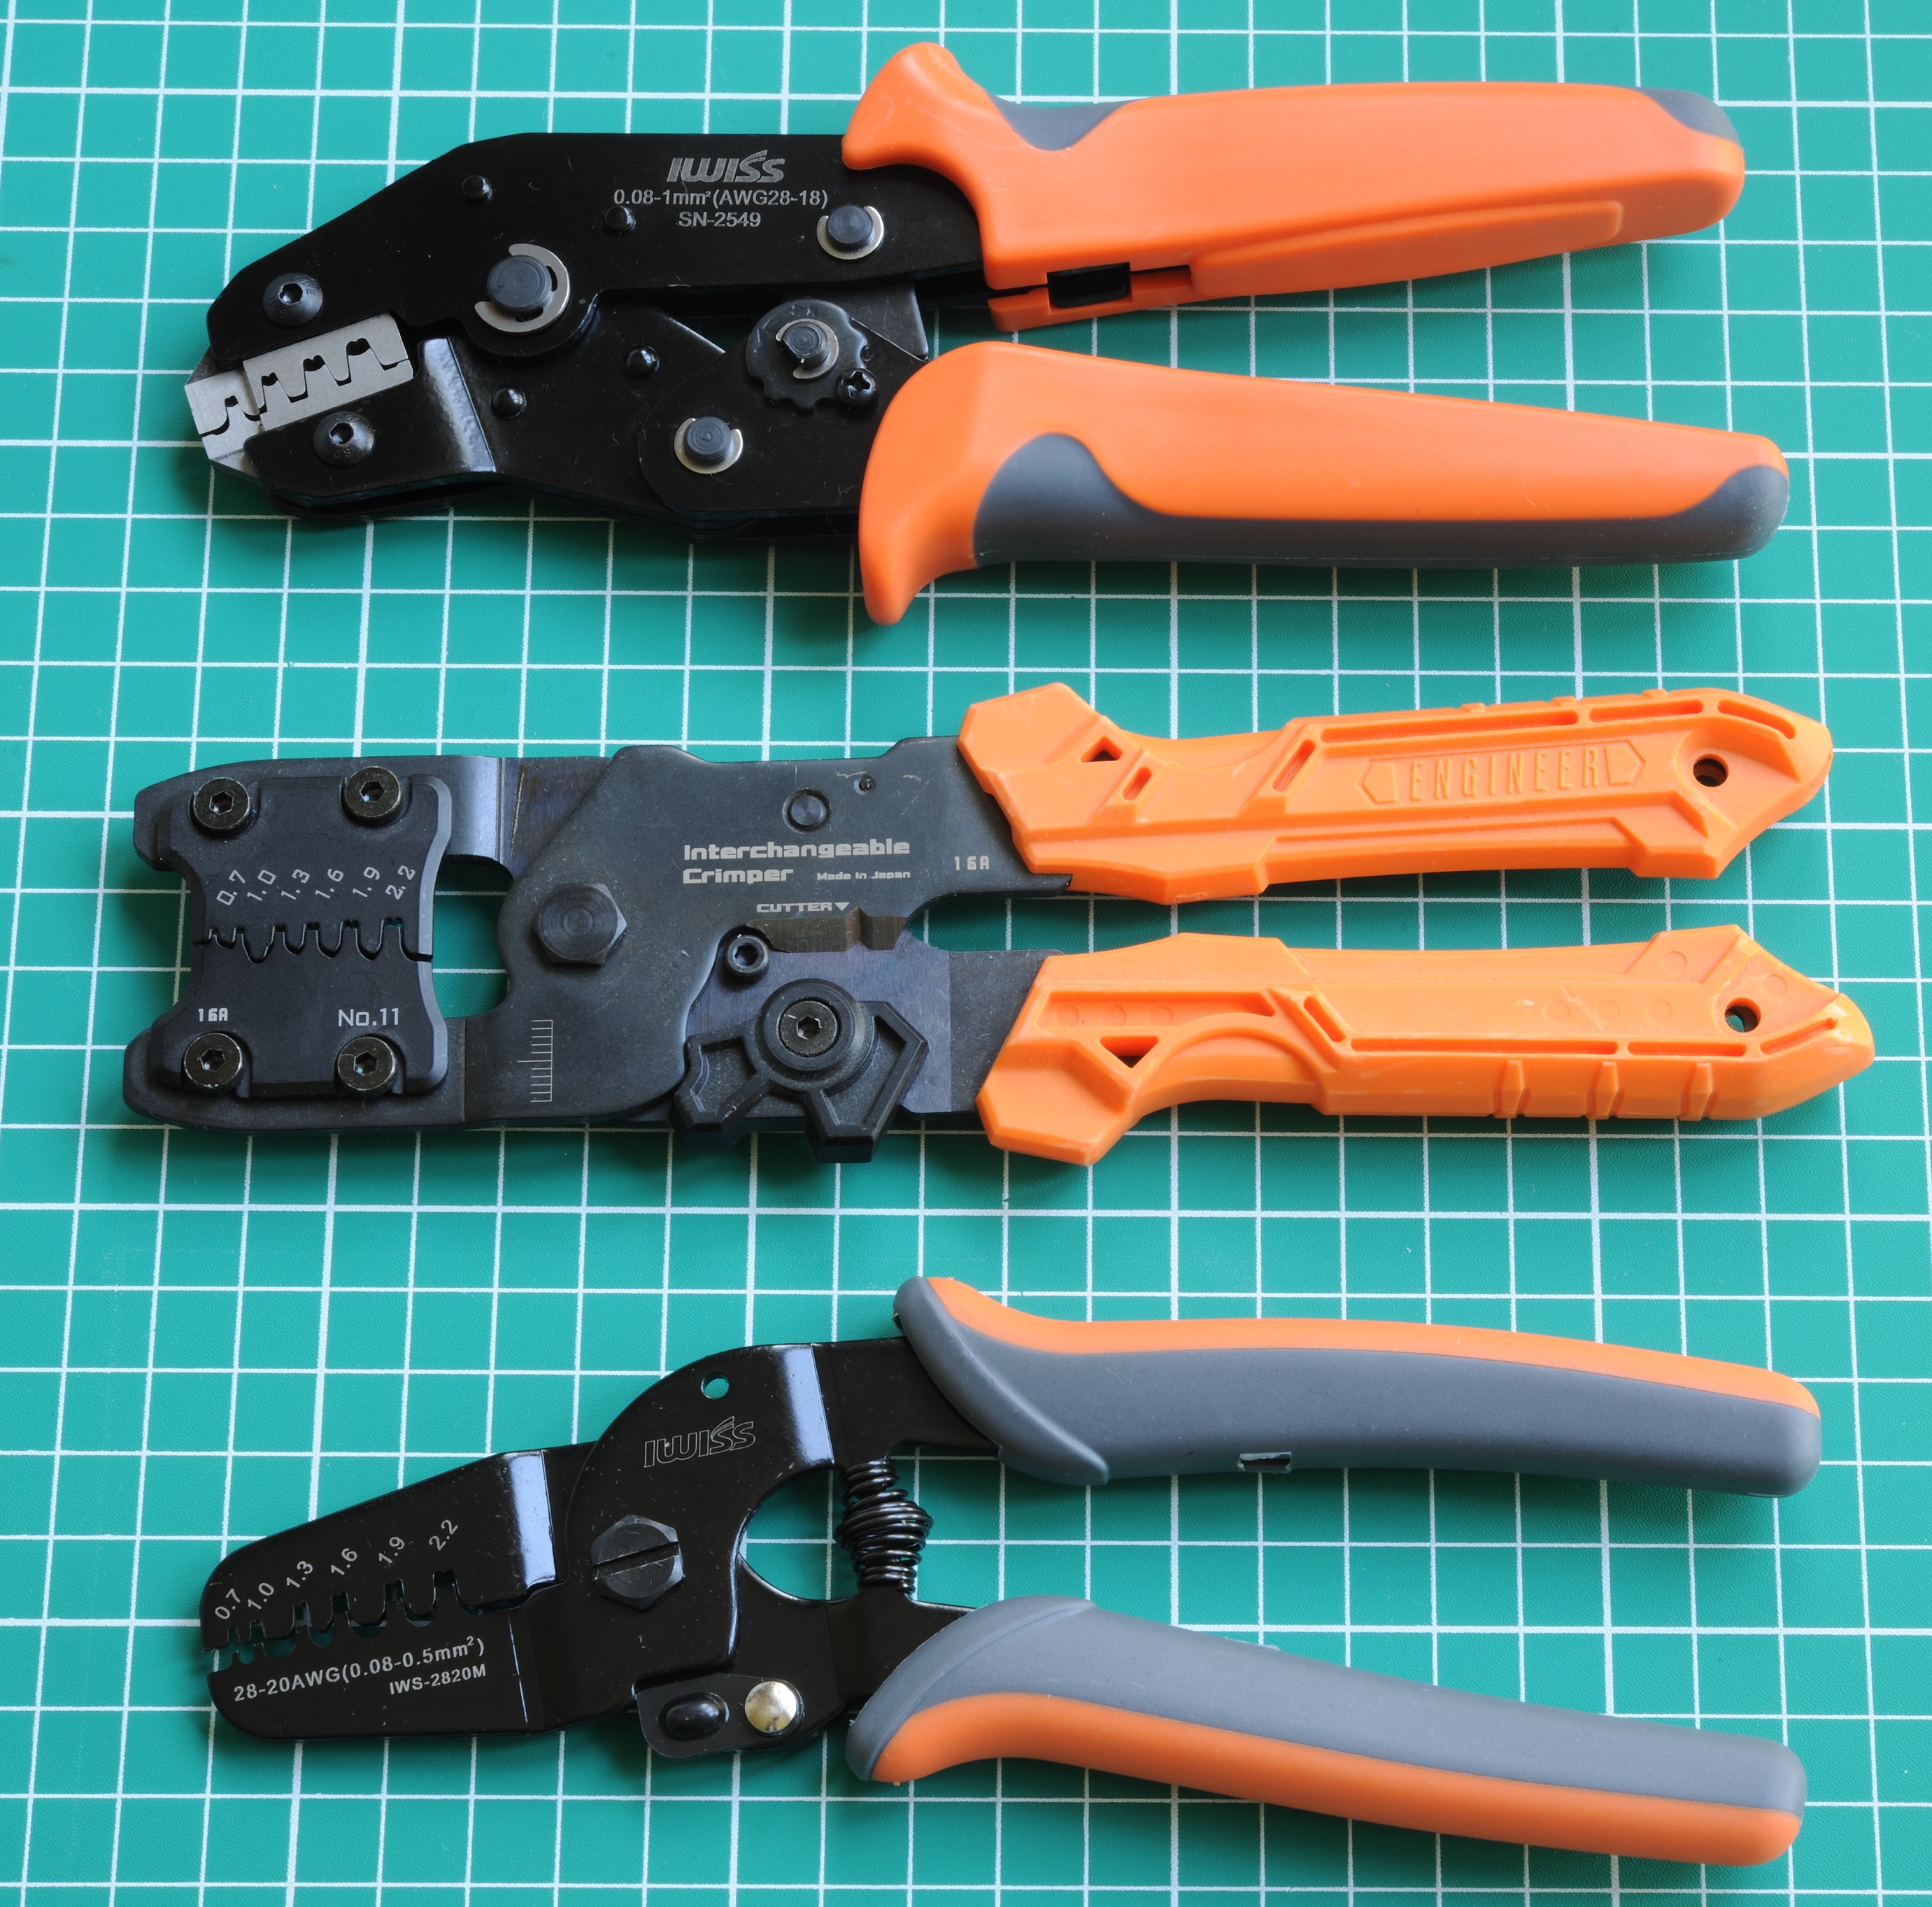
- IWISS SN-2549. A 4 die tool for smaller contacts. It’s good for most medium sized power connector families on this page i.e. Microfit, Mini-Fit Jr, E.I., KK .156, Mate-n-Lok, .187 FASTON, JST PH. It has a cleanly machined jaw, so contacts won’t get stuck in it. It crimps the conductor and insulation in a single action, with the ratchet double hinge mechanism providing good force on the conductor part. It tends to apply too much force to the insulation part, but one cannot have it all on a budget.
- IWISS SN-58B. Another good 4 die tool from IWISS, however all significantly larger than the SN-2549. Recommended if you work with larger contacts.
- Engineer PAD-11. Unlike the PA-09/21 its jaw is cleanly machined, allowing easy removal of contacts after crimping. It is a little pricey but definitely wins for crimping smaller contacts i.e. PH, XH, Picoblade, SL, KK 100 etc.
- IWISS IWS-2820M. A copy of the Engineer PAD-11. Not as well made but for the significantly lower price, it could be forgiven.
For those with a little more to spend

Several readers have written to me about this tool over the years – it’s generally well spoken of. I recently obtained a sample myself and can confirm that it’s a good option for those happy to spend a bit more. It tends to cost around $70-80 and has to be ordered from Japan.
It has two features which many generic tools lack:
- Lots of conductor crimping force. Its compound hinge amplifies the crimping force, meaning you can have as much as you like, you can even crush the contact into two if you so desire. Single hinge tools like the Engineer PA-XX models cannot achieve this unless one has an extremely strong grip, or the tool is compressed in a vice.
- It has two ‘O’ shaped crimping dies, something that is rarely seen on generic tools. This means it does good ‘DuPont’ crimps. More about that here.
- The above two features are combined in a tool which crimps conductor and insulation separately. This gets around another common problem with generic tools where these are combined, in that one may be under or over crimped. You can crimp both separately to whatever extent you require.
It’s not a clear-cut winner however as it is more effort to use than the IWISS ratcheting tools and gets less consistent results, owing to the fact that crimping force is controlled by your hand.
IWISS have added an exact copy of this tool to their catalogue – IWS-1442L. Don’t expect it to be made to the same standard as the Hozan. Personally I would prefer they spent their efforts improving the mediocre results of their own designed crimp tools, rather than copying others.
Do your own research too. There are thousands of generic crimp tools out there. I cannot test them all.
What differences can I expect using original tools versus generic tools?
These are four main differences:
- Single action: All original tools allow insertion of the contact and crimping in one go. Generic tools will often require the insulation and wire crimp to be performed as separate actions
- Correct crimping force: When using generic tools, it can often be difficult to get sufficient crimping force, especially when crimping thin / small gauge wire into contacts . It is also equally easy to over crimp contacts, damaging the wire in the process.
- Locator: All original tools have a ‘locator’ which holds the contacts in place during crimping, this means that your crimps are perfect every time. Using generic tools, it can be frustrating trying to line the contacts up correctly.
- Insulation crimp accuracy: Original tools are designed to not piece the insulation, whereas generic tools do most of the time. This means that terminations subject to continual mechanical stress are going to last a lot longer.
- Cost: Original tools are all extremely expensive. Unless like me you’re happy to prowl eBay looking for deals on second hand original tools, expect to be paying hundreds to over a thousand dollars (USD) / £ (GBP) for an original tool, only to have it work on a single connector family! To rub additional salt into your wounded wallet, it’s not uncommon to find that the connector manufacturer has a different tool for every single wire size, each costing $500+
What’s wrong with just soldering contacts?
Before I get started, let’s cover this one briefly with a simple diagram:
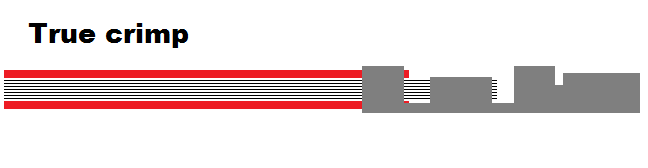
When crimped properly, the strands remain individual even upon entering the insulation crimp, making the chances of strands breaking low.

When soldering, there is a very high chance that the solder will wick up the conductor, beyond the insulation crimp, making it very vulnerable to mechanical damage. In this situation, it only takes a small amount of movement to start snapping the strands at the invisible weak point.
Soldering doesn’t have any disadvantage in electrical terms, only mechanical. That make this method non-viable for production use; except under very controlled conditions with connectors that are designed for soldering. This having been said, I would recommend soldering in scenarios where connectors are carrying significant current, and the manufacturer tool is unavailable (see below).
Below is an interesting graphic from TE, from this video. On the left a cross section of a “gas tight” crimp, typical from a manufacturer original tool. The graphic on the right is the typical result of an off-brand tool. It’s important to put this into context however – gas tight crimps are only needed where contacts are used near their current rating, are expected to last a very long time, and/or the consequences of failure are serious.

Branded vs no-brand contacts
Back when I first started using crimp connectors, almost everything I built made use of cheap no-brand contacts with no particular care as to what they were plated with (not that it was ever specified anyway). Why waste money on name brand contacts when no-brand contacts work just fine?
Fast forward a few years, and I find that some of that equipment I built 3-5 years ago begins to malfunction. The problem was that I had mated contacts from two different eBay sellers with differing plating. The dissimilar metals in use corroded over the years ending in failure.
Attempts to save a few quid back then have now resulted in hours of profanities as all of those connectors have had to be re-crimped with name brand gold contacts.
If you are not on a tight budget, and building something that has to be reliable, and last – go straight for manufacturer original gold plated contacts . If buying Molex: 0.38µm “Selective” plated contacts are good enough (unless your creation is a life support system, or going to the moon).
Alternatively, if you don’t want to stump up for gold plated contacts – Tin plated contacts from known brands i.e. Molex / TE/ Amphenol / JST will last a lot longer than no-brand contacts.
Brass vs Phosphor bronze contacts
Phosphor bronze and brass are both alloys of copper, however with different ingredients. Phosphor bronze contacts are generally regarded as superior as they are harder and retain their tension for significantly longer. Smaller brass contacts may need to be re-tensioned after 5-10 mating cycles. If a contacts material is not specified (i.e. it’s a cheap no-brand type) assume it’s brass.
There are other exotic materials used in contacts i.e. beryllium alloy however these tend to only be found in very expensive contacts (for example genuine Mini-PV).
Mini-PV – Amphenol, M20 – Harwin (and other “DuPont” clones)

These (and look-a-likes) are the most commonly used type by hobbyists. I have a separate page with a lot of detail relating to these.
Common JST Connectors

Another range of common types used by hobbyists. There are quite a few to cover. I’ve detailed them on a separate page.
KK 254 / KK .100 (Molex)
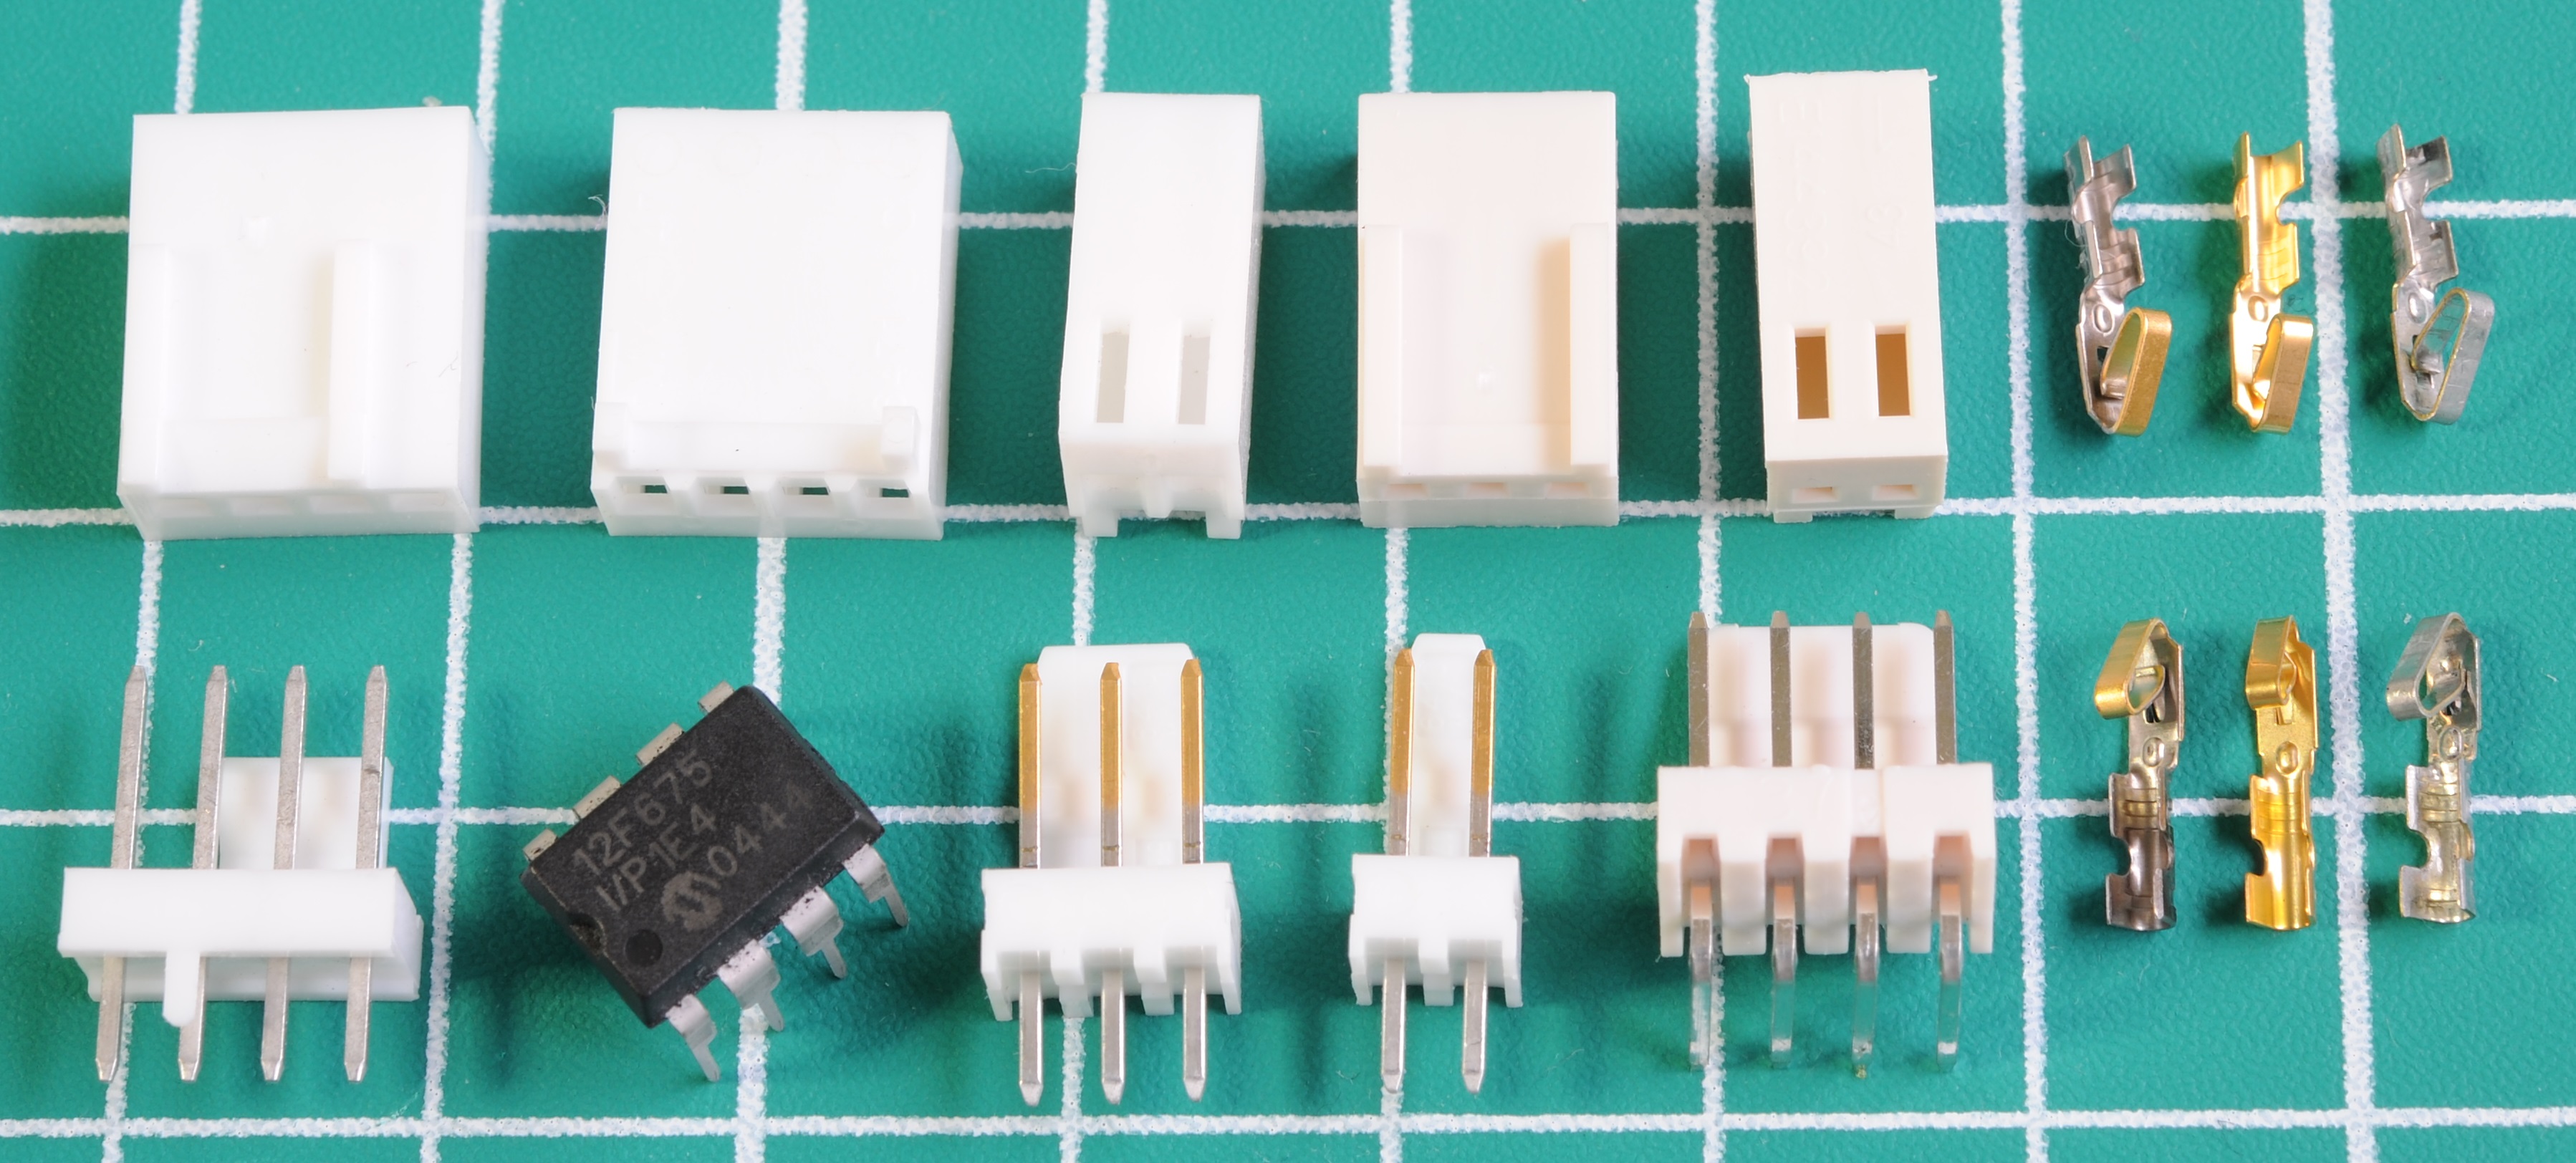
Connectors resembling these are produced by many manufacturers, most of whom are anonymous factories in mainland China, whose product is sold under a plethora of different brand names. For the most part, headers and housings mate and latch fairly well across brands.
As explained in the caption above, Molex/TE’s housing design is different to most no-name types of this connector. I’ve not been able to identify a well-known manufacturer who produces these with the longer (superior) polarising ribs.
Despite my dislike of Molex’s polarisation design – I don’t use the more common no-brand types anymore as several years ago I had a bunch of them fail after 18 months due to corrosion on the mating surface. I have since replaced all them with Molex Gold plated types which have now been running for 4 years without incident.
Example part numbers (Molex)
Numbers in bold can be changed to order connectors with a different number of positions.
| Contact AWG 22-30 (Tin plated) | 08-50-0114 |
| Contact AWG 22-30 (Selective gold plated, mating surface only) | 08-55-0102 |
| Housing 3 position | 22-01-2035 |
| Housing 4 position (PC fan style polarisation) | 47054-1000 |
| Header 3 position (Tin) | 22-27-2031 |
| Header 3 position (Gold plated) | 22-29-2031 |
| Header 4 position (Tin plated, PC fan style polarisation) | 47053-1000 |
| Header right angle 3 position (Gold plated) | 22-12-4032 |
| Header right angle 3 position (Tin plated) | 22-05-7038 |
| Hand crimp tool AWG 22-30 | 63811-8200 |


Unofficial male connectors
Unfortunately there is no standard male connector in the KK 254 family, but this hasn’t stopped a slew of unofficial connectors from being produced. These connectors bear and extraordinary resemblance to the Molex SPOX 5420 series (SPOX is a similar, but incompatible type, which does have a wire-to-wire male).

Above is a variety of Chinese manufactured connectors I’ve purchased off eBay and Alibaba which are designed to mate with KK 254 female connectors. They are only found in 2, 3 and 4 positions, because, these are the variants used for PC fans.
The quality of these is not comparable to that of the mating connectors, but perhaps this is not so surprising, given the intended market of these connectors.
SL (Molex), AMPMODU MTE (TE Connectivity)

A common 0.1″ (2.54mm) pitch connector which is similar in appearance to Mini-PV / “DuPont” types, even mates with them but is quite different in design, in that the retention mechanism is part of the contacts, where as with Mini-PV it is part of the housing. It is manufactured by both TE and Molex with some minor differences. Chinese reproductions of this type are common.
If I were to start over, I would probably use these connectors in place of several others I commonly use, this is because it is truly a “do-it-all” connector family.
With 2.54mm pitch, they’re good for breadboard, strip board and anything else like it, they have a reliable and practical wire-to-wire male connector, they’re polarised, latching and contact positioning is very good i.e. in male housings they don’t flop around risking bending on mating. There’s even panel mounting options!
They’re not particularly cheap, but if not on a budget, well worth considering.
The downside is that PCB headers have a large footprint. Mini-PV is a connector family with comparable versatility including polarised PCB headers of significantly smaller footprint, and better quality contacts, however at slightly higher cost.
Example part numbers (Molex)
Numbers in bold can be changed to order connectors with a different number of positions. Non latched, and dual row types are also available.
| Female contact AWG 24-30 (Gold plated) | 16-02-0082 |
| Female contact AWG 24-30 (Tin plated) | 16-02-0069 |
| Male contact AWG 24-30 (Gold plated) | 16-02-0077 |
| Male contact AWG 24-30 (Tin plated) | 16-02-0105 |
| Housing 4×1 position female (with latch) | 50-57-9404 |
| Housing 2×1 position male (with latch) | 70107-0001 |
| Housing 4×1 position male (with latch) | 70107-0003 |
| PCB Header 2 position (Gold plated, with latch) | 70543-0001 |
| PCB Header 4 position (Gold plated, with latch) | 70543-0003 |
| PCB Header 2 position (Tin plated, with latch) | 70543-0036 |
| PCB Header 4 position (Tin plated, with latch) | 70543-0038 |
| Hand crimp tool AWG 24, AWG 26, AWG 28, AWG 30 | 63825-8800 |
| Hand crimp tool AWG 22, AWG 32, AWG 34, AWG 36 | 63811-8700 |
| Hand crimp tool AWG 24-30 (Historic) | 11-01-0209 |
| Hand crimp tool AWG 22-24, AWG 30-36 (Historic) | 11-01-0208 |


Unlike Mini-PV which almost no generic tools can crimp properly – SL Contacts crimp pretty well with off-brand tools.
As we can see from the picture above we have a familiar problem of not being able to apply the same kind of force. The original tool is designed in such a way that a large amount of pressure can be applied to a small area, but on the Engineer tool this just isn’t possible short of jamming the jaw into a vice every time, which’d be a little time consuming.
M22 (Harwin), Milli-Grid (Molex)

A common 2.0mm pitch grid type connector. Available in single and dual row configurations. Similar types are made by both Harwin and Molex. Harwin’s type is cloned by Chinese manufacturers and is significantly more common.
Example part numbers (Harwin)
Numbers in bold can be changed to order connectors with a different number of positions.
| Contact AWG 24-30 | M22-3050042 |
| Blank polarising plug | M22-0340000 |
| Housing 4×1 position | M22-3010400 |
| Housing 4×2 position | M22-3020400 |
| PCB Header 4×1 position | M22-2010405 |
| PCB Header 4×2 position | M22-2020446 |
| Hand crimp tool | Z22-020 |


M22 and Milli-Grid contacts crimp easily and cleanly with tools like the Engineer PAD-11, however with the usual problem of significantly less force on the conductor part, which means cable assembles have to be pulled from the connector body (not the wire) to avoid wire pulling from the contacts.
Tiger Eye 2.0mm (Samtec)
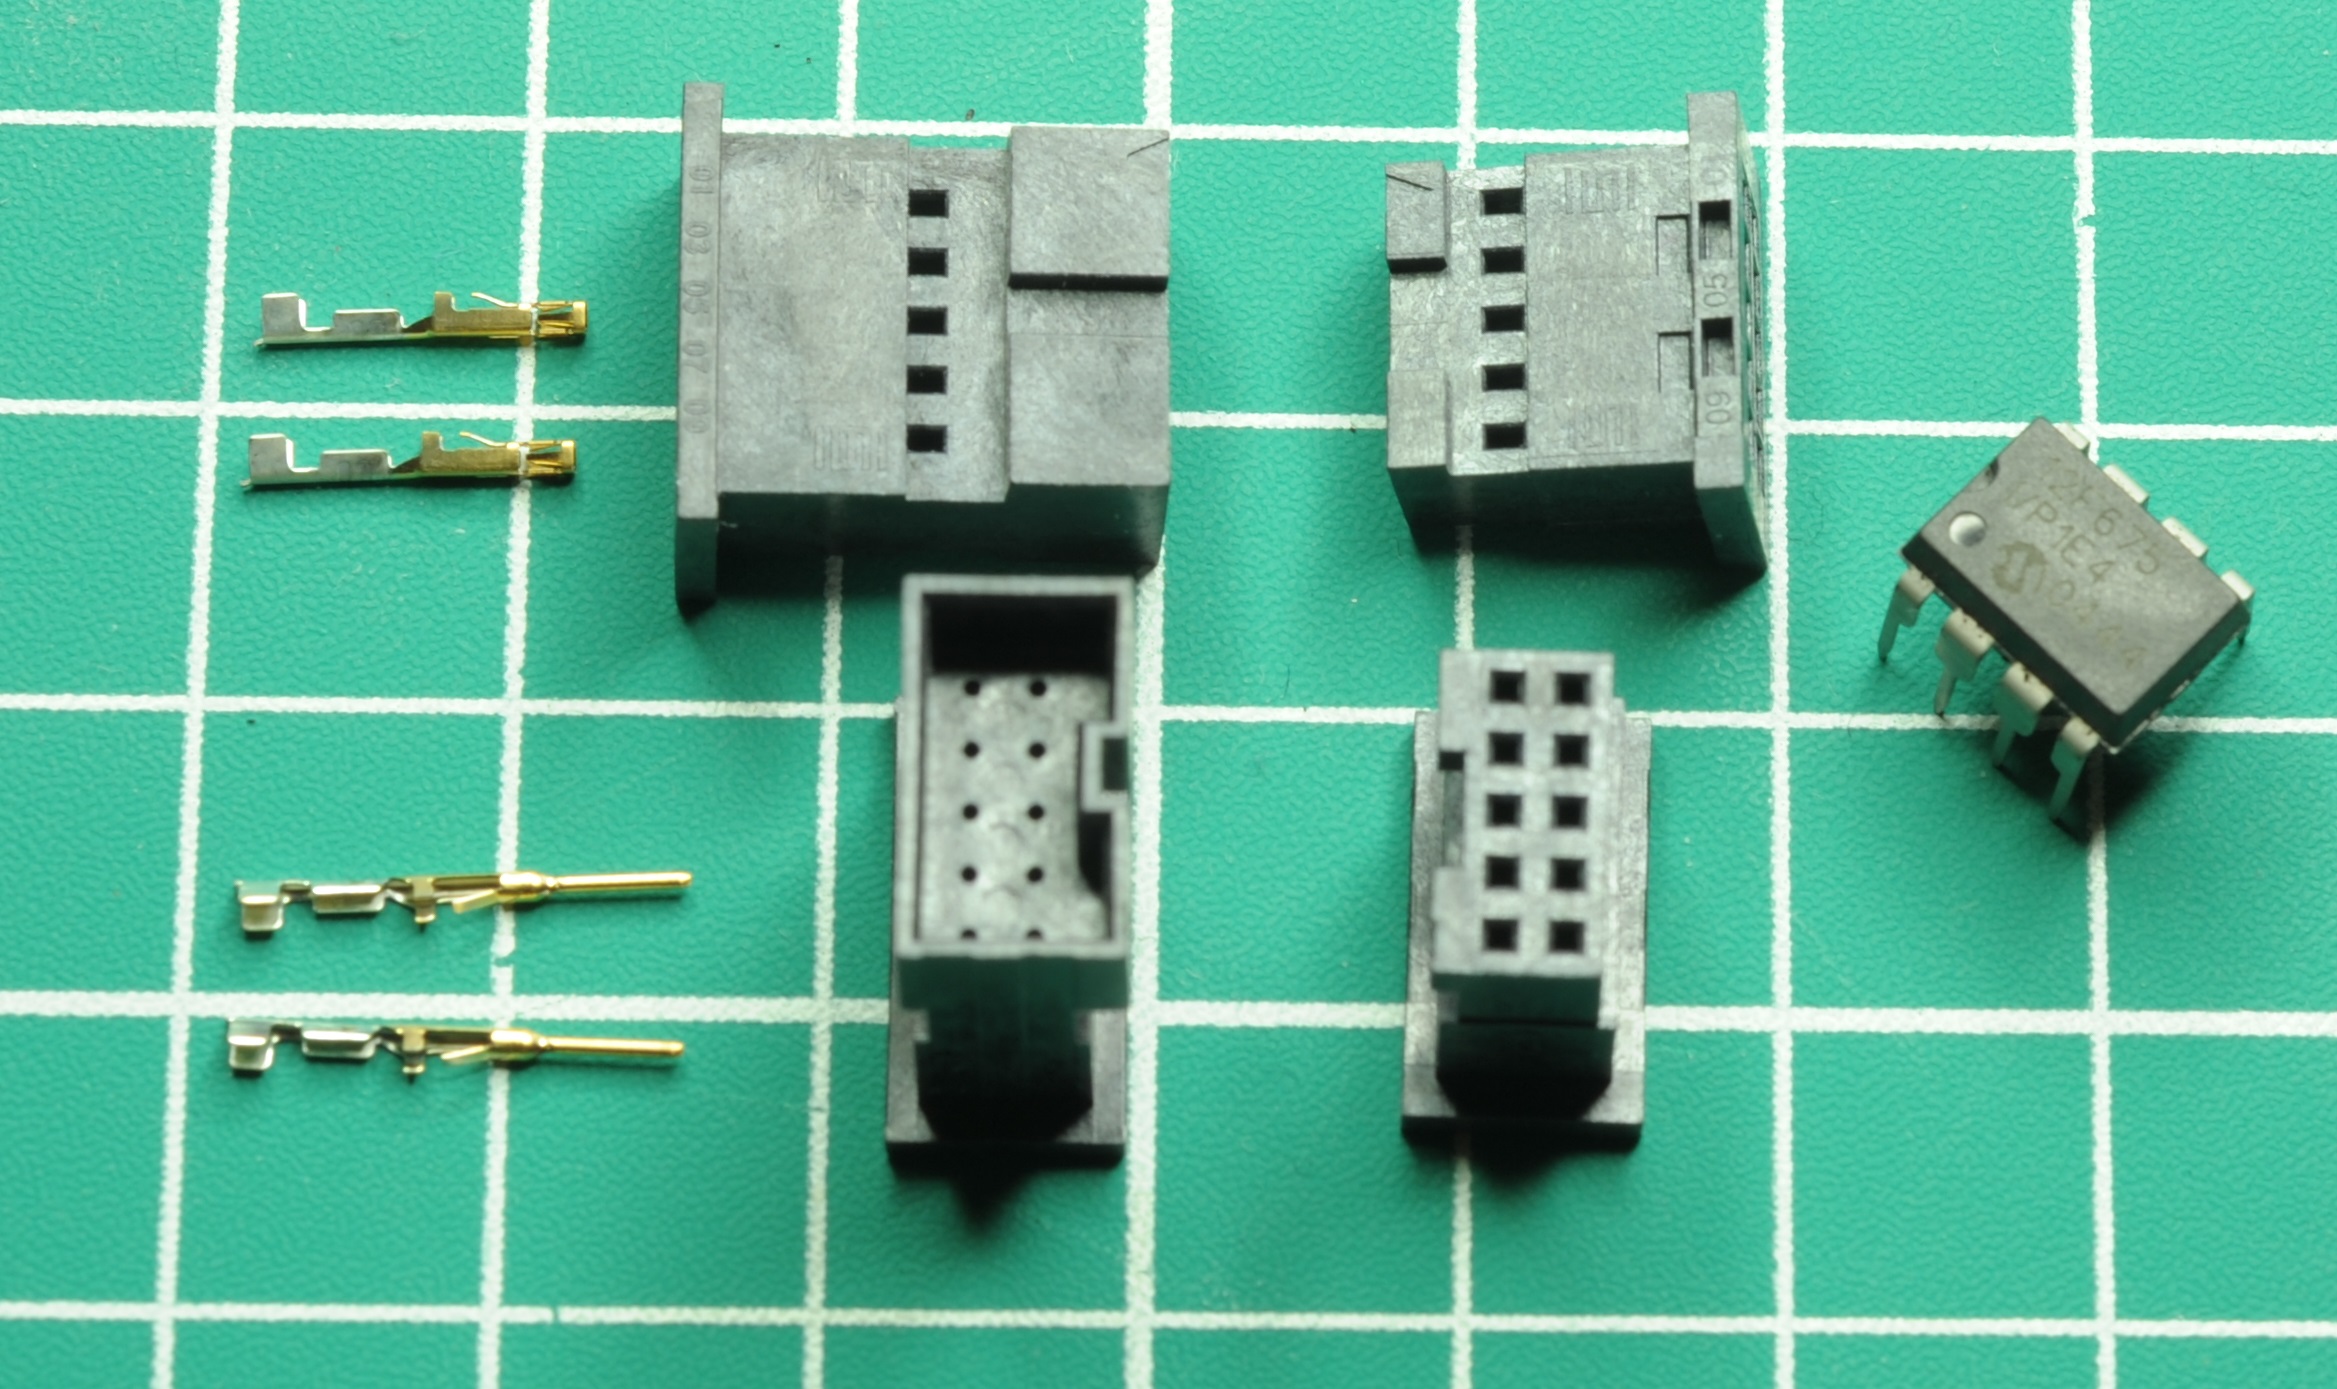
A exceptionally rare example of a two row wire-to-wire connector system. In total I have only ever identified two such types of connector, other other being dual row Mini-PV. If you come across any more, please let me know!
CGrid III (Molex)
Very similar to the SL series mentioned above, except cheaper, lower quality and lacking latching options. These are an option for those looking for something in the form of “DuPont” style connectors, but better quality, and cheaper than genuine Mini-PV connectors.
The design of the contacts is distinctly different to SL. They crimp more like Mini-PV contacts with an ‘O’ crimp on the insulation.

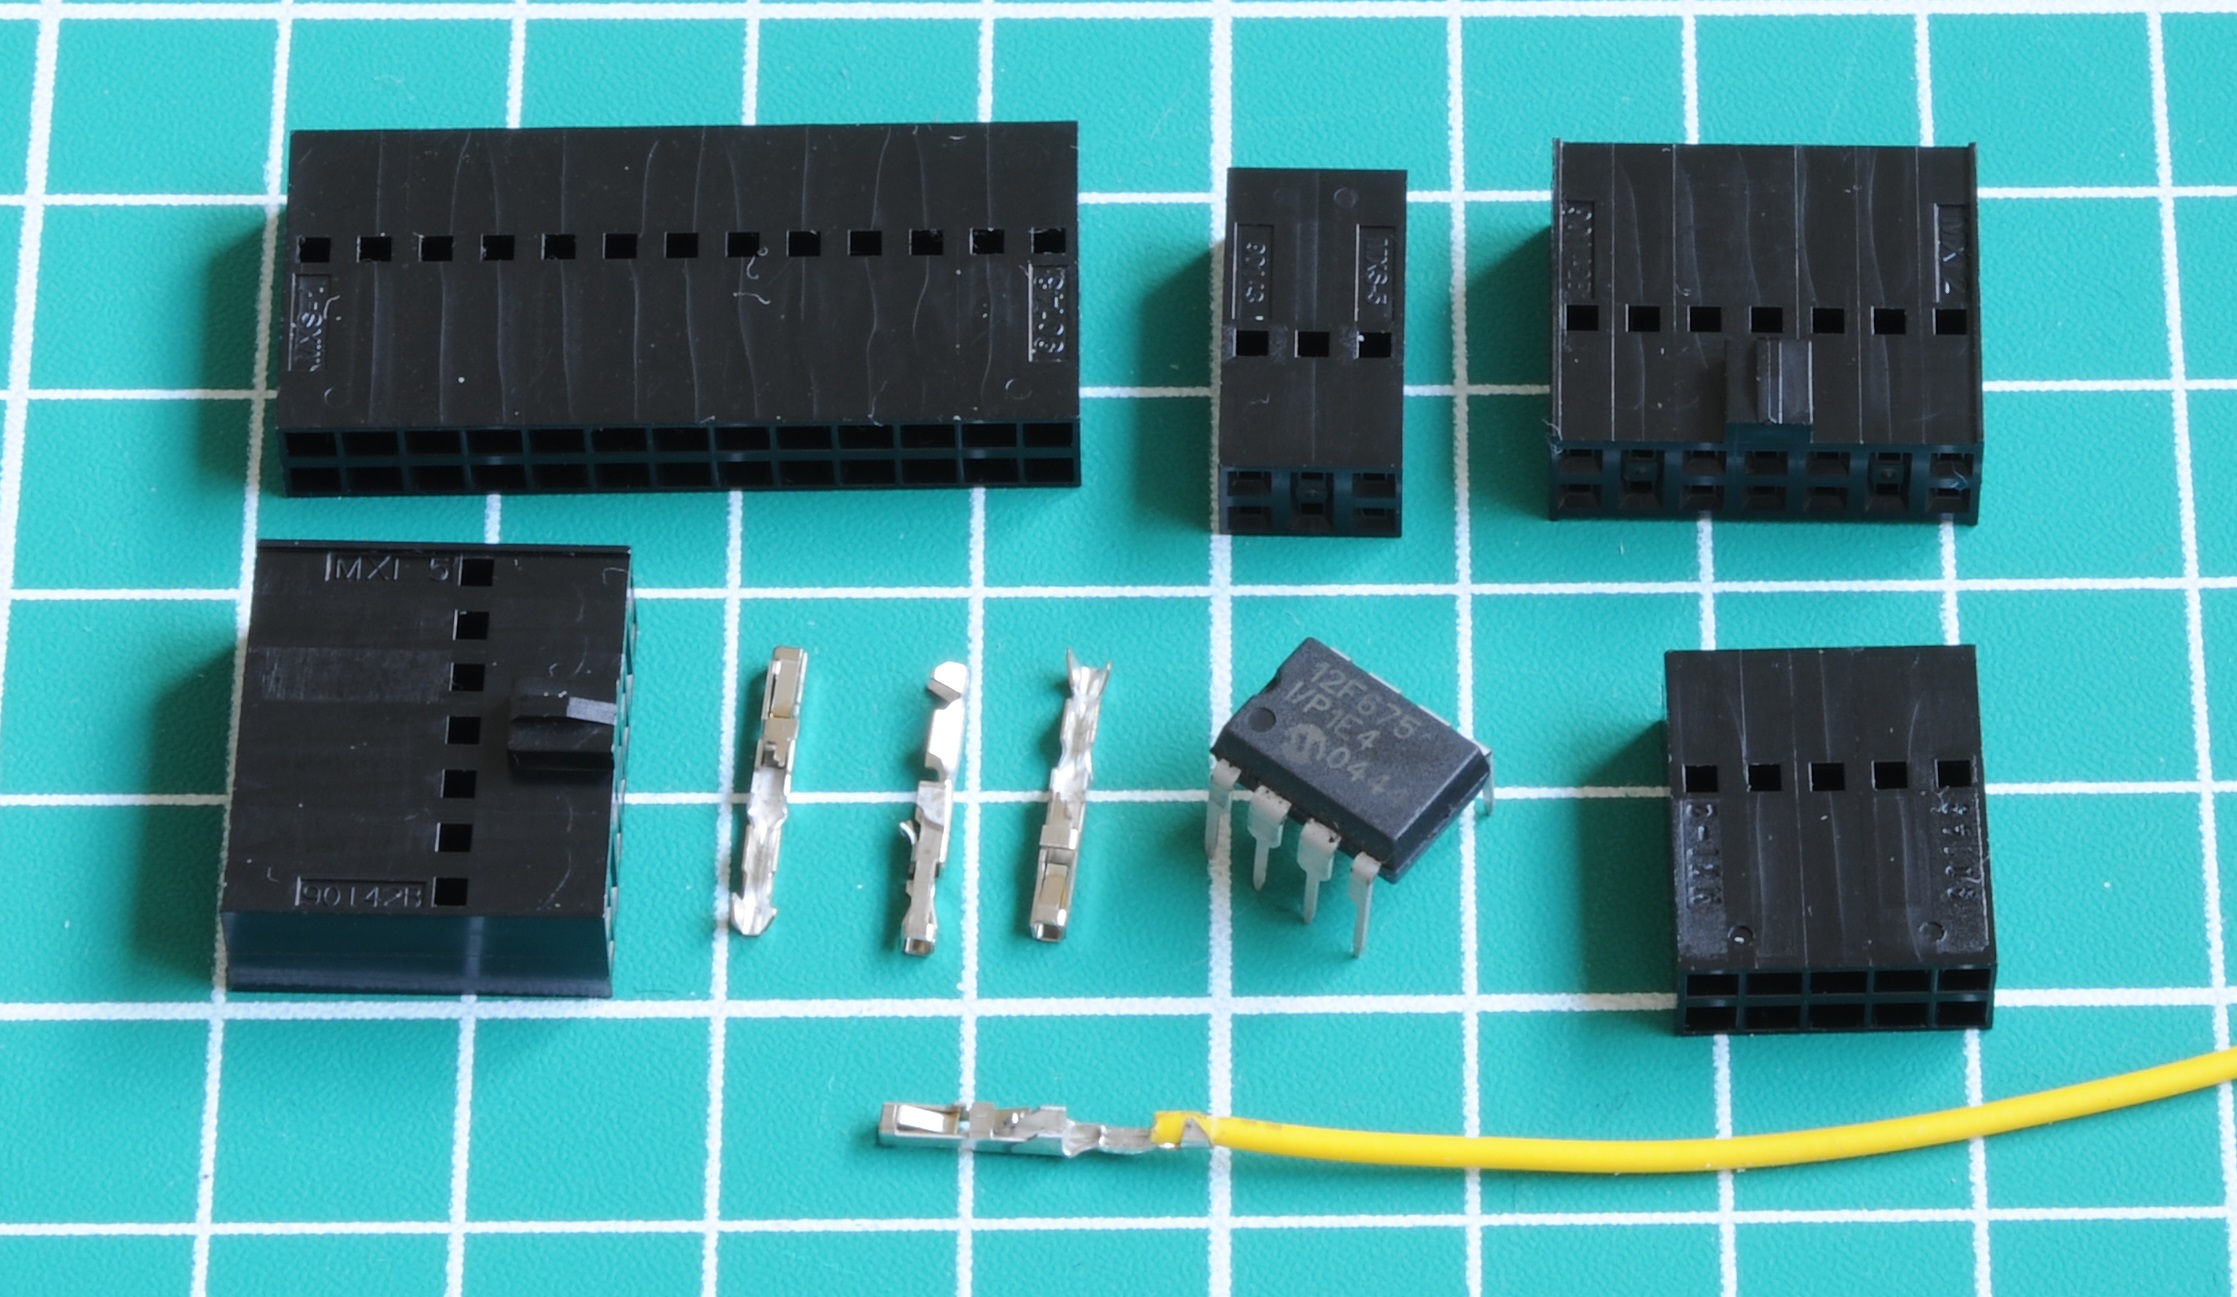
AMPMODU MOD IV (TE Connectivity)

Tired of reading about 0.1″ wire to board connectors yet? AMPMODU MOD IV is yet another example, but one from the ark. The newest equipment I’ve ever found one in was manufactured in 1986. They remain in full production to this day, for some reason or other.
The housings are quite a bit thicker than most other types. The two row housing has the same thickness as a 0.1″ IDC connector. To me the only interesting thing about this family is the housing on the left. It’s got the exact dimensions and polarisation of an IDC connector. Quite handy when in situations when mating a non-IDC cable assembly to a shrouded IDC header. Agreed, an unlikely use-case. Beyond this, these are an expensive relic.
KK 396 / KK .156 (Molex)

Effectively a jumbo version of the KK .100 connector, this is another very common wire-to-board connector of which compatible connectors are made by a large number of manufacturers. Pitch spacing is 0.156″ (3.96mm). The most likely place you will encounter them is inside of switching power supplies, almost certainly on the primary side, and possibly on the secondary side too.
As with KK .100/.254, connectors with this same 0.156″ pitch, which mate with these are available from many other manufacturers.
There are two varieties of contact: basic and “trifurcon” – a special variant which contacts the pin on three surfaces for increased current carrying capability.
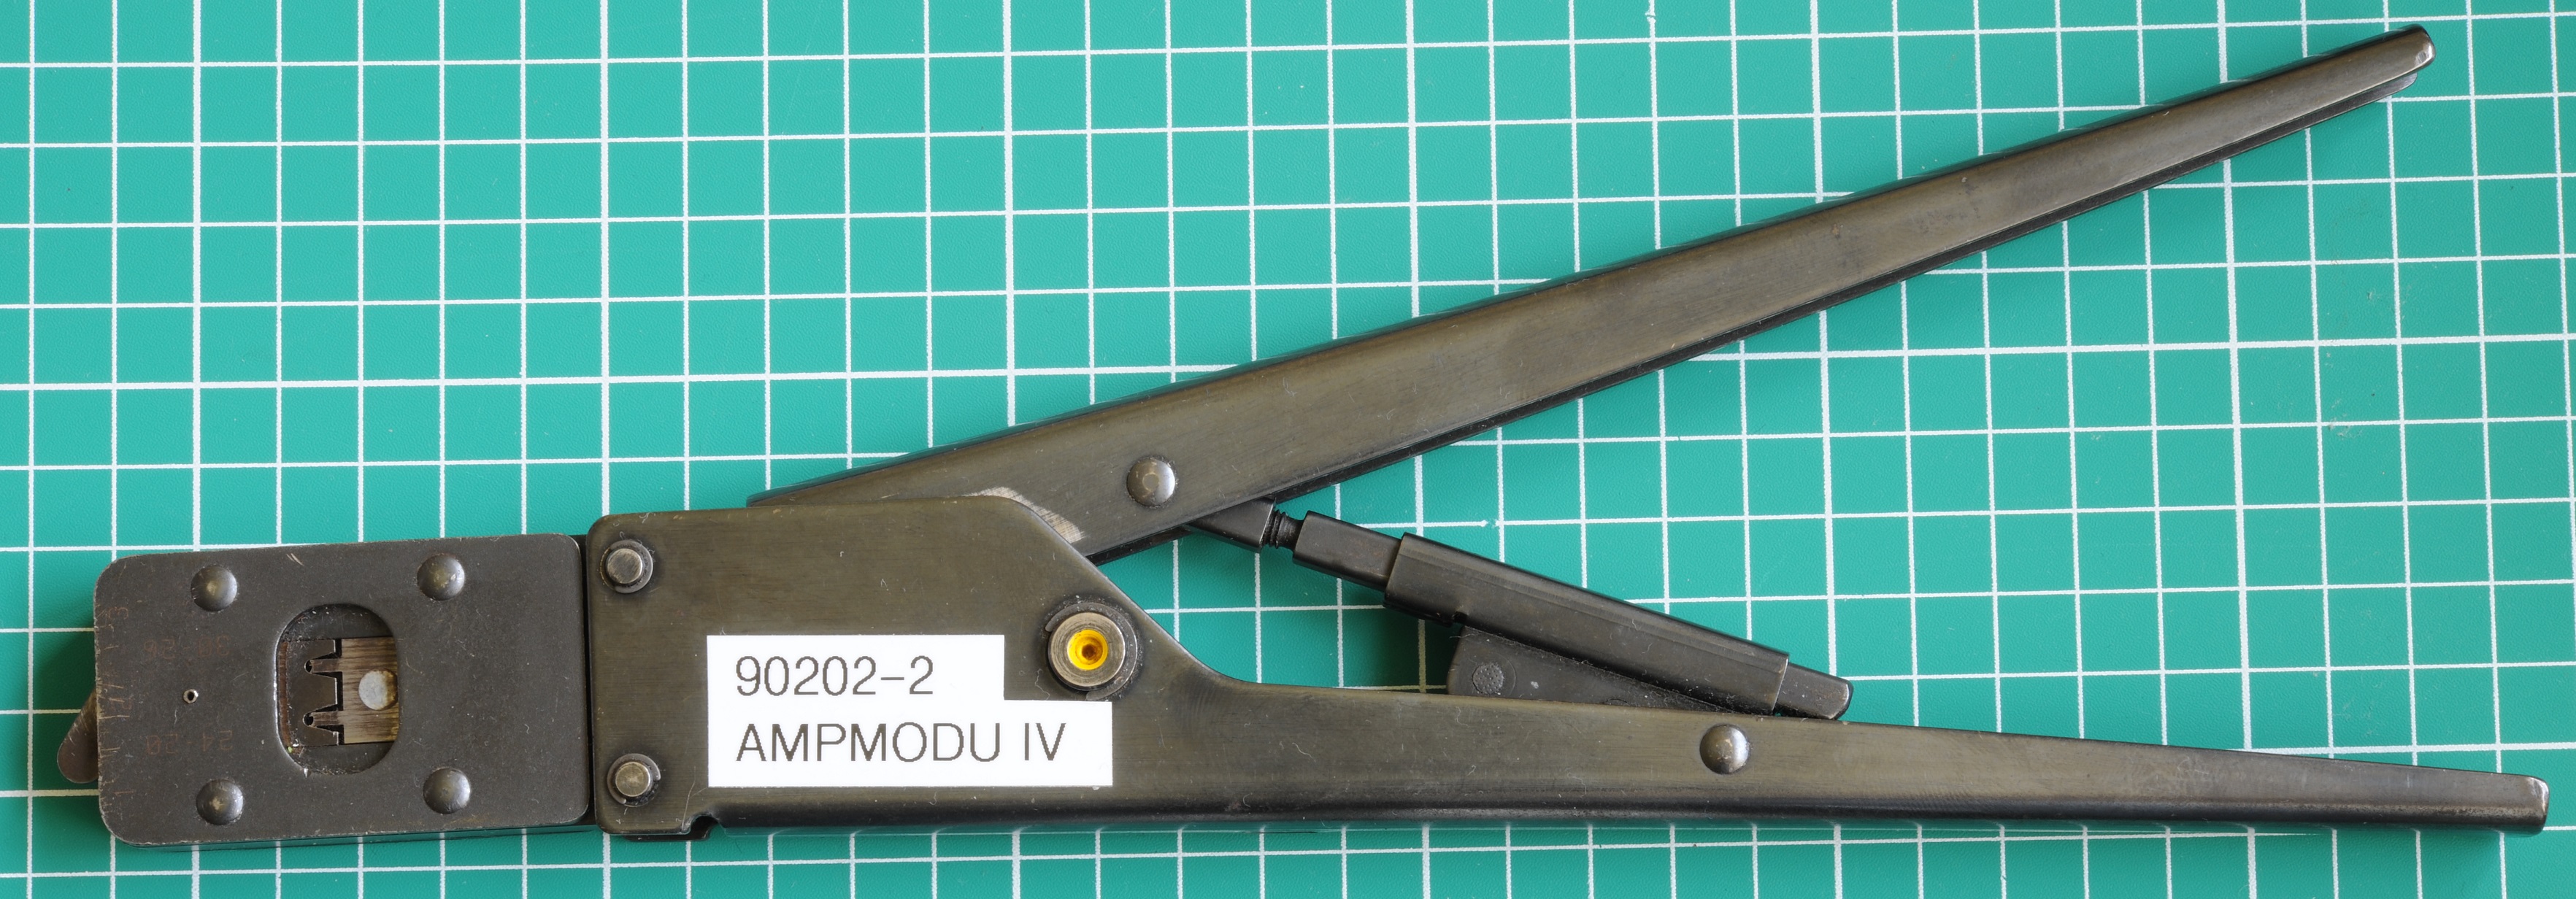
- 63811-7500: Official crimp tool (This has now apparently been replaced by a new tool)


- Left: Crimped by Molex 63811-7500
- Centre: Crimped by Generic tool (HT-225D)
- Right: Crimped by Engineer PA-21

As expected, the original tool is effortless to use and gets absolutely perfect results. The IWISS SN-025 is a tool I found crimps these very well despite it not being inteded for this purpose.
Mini-Fit Jr (Molex)
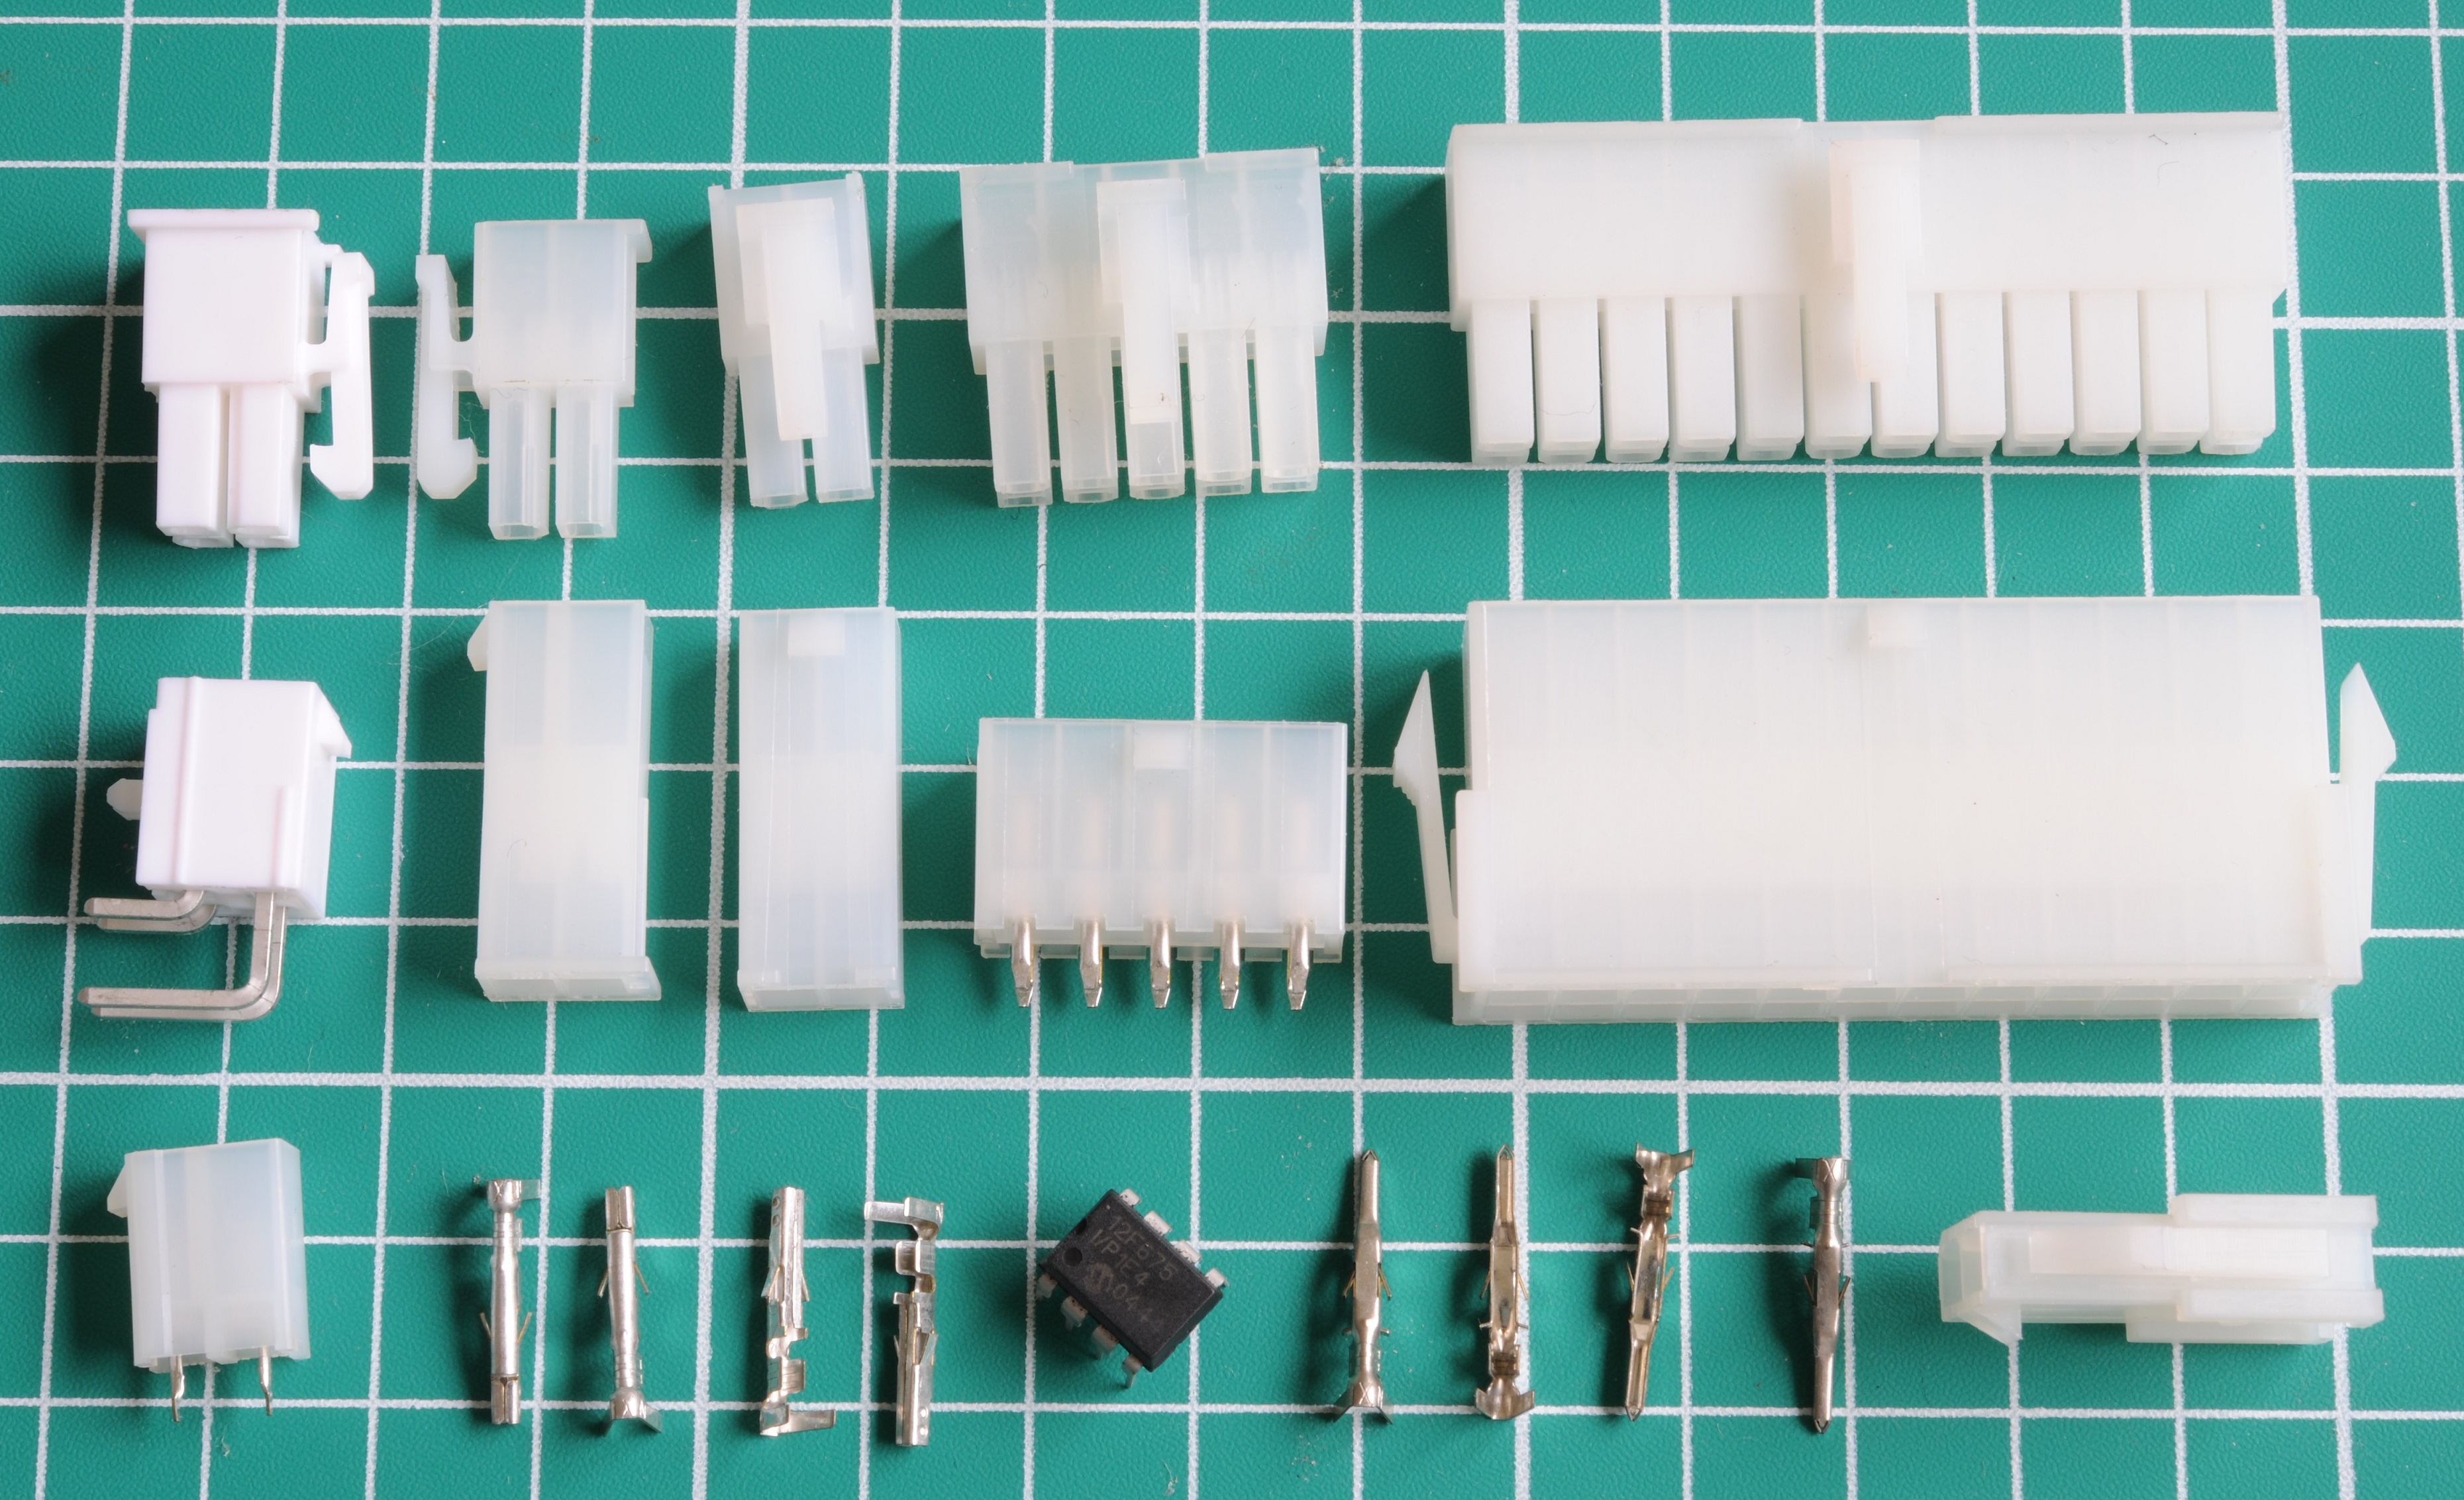
Used for 20 and 24-pin ATX power supply connectors, and for the 4, 6 and 8 pin +12V connections found in modern PCs.
Example part numbers (read notes below first)
All of the part numbers specified below are for the “natural” colour types as pictured above. They are also available in black and white (left, above).
If supplied by Molex, black housings are for “glow wire” compatibility (they don’t spontaneously ignite in the event of a connection overloaded to glowing point). White housings are for UL94-0 fire safety compliance, i.e. they’re less flammable than the “natural” coloured types, however more expensive.
No-brand (non Molex) types are often coloured black for aesthetic reasons typically for use in PCs, and are made of low quality plastics which do not feature the improved fire safety ratings of Molex types.
Contact and header part numbers are for the most common Tin plated types. Gold plated types are also available however these should not be used unless both mating sides are gold plated.
Numbers in bold can be changed to order connectors with a different number of positions.
| Female contact AWG 18-24 | 39-00-0039 |
| Male contact AWG 18-24 | 39-00-0041 |
| Female contact AWG 22-28 | 39-00-0047 |
| Male contact AWG 22-28 | 39-00-0049 |
| Housing 2×1 position (female receptacle) | 39-01-4020 |
| Housing 4×1 position (female receptacle) | 39-01-4040 |
| Housing 1×2 position (female receptacle) | 39-01-2020 |
| Housing 2×2 position (female receptacle) | 39-01-2040 |
| Housing 2×1 position (male plug, no panel mount) | 46999-0655 |
| Housing 2×1 position (male plug, panel mount) | 46999-0656 |
| Housing 2×2 position (male plug, no panel mount) | 39-01-3043 |
| Housing 2×2 position (male plug, panel mount) | 39-01-2041 |
| PCB Header 3×1 position (with mounting peg) | 39-30-1039 |
| PCB Header 4×1 position (with mounting peg) | 39-30-1049 |
| PCB Header 2×1 position (no mounting peg) | 39-28-1023 |
| PCB Header 2×2 position (no mounting peg) | 39-28-1043 |
| PCB Header 2×2 position (with mounting peg) | 39-29-9023 |
| PCB Header 4×2 position (with mounting peg) | 39-29-9043 |
| Budget hand crimp tool AWG 16-28 | 64016-0200 |
| Premium hand crimp tool AWG 16-24 (Historic) | 63819-0900 |
| Premium hand crimp tool AWG 18-24 (Historic) | 11-01-0197 |
| Premium hand crimp tool AWG 18-24 (Current) | 63819-0901 |
| Premium hand crimp tool AWG 16 (Current) | 200218-2200 |
| Premium hand crimp tool AWG 22-28 (Current) | 63819-1000 |
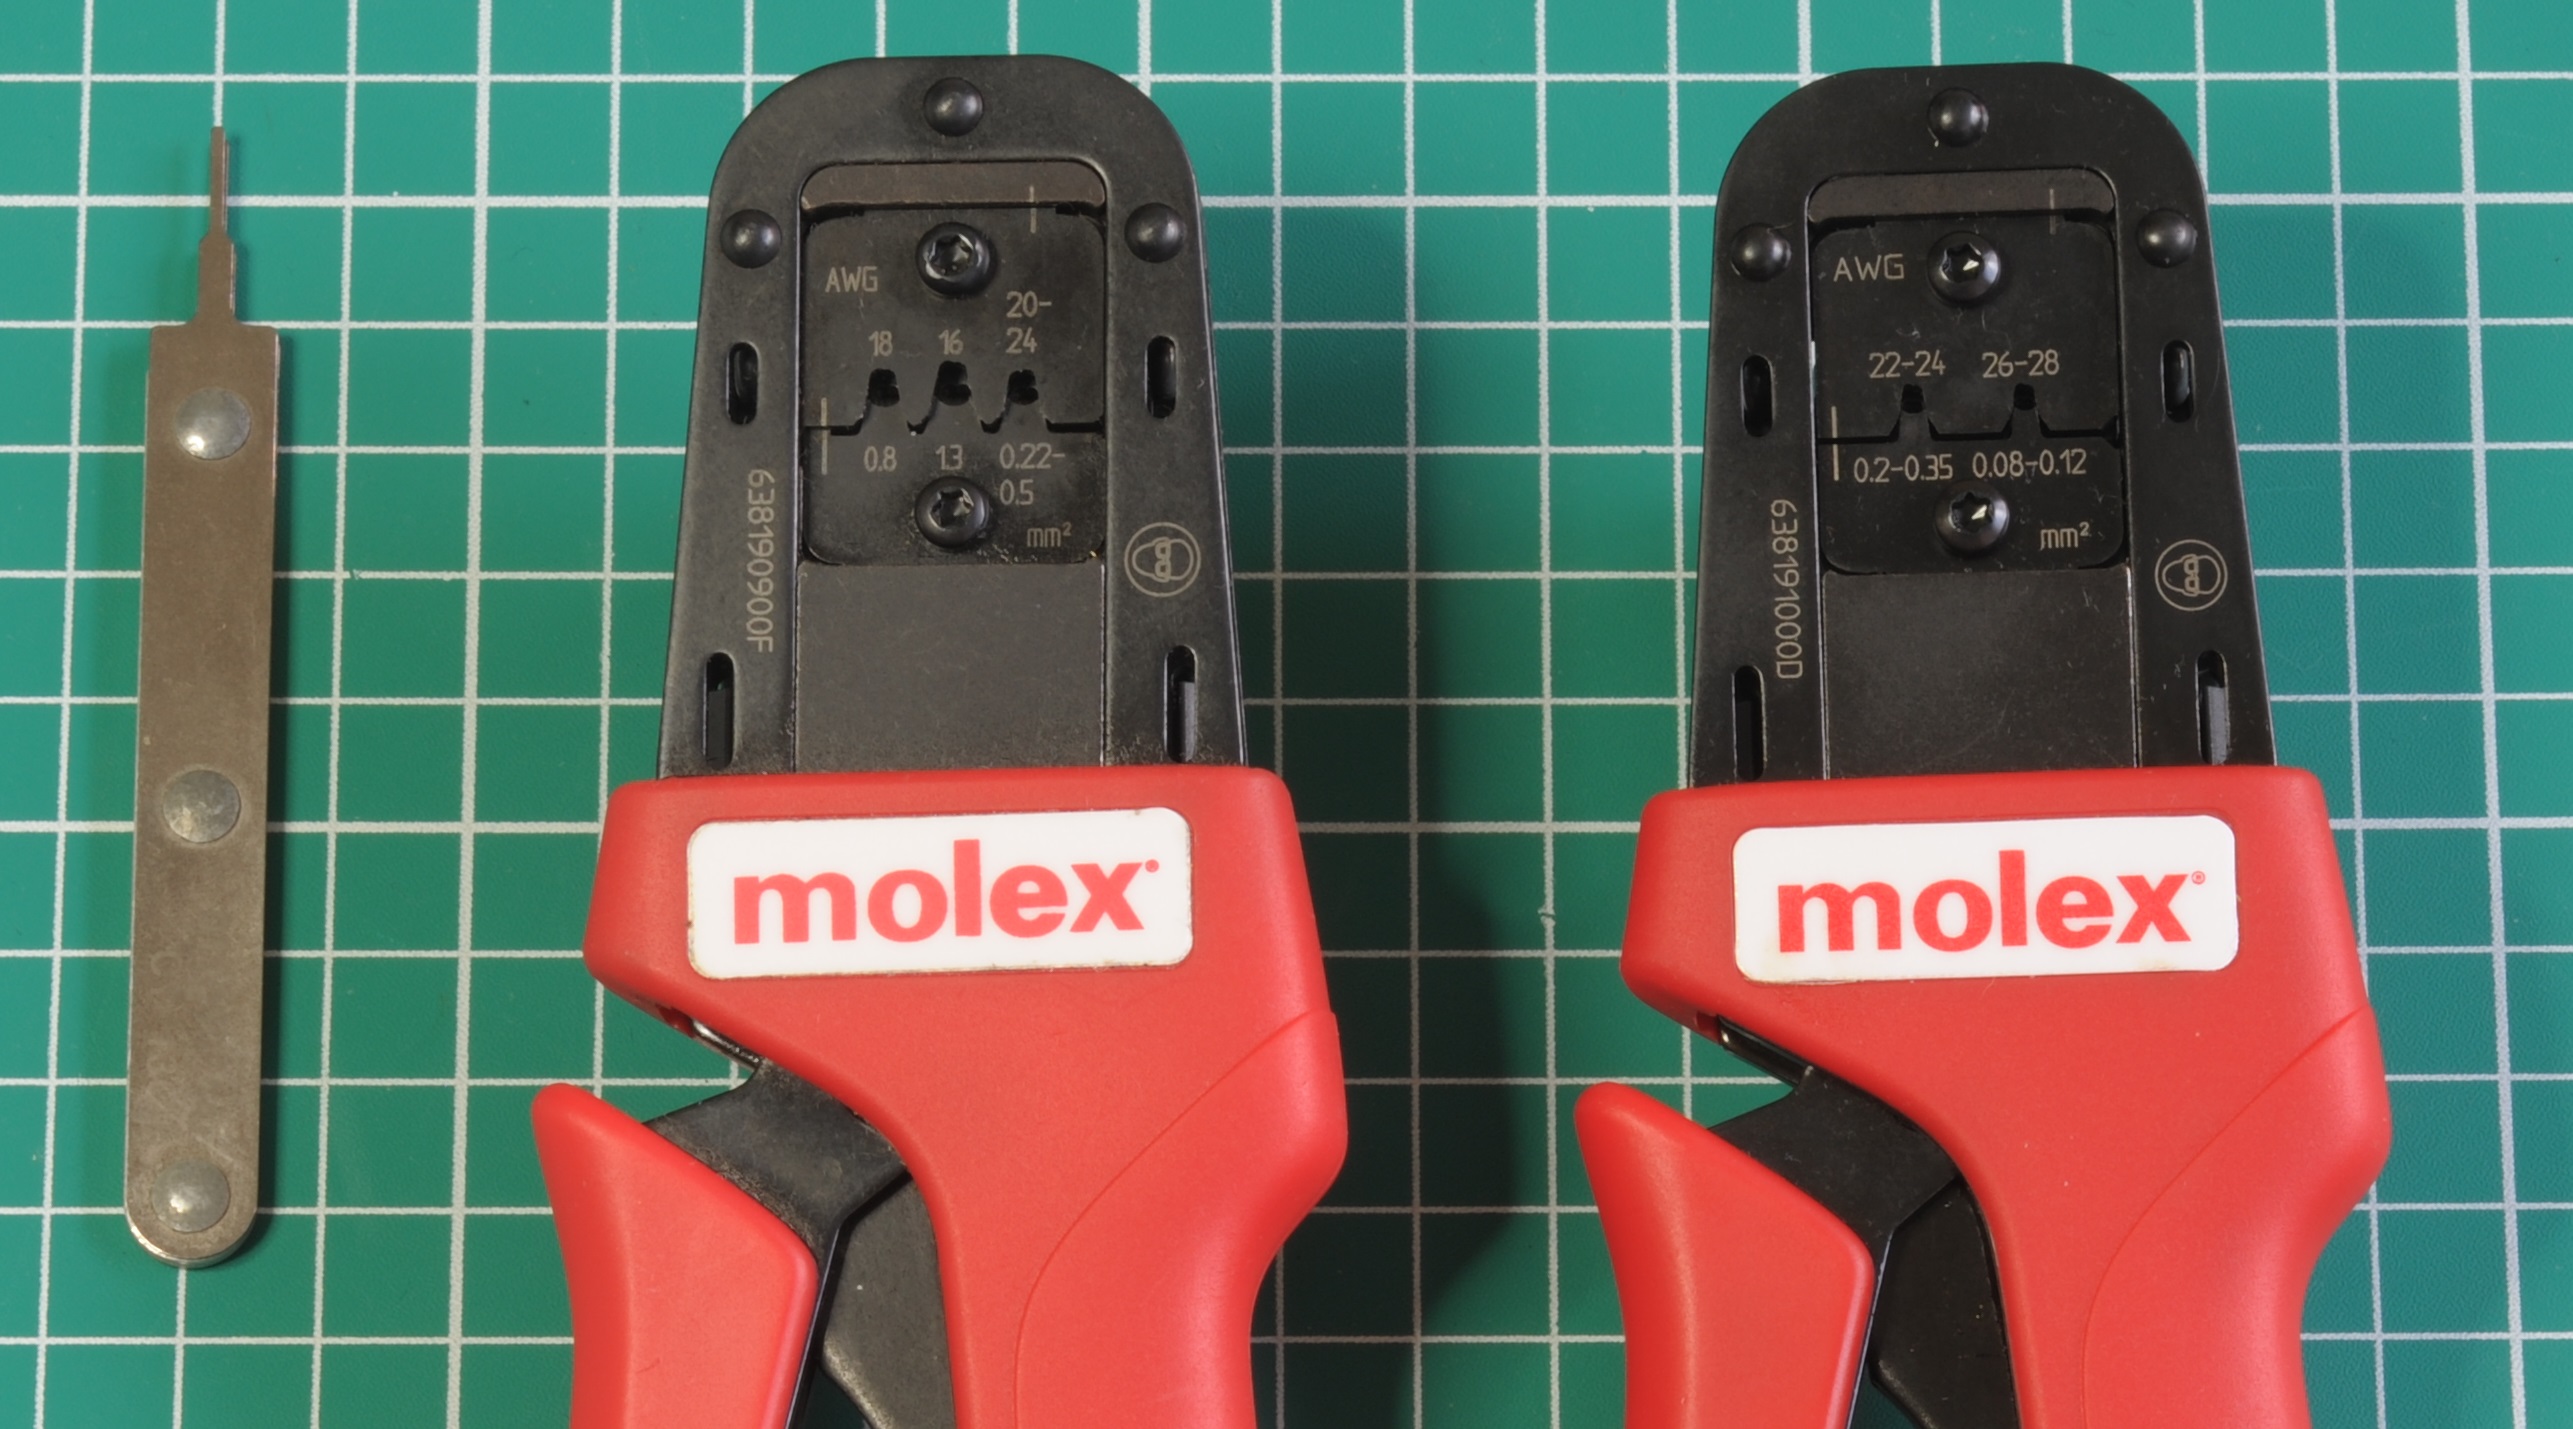
| Contact extractor | 11-03-0044 |
The extraction tool
Sold separately. If you’ve ever found yourself trying to remove already inserted contacts, you’ll appreciate one. Instead of potentially hours of uttering profanities attempting to extract contacts with sewing needles, the contacts will pop straight out with one of these.
Crimp tool considerations
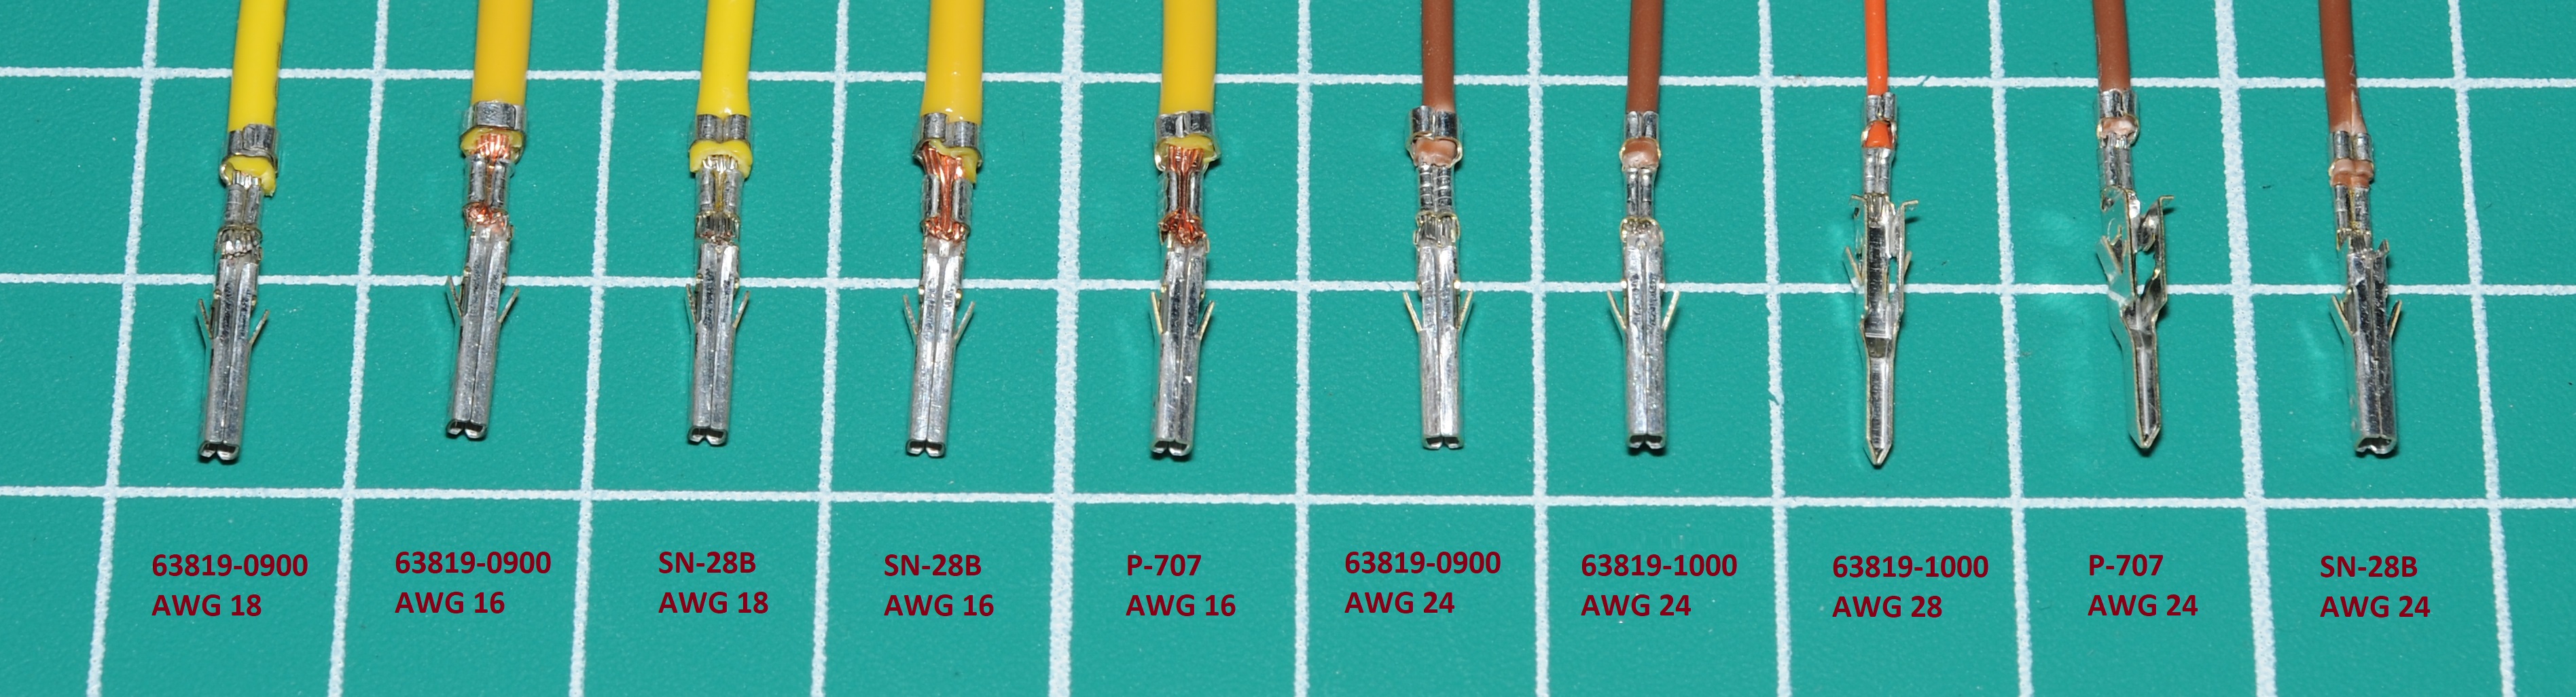
Above is a selection of crimps by various tools, including Molex original and some others which do a fairly decent job, with the exception of the IWISS SN-28B on AWG16, which is too loose for serious use.
For AWG24+ wire sizes, smaller contacts i.e. 39-00-0047 are used. Note that both 63819-0900/0901 and 63819-1000 both support AWG 24 but in each case, contacts for appropriately sized for the tool must be used.
There are of course many other possible combinations. I cannot cover them all. I wrote a bit more about Mini-Fit Jr on this page.
Universal Mate-n-Lok – 6.35mm pitch (TE Connectivity)

Also known as Universal Mate-n-Lok. At 600V it is the highest voltage rated connector I cover here. Contact rating is 19A.
Its contacts are remarkably similar to the 5.08mm pitch Mate-n-Lok connectors mentioned below, but not quite the same. They’re not interchangeable. As you may have predicted, officially there’s a different tool for them too, so that’s another months spending money if you aren’t keen to crimp them with off-brand tools.
I keep a small stock of these for high voltage applications, as they safely handle a 230V 13A load (UK max socket outlet) without breaking a sweat. They crimp perfectly with the 91504-1 tool mentioned below, despite it not being intended for this purpose.
Example part numbers
| Female contact AWG 14-20 | 926893-1 |
| Male contact AWG 14-20 | 926894-1 |
| Housing 2 position (receptacle) | 1-480698-0 |
| Housing 2 position (plug / “cap”) | 1-480699-0 |
| Current AWG 14-20 crimp tool | 58637-1 |
| Historic AWG 14-20 crimp tool | 90296-2 |
| Contact extractor | 539972-1 |

Contact extraction tool

This tool is well made and effective. Extracting contacts from receptacles (pictured above on the left) is tremendously difficult without one. Unfortunately at $60 it’s not cheap. I got mine off eBay for a song. It also works with 5.08mm pitch Mate-n-Lok connectors pictured later on this page.
Crimping with unofficial tools
I went through all my cheap eBay tools on these. The one that came out on top is labelled SN-48B. The engineer tools aren’t suitable for contacts this large.

Not too bad of a result, however not quite enough force on the conductor part, this is a bit of an issue under heavy load as the thermal camera image at the top of this article shows.
Universal Mate-n-Lok “High Current” variant


These connectors come in an unadvertised variation which increases the contact rating to 31A with wire sizes up to a massive AWG 10. Contacts are incompatible with regular types. PCB headers are loaded with large female contacts which look distinctly different. They also require different housings and a different crimp tool (Daniels M310).
| “High Current” male contact AWG 12-14 | 193841-1 |
| “High Current” female contact AWG 12-14 | 193842-1 |
| “High Current” 2 position housing | 770017-1 |
| “High Current” 2 position PCB header | 193839-1 |
Commercial Mate-n-Lok (5.08mm pitch) – TE, Formerly Tyco, Formerly AMP

Also known as Commercial Mate-n-Lok. Not a particularly popular connector family anymore but notable as the 4 position variety of these were used on 5.25″ floppy disks as far back as 1976, they were also adopted on 5.25″ PC hard drives, CD-ROM drives and 3.5″ parallel ATA hard disk drives, plus a veritable arseload of other PC related applications. The two and three position varieties are sometimes found on very old computer equipment in design specific applications only.
This connector family includes a rather uncommon member: A single position housing. The contact’s circular mating surface allows them to swivel 360°
There is a hoard of different tools for Commercial Mate-n-Lok, Pictured below are 91504-1 and 91512-1 which crimp sizes AWG14 to AWG24.

Example part numbers (TE)
| Female contact AWG 14-20 | 60619-1 |
| Male contact AWG 14-20 | 60620-1 |
| Housing female 4 position (Disk drive style polarisation) | 1-480424-0 |
| Housing male 4 position (Disk drive style polarisation) | 1-480426-0 |
| AWG 18 / AWG 20-24 crimp tool | 91512-1 |
| AWG 14-20¹ / 2x AWG18² crimp tool | 91504-1 |
¹ Although the singe wire die states AWG 14-20, it’s more like an AWG 14-16 in practice.
² Special contacts with longer tabs are required when crimping two wires into a single contact.
Contact extraction tool

Is a piece of rubbish made of some kind of brittle metal. It broke about 10 minutes after I received it. I’m normally a sucker for a good contact extractor but this was a waste of $20. The Universial Mate-n-Lok (6.35mm pitch) extractor pictured earlier is significantly better quality, and works perfectly on these connectors.
“Molex” connector
Molex introduced a compatible connector (for the 4 position variety only) in 1983 imaginatively named “Disk Drive Power Connection System”, making them a second supplier of what was by then a very popular connector in the PC industry. Despite (somehow?) their name becoming the vernacular term for this type of connector, they have since exited this market, with all parts either discontinued or near end of life.
In practice it is unlikely that one would ever encounter a Molex branded connector. Where quality parts are utilised; Mate-n-Lok is the more common choice given AMP’s long term commitment to this family.
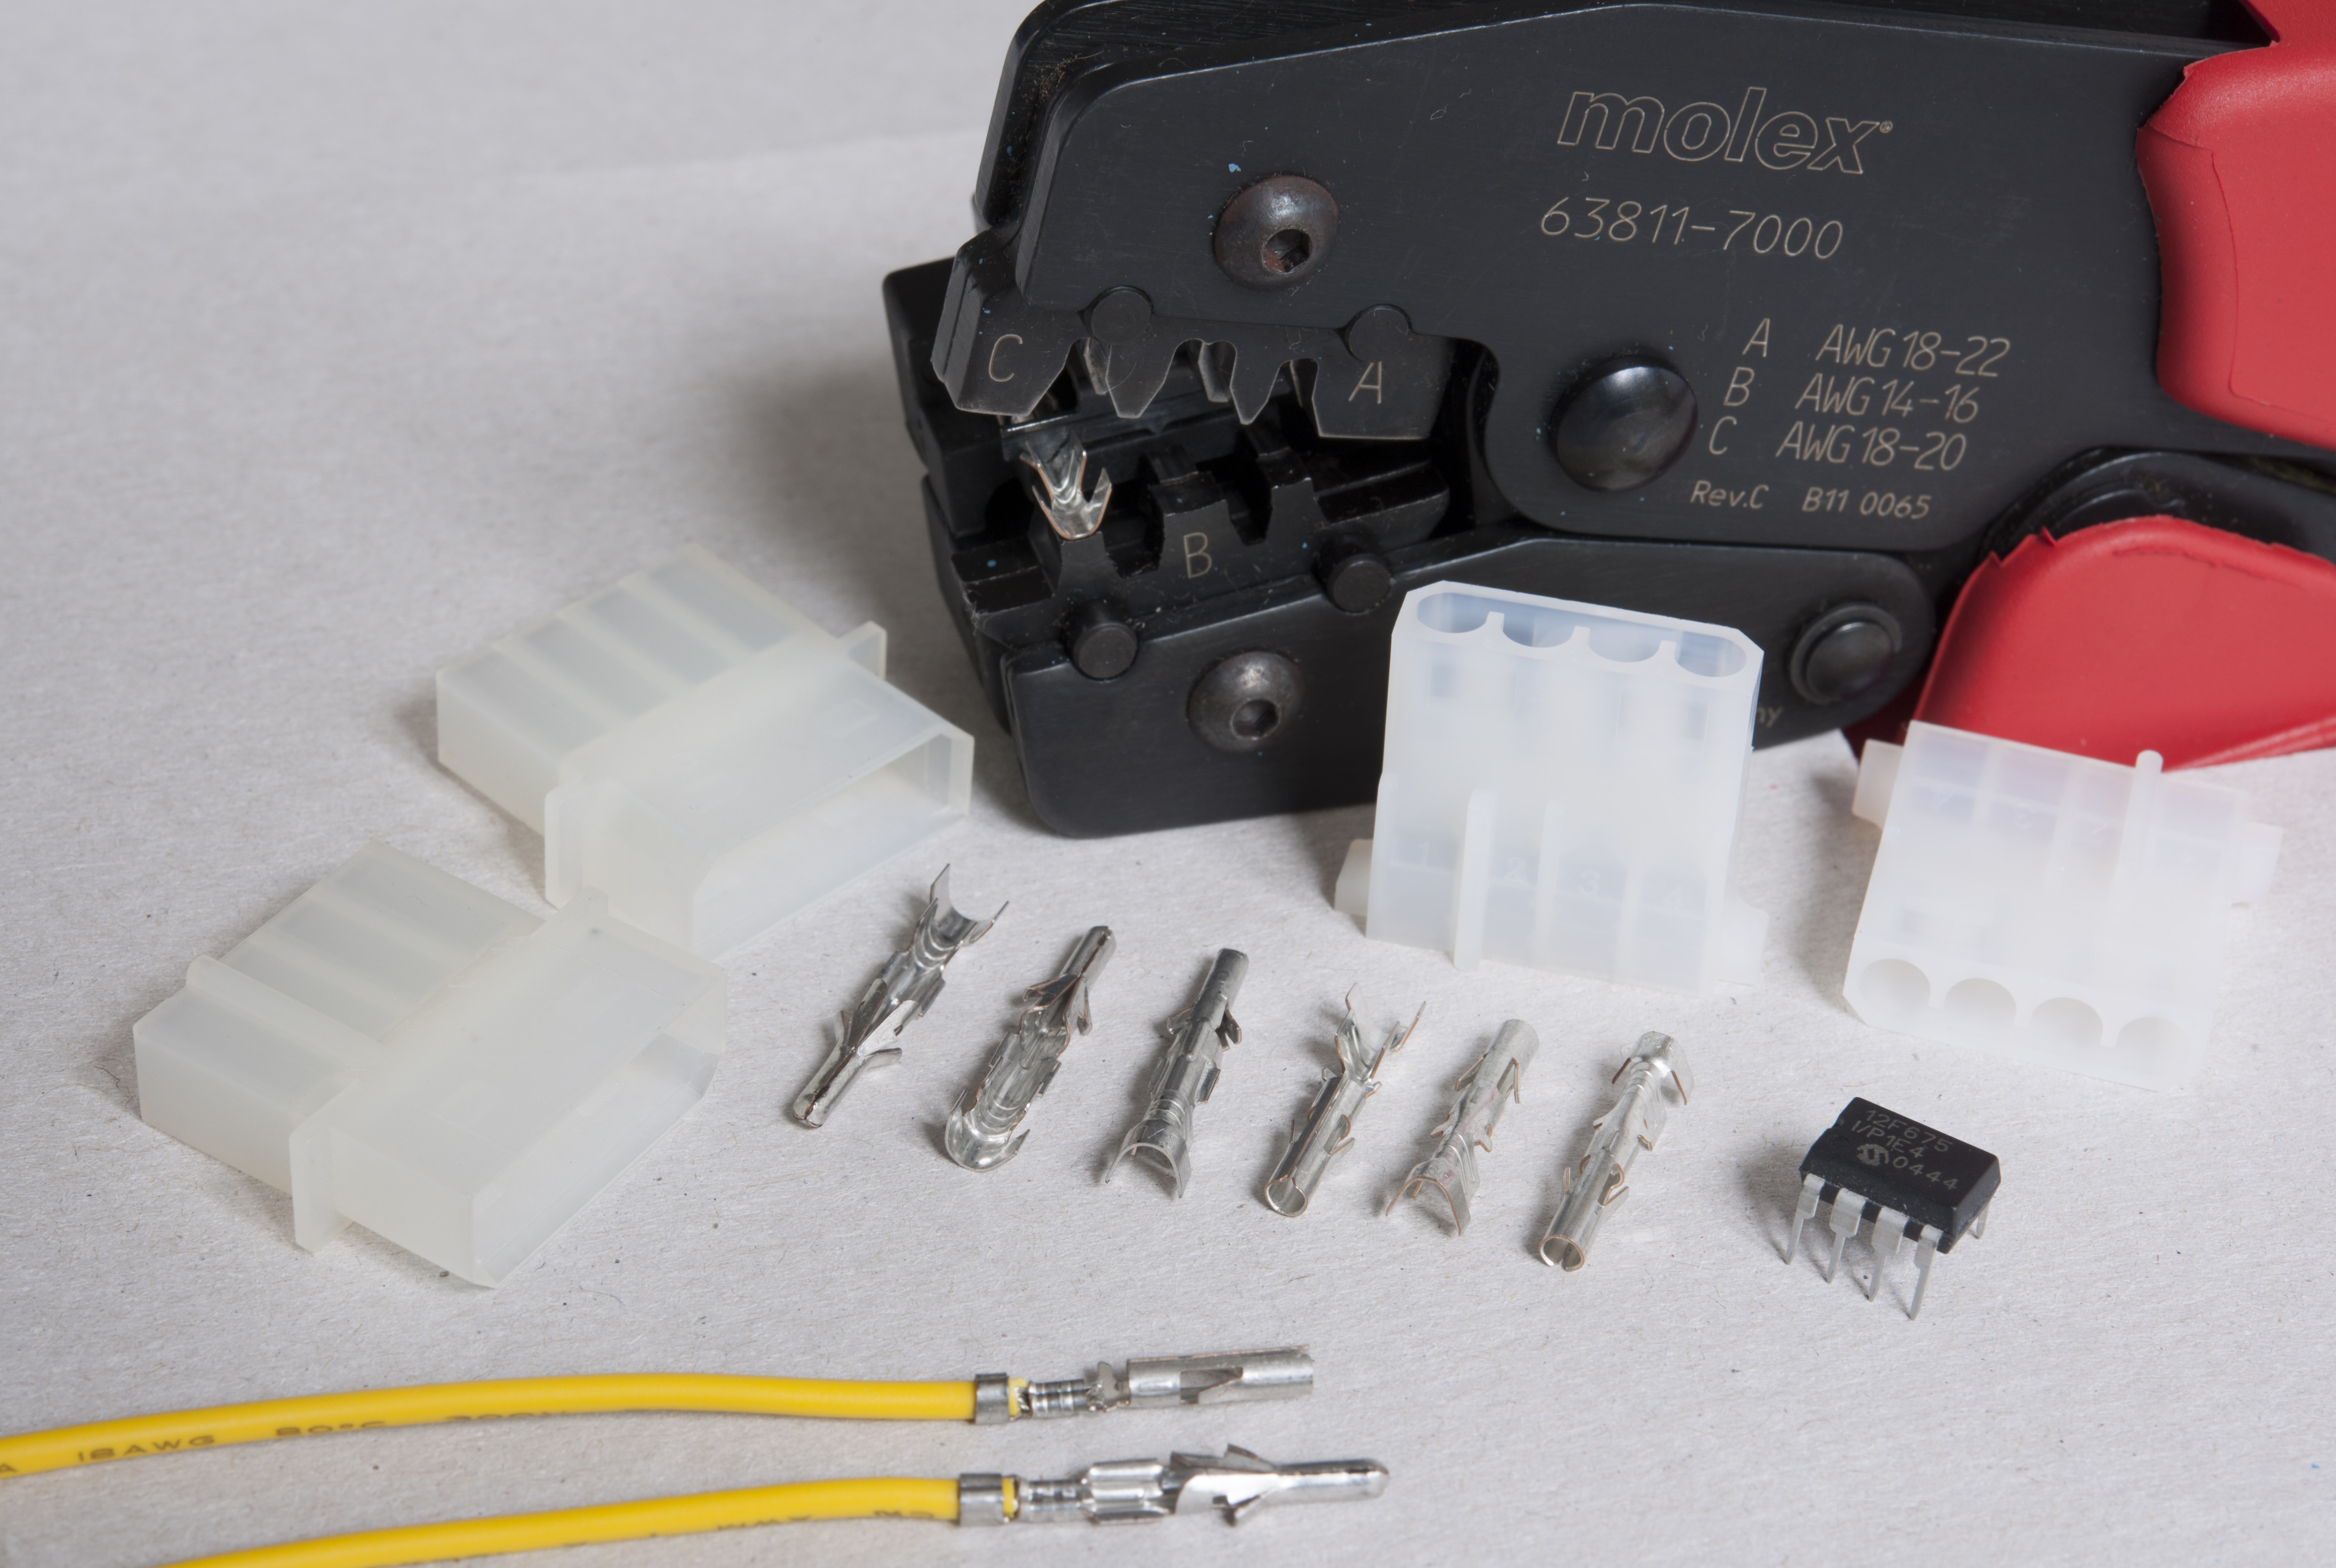
Molex contacts have a special retention feature for the locator in the tool, which makes both the tool and the contacts incompatible with anything else. Male Molex contacts are larger at the throat than other makes, meaning they fit very tightly in the housing, so one does not have to manually line up the pins before mating, however because of this they do not interchange with other branded parts. Unless like me you have a propensity for collecting crimp tools and connectors I would not recommend attempting to obtain any of the above.
There was a predecessor to the 63811-7000 tool show above with the part number 11-01-0206 – in the unlikely event you are seeking a tool for these connectors.
Crimping with unofficial tools
The IWISS SN-58B does a good job of crimping Mate-n-Lok.
Mini-Fit Sr (Molex)

A commonly used heavy (50 amp) power connector. It has no frequent consumer uses, but is often used industrially for battery connectors, chargers, large motor controllers, DC power supplies etc.
Despite the similarity of the name to Mini-Fit Jr, that’s about where it ends – these connectors are big. They would make a very a reliable replacement for cigar plugs in marine/automotive applications.
There are three official crimp tools for this family:
- 63811-1500: AWG 8
- 63811-1600: AWG 10, 12
- 63811-3800: AWG 14, 16
Given the amount of force required to crimp these, I’m doubtful there is much in the way of good unofficial crimp tools. Even with 63811-1600 – large enough to bludgeon someone to death with, crimping requires significant elbow grease.
Half measures aren’t generally a good idea when you’re dealing with something that carries the kind of power these are designed for. If you don’t have the tool, I would suggest carefully soldering contacts – unless you’re looking to start a fire. Mini-Fit Sr contacts are near impossible to reliably manually crimp with pliers.
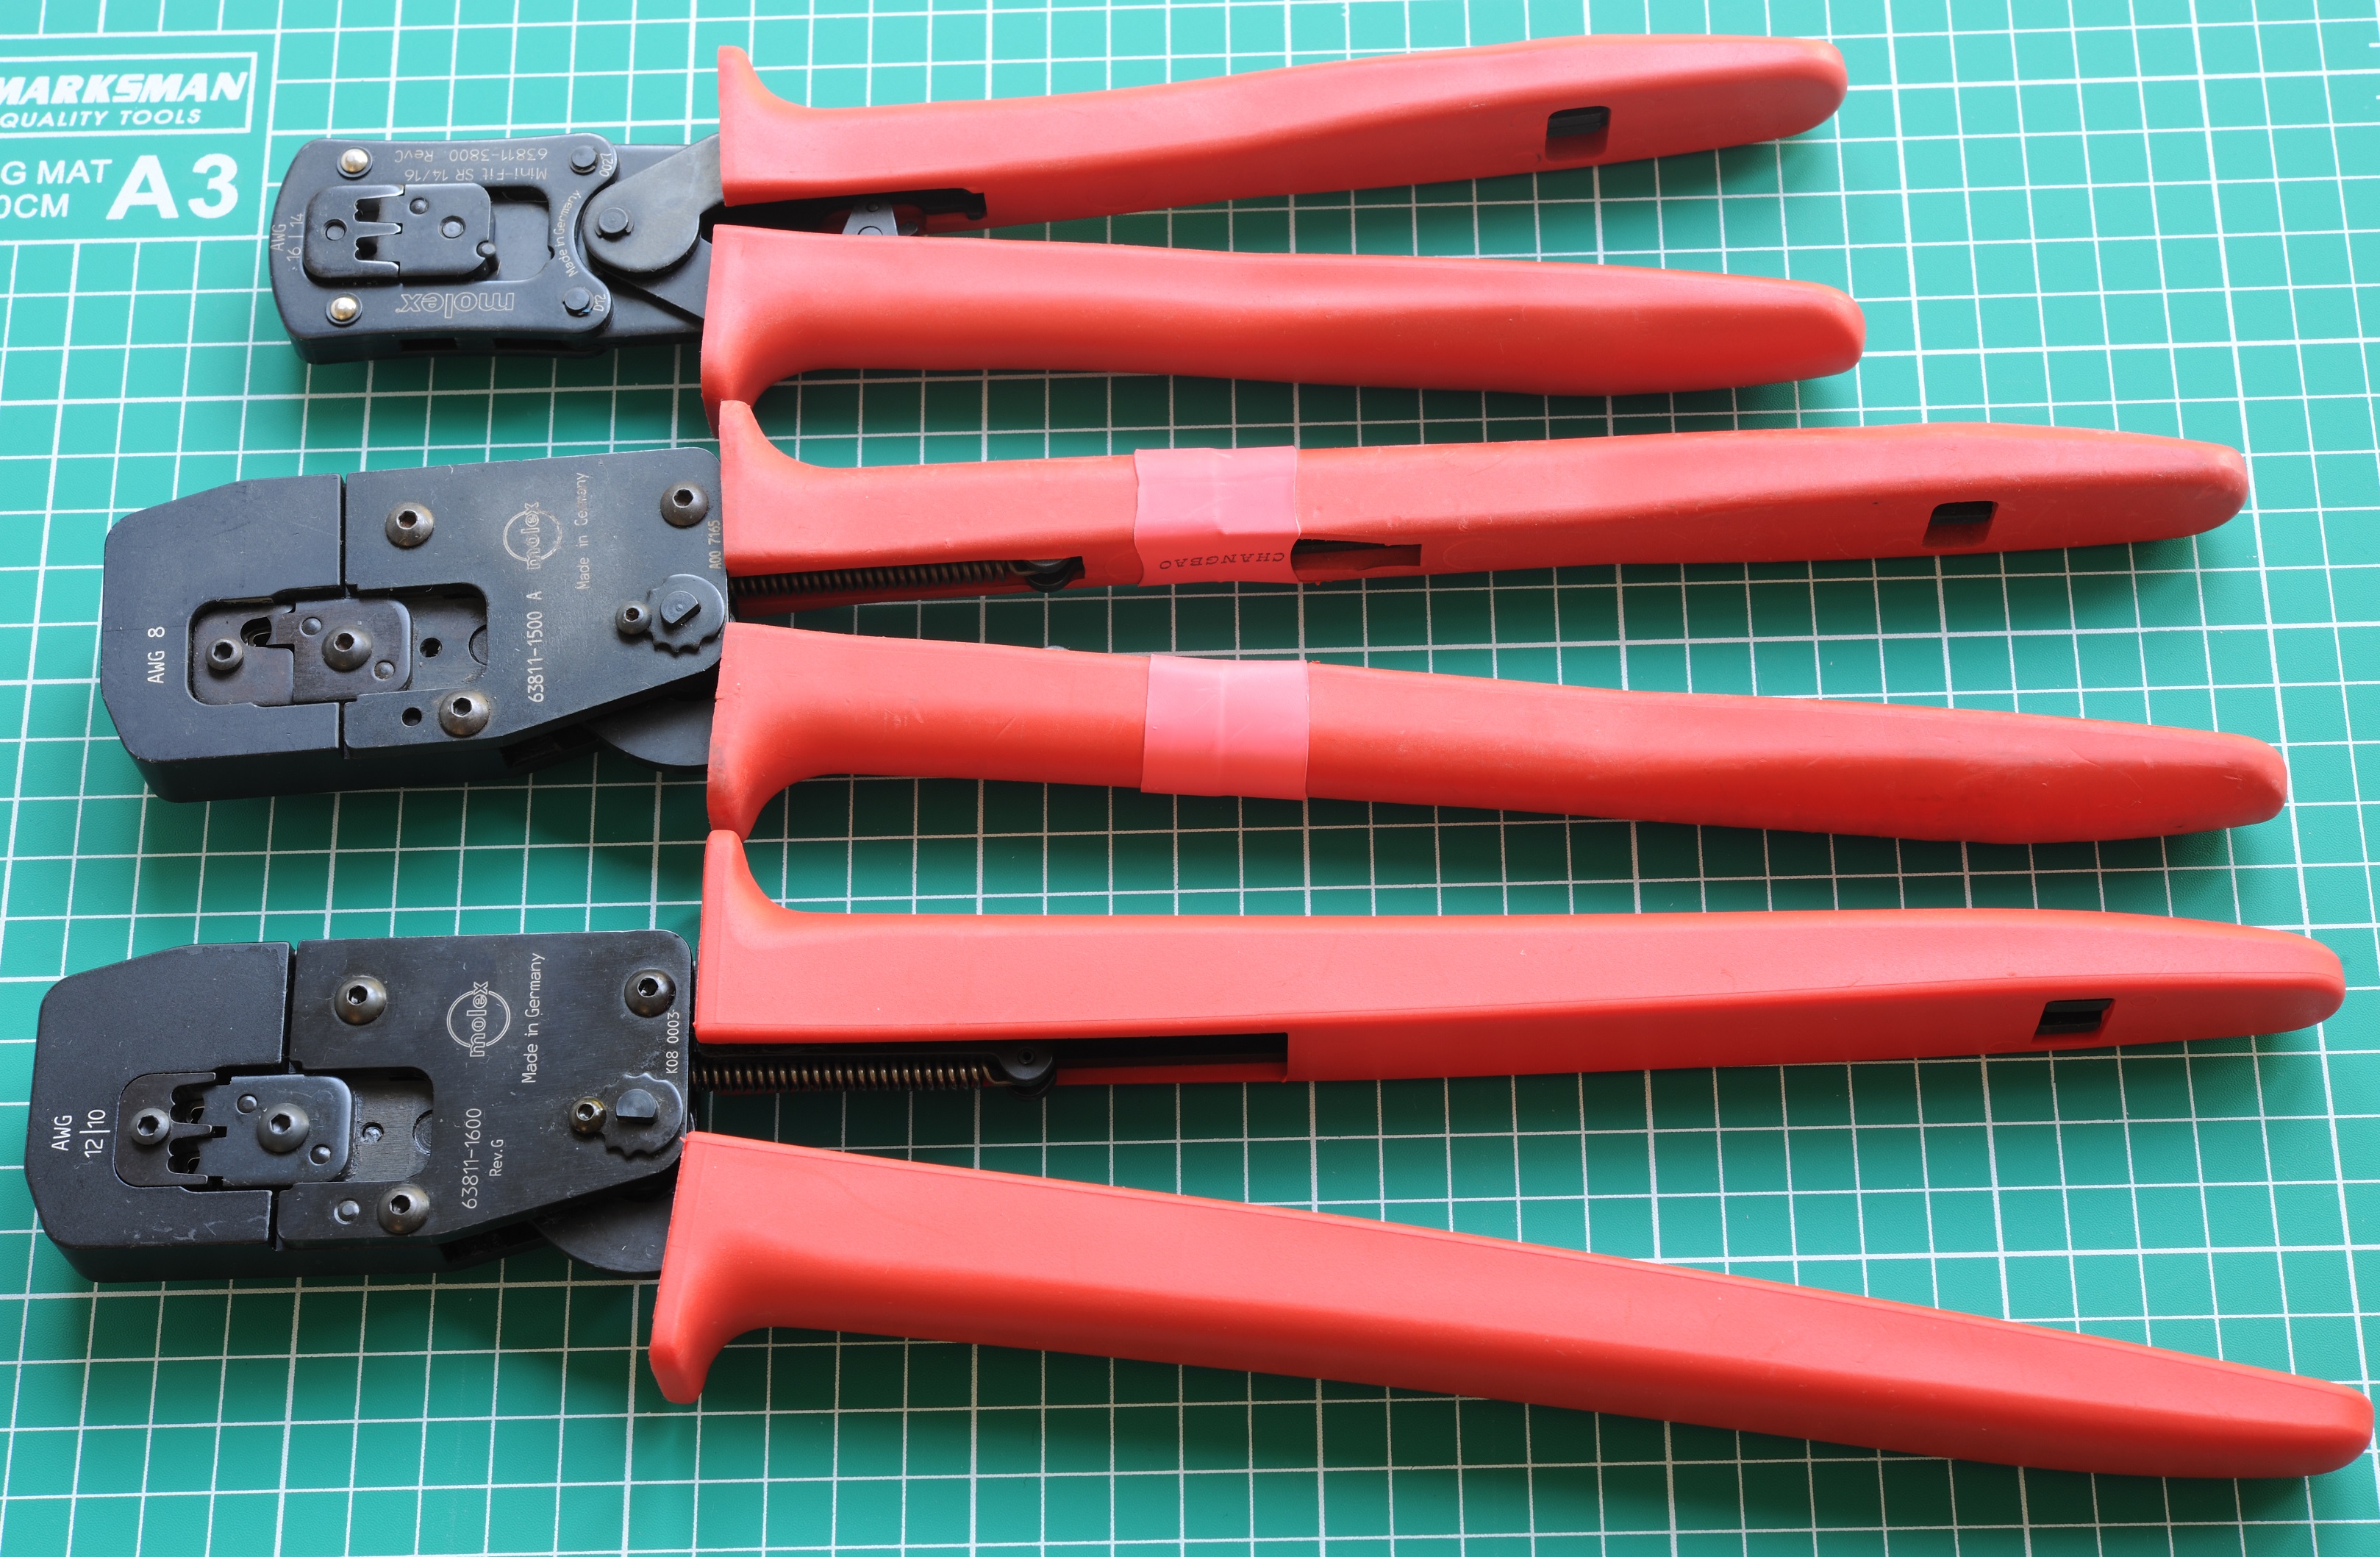
Mini-FIt Sr in recent years has become my go-to for big DC power connections. The one gripe I have is that in the case of the AWG8 contacts – Molex appeared to have forgone the possibility of an insulation crimp. Instead those larger contacts are crimped entirely onto the conductor, leaving nothing restraining the insulation, which isn’t as robust as what we end up with on AWG10+ sized contacts.
The AWG 14/16 tool understandably requires smaller contacts. I find it a little difficult to insert the contacts into the tool, so not so great for usability, In any case, these wire sizes are far too puny for the monster size and carrying capacity of these connectors. If you are using AWG 14/16, it’s because everything else in your system uses a bigger size, and you want something smaller on this one particular occasion. That can make splashing out on this tool hard to justify.
AWG 10/12 are the optimum wire sizes for Mini-Fit Sr.


Micro-Fit (Molex)

These look similar to Mini-Fit Jr, but scaled down. Not often seen in consumer products but has occasional use in small ‘DC’ / ITX / Automotive PC power supply applications. I’ve also seen them in other unusual applications such as the connector on the DC end of the plug pack for HP Printers and Cisco routers.
- 63819-0000: AWG 20-30 crimp tool
- 63828-0200: AWG 18 crimp tool
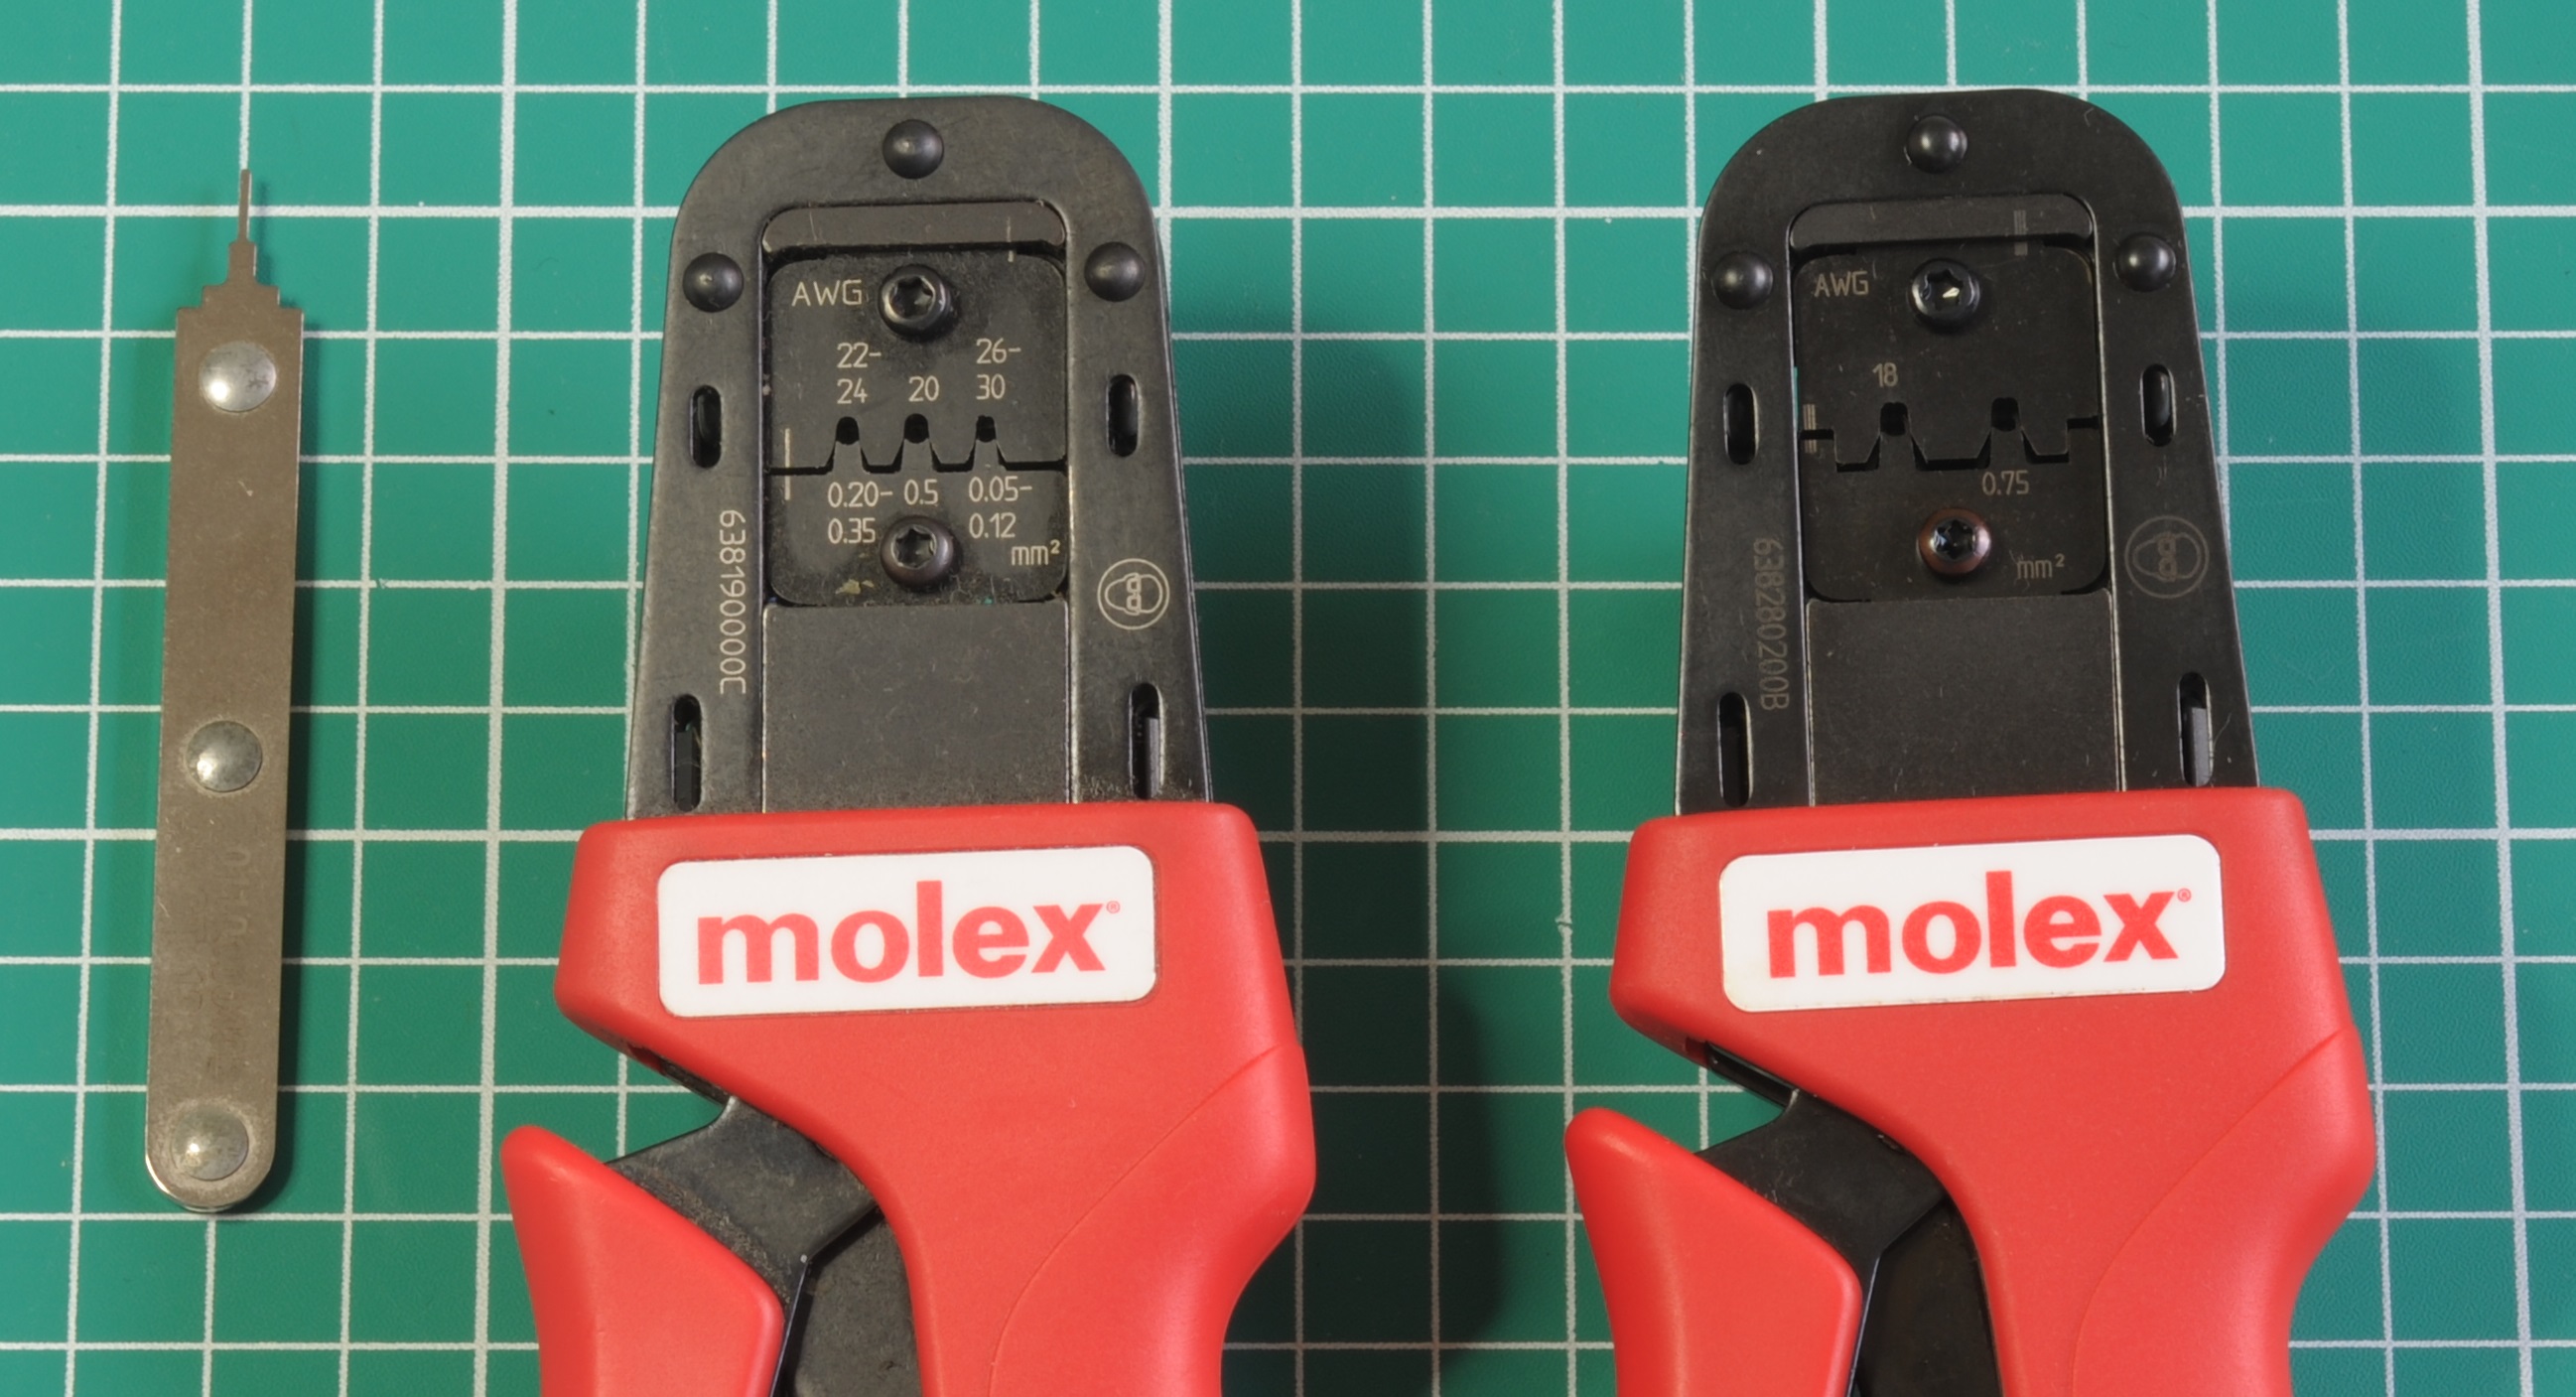
Molex have recently added an AWG 18 option to Micro-Fit, which I very much welcome however note that a new tool, and different contacts is required. The AWG 18 tool also has a 0.75mm² die with barely a fag paper of difference.
The extraction tool
Similar in appearance to the Mini-Fit Jr extraction tool, but used quite differently. Read the manual.
Microfit 3.0 contacts crimp fairly well with generic tools:


As always when using generic tools, results are usable but not entirely ideal. The insulation crimp has clearly pierced the insulation, meaning it would be at risk of tearing under mechanical stress. Another issue I noticed is that the contact ends up bent vertically a little too, due to the awkward un-crimped shape of the contact. This means that you’ll have to bend each contact straight again before insertion into the housing.
Due to their small size and high current capacity, these have become one of my favourite connectors.
.250 FASTON, .187 FASTON – TE Connectivity

PIDG terminals a bit too cheap for you? Fear not…
FASTON is a proper connector family, yielding very professional looking terminations, with a proper $1600 tool to match. They crimp OK in common tools like the SN-48B tools for wire sizes AWG18+.
Example part numbers
| 0.250″ AWG 14-18 Female terminal | 41274 |
| 0.250″ AWG 18-22 Female terminal | 63609-2 |
| 0.250″ Clear sleeve | 1-170823-8 |
| 0.250″ Male tab terminal (requires a large AWG 10/12 tool to crimp) | 41412 |
| 0.187″ Female terminal | 61758-2 |
| 0.187″ Clear sleeve | 1-170823-3 |
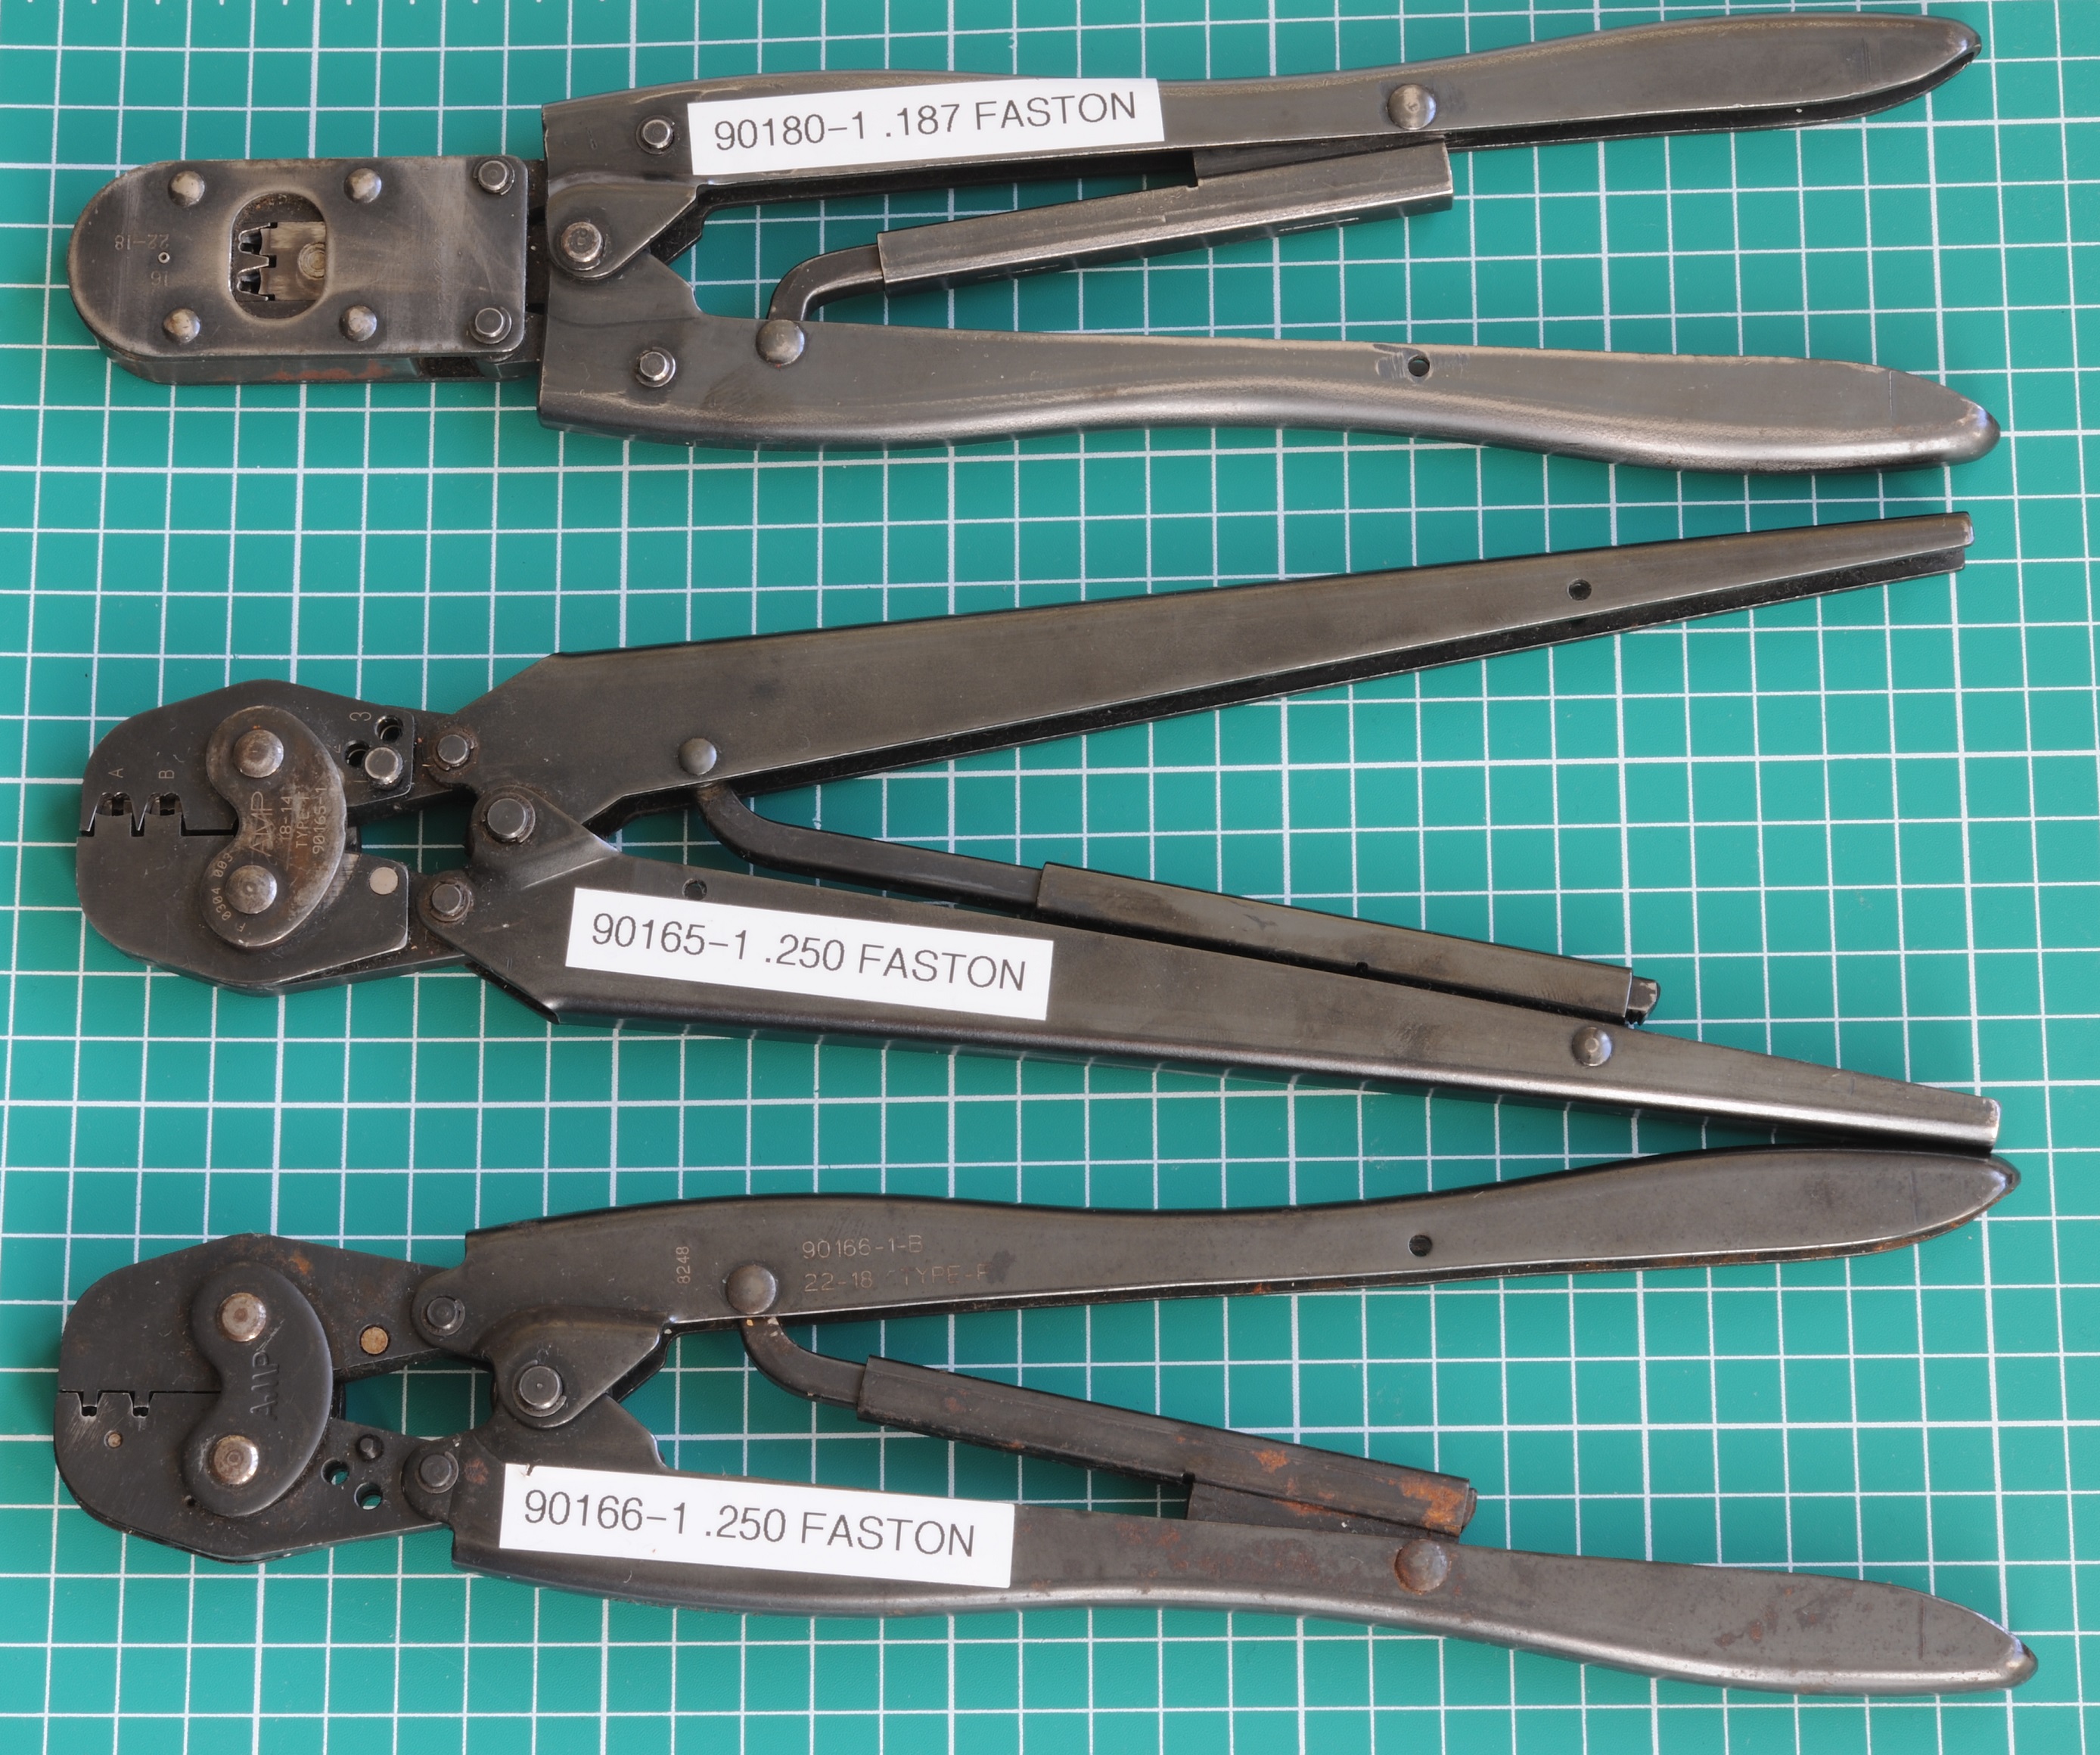
| .250″ Hand crimp tool AWG 14-18 | 90165-1 |
| .250″ Hand crimp tool AWG 18-22 (Historic) | 90166-1 |
| .187″ Hand crimp tool AWG 16-22 | 91509-1 |
| .187″ Hand crimp tool AWG 16-22 (Historic) | 90180-1 |
Annoyingly (and predictably) there is a brace of different tools for FASTON contacts, for example, there are at least four tools for .250 contacts, and .187 contacts have a different tool too. The IWISS SN-2549 crimps these very nicely. Male “tab” contacts require the massive AWG 10-14 tool due to the material thickness. I use my Mini-Fit Sr 63811-1600 tool for these.
E.I. – Economical Interconnect – TE, Formerly Tyco, Formerly AMP

E.I. is most commonly known by its 4 position variant which became the de-facto standard power connection for PC 3 ½” floppy drives, and various other peripherals which installed into 3 ½” drive bays.
Despite its ostensible obsolescence by its original floppy drive use-case, this type of connector lives on as a sundry power connection for a variety of items which people install into their PCs requiring only a small amount of power. Contemporary power supplies still also include this type of connector and adapters to it from other types of connector are still sold in reasonable quantities. Unless some kind of new standardised power connection surfaces which meets this need, it isn’t going away. Clearly someone is still using the other types for some unknown purpose as well, as this product line and all its variants remain in full production.

There is a swag of different tools for E.I. as one would expect for an AMP connector family, but the one most commonly used is 91556-1 which crimps AWG 20-26 wire, with the corresponding sized contacts.
Molex 90331/8619 series

The IBM PC 5150 was the first type of computer to use a connector compatible with these for the power supply connection to the mainboard, and also internally inside the power supply – but from a different manufacturer. It may have been Berg who originally introduced this type but considerable research efforts by myself have failed to confirm this.
They were used for the power supply to mainboard connection for PCs up to the Pentium I era. Starting around 1998 they were gradually replaced by Mini-Fit Jr connectors, which are specified in the ATX standard. They made a brief re-appearance in the early 2000s with AMD’s supplementary CPU power connector however this was quickly supplanted by Intel’s 4-position 12V CPU power connector.
The original series came in a number of different positions. On this page I show an obscure 4 position example from the original mystery manufacturer – “P4” which was used for the AC Fan.
Molex only ever produced a 6 position variety of this connector, as this was the only one which came to be incorporated into the XT/AT standard.
The most useful housing is 90331-0001 which comes with all polarising ribs attached, allowing one to snip off the remainder to achieve the desired polarisation. Unfortunately for anyone needing them, they’re now rather difficult to come by.
Sub series
- 8619: PCB Headers
- 90331: Housings
- 2478: Crimp contacts
- 63811-7500: Official crimp tool
AMPLIMITE – TE, Formerly Tyco, Formerly AMP

There are quite a few manufacturers of crimp D-Sub connectors. I ended up with the tools for these from a job lot, so that’s what I’ve mentioned here. D-Sub’s are normally soldered, however there are some scenarios where it is desirable to crimp them:
- Where large numbers of connectors are terminated by hand – crimping is easier
- In applications of significant mechanical stress – crimped terminations are more robust
- In my case – I can’t be bothered with backshells most of the time, and found that even heat-shrink covered terminations were constantly breaking, so switched to crimping, resulting in easier-to-make longer-lasting cable assemblies.
Example part numbers
| Female contact (with insulation support) | 66683-4 |
| Male contact (with insulation support) | 66682-4 |
| Female housing size E / 9 position | 205203-3 |
| Male housing size E / 9 position | 205204-4 |
| Hand crimp tool for contacts with insulation support | 91549-1 |
| Hand crimp tool for contacts with insulation support (historic) | 90374-1 |
There is a plenitude of current and former crimp tools for these connectors, supporting various different wire sizes, as well as contacts with and without insulation support.

Unsurprisingly the current tools are very expensive. eBay is awash with the older tools for reasonable prices. Unless working with large wire sizes, 90374-1 is probably the only one worth bothering with. The 90265-1 tool I’ve pictured is for contacts which don’t have an insulation support. I am unsure why anyone would choose such an arrangement.
In terms of crimping these with budget tools, there’s nothing particularly special about them. Tools like the Hozan P-707 or Engineer PAD-11 will suffice for hobbyist applications.
Picoblade (Molex)

A very small (1.25mm) pitch connector.

Picoblade is a type connector whose contacts are so tiny that they are quite difficult to crimp with generic tools. The Engineer PAD-11 does well with these.
The only budget tools I (still) use

Pictured above are the only two generic tools I that I still use (since I have the manufacturer tools for everything else).
I use the SN-2546B for “fixing” insulation crimps which I’m not happy with, for example, all of the FASTON tools crimp the insulation too lightly on smaller wire sizes, so I re-crimp those with this tool afterwards if needed. It’s not designed for this, but having a set of single large dies, it works well for it.
The IWS-02B is designed for “buckle” crimps (un-insulated wire joiners), but I found it does very nice crimps on pre-insulated contacts:
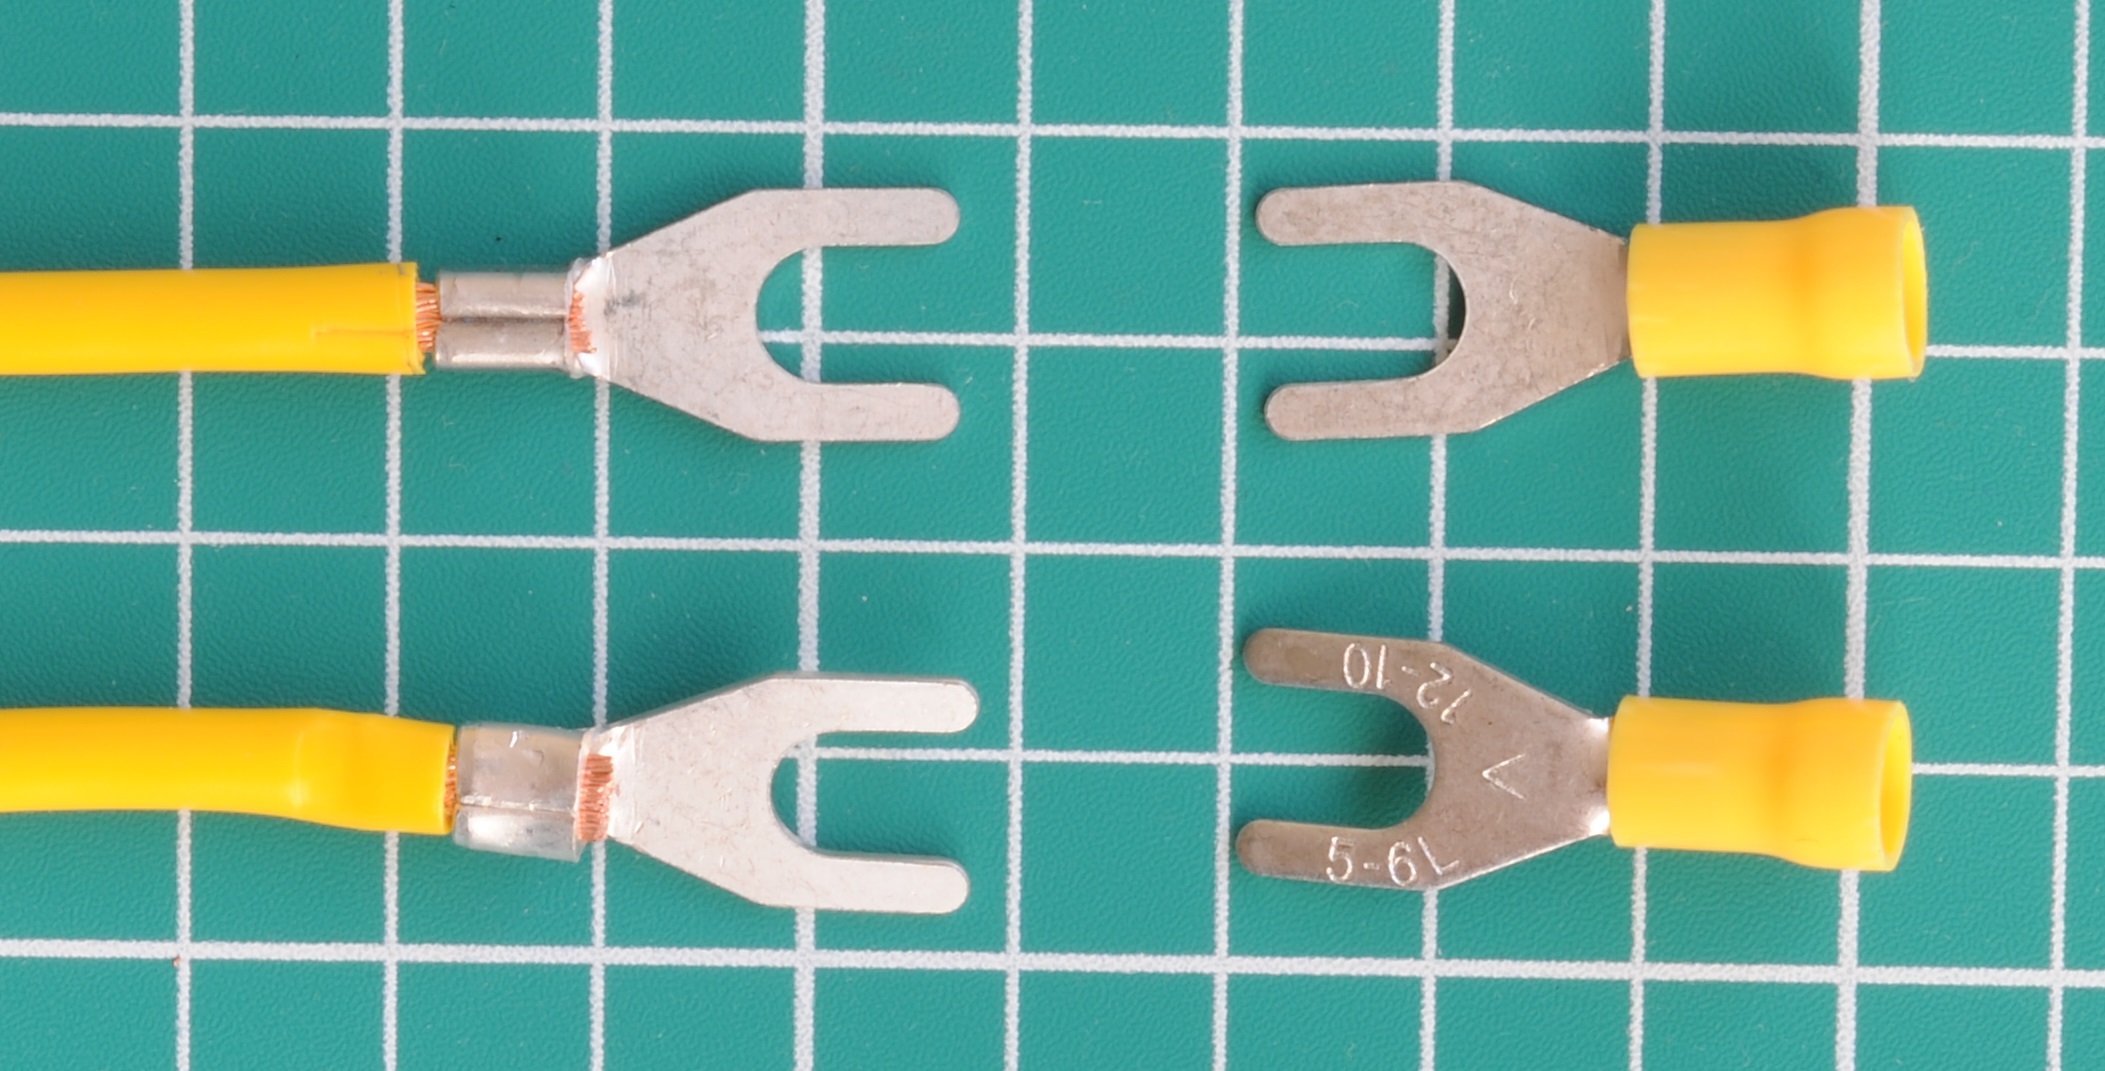
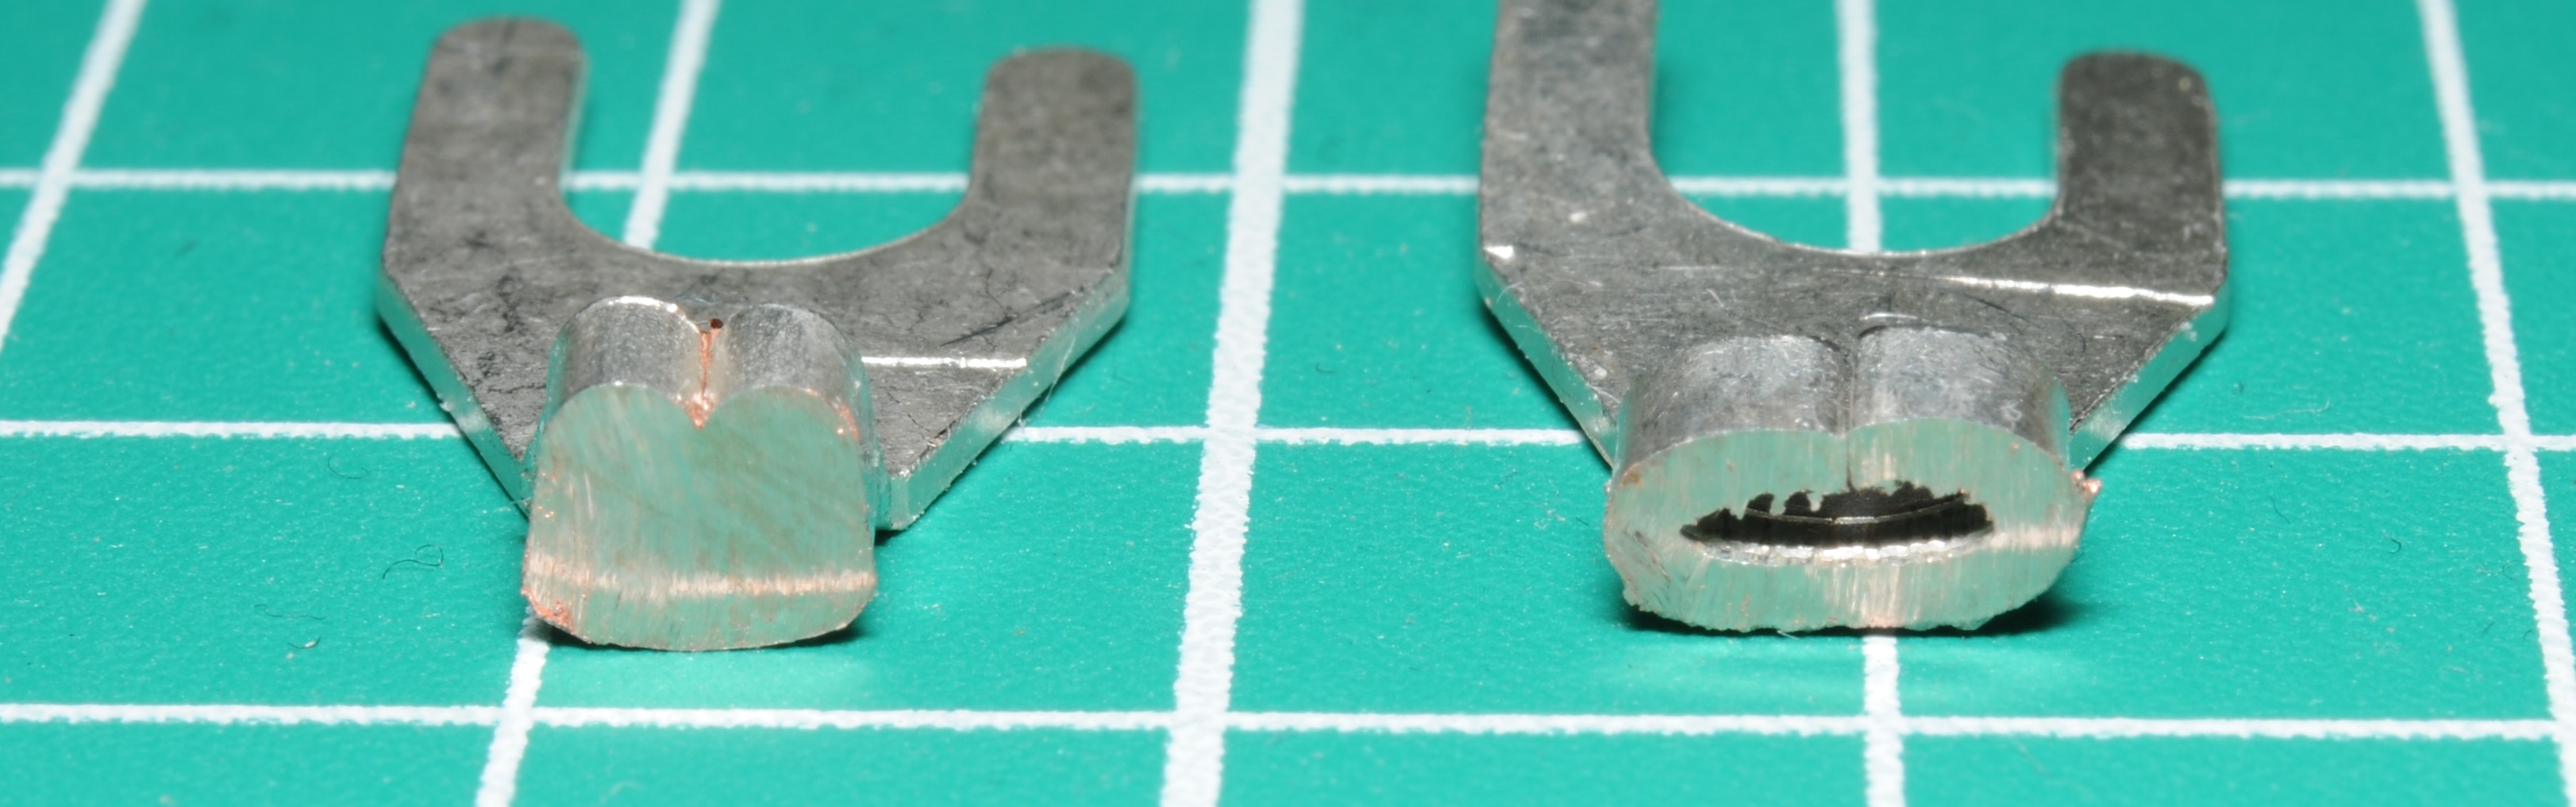
The above image demonstrates why I’ve abandoned my pre-insulated crimp terminal tool. When I cut open the contact crimped with the IWS-02B, contact and conductor are crimped nicely into a solid mass of copper. I then finish this with a layer of glue-lined heat-shrink, making an inexpensive but excellent termination.
When I cut open the contact crimped with the recommended tool, all of the conductor strands fell out. Hardly a termination I feel I could trust.
You’ve got a type of connector which I haven’t listed here
Over the years I have received hundreds of emails from people asking me to identify obscure connectors. I didn’t know what any of them were. In summary: If it’s not here, I don’t know what it is. I would have to spend hours looking through thousands of pictures of connectors on re-sellers websites to identify it. I do not have time for this!
From time to time I come across obscure rarely used connectors too. Because we live in a world where there are tens of thousands of different types if connectors, it can take (even me) days to identify these. My general approach is to measure the pitch between the contacts with calipers. You should be able to work out its spacing i.e. 1.0mm 1.5mm 0.1″ 0.2″ (2.54mm, 5.08mm) etc. Enter this measurement as well as the number of contacts (any other visibly obvious features) into either Mouser or Digi-key’s parametric search on their connectors category. You may just find it.
Molex have a good web page with pictures summing up their wire-to-board connector products.
The most likely bet however are JST who have a very large range of products. They have reasonable product listing too.
MPI (a company that sells R/C stuff) sells servo plug kits using the “double D” type pins I was talking about earlier, they look like Mini-PV but they have an insulation and conductor crimp with square “wings” and will crimp correctly with double D type crimpers. I don’t think these are real JST-RE connectors rather I think they are a chinese knockoff, for one thing JST-RE doesn’t have an official male pin. I’ve noticed that a lot of R/C hobby servos now use these instead of the Mini-PV knockoff.
In this day and age it is quite difficult not to come across TE. They do now own several of the families I have listed on this blog.
Most of the stuff I’ve listed on here is made by several manufacturers. Connectors like what you’ve mentioned are still in patent and only made by the one company. Of course, when dealing with such systems, it will not be cheap and therefore not really in the ‘hobby’ realm.
Sorry I’m back again (even when I try and Google an answer your page comes up the top).
I’ve literally been looking for a couple of weeks for 2.54mm (breadboard compatible) connector system that is suitable for both wire-to-board and wire-to-wire connections. I do a lot of breadboard and low power robot projects and am looking for a good connector system to justify the invest in a crimping tool. I’m trying to satisfy these requirements:
– Small header for board socket, 6 to 8 mm,
– Locking mechanism,
– Crimp Contacts,
– Supports 22 AWG wire.
– Price, 2 position plug & socket less than USD1 each.
The only thing I’ve found that matches the first 4 are the AMPMODU MTE family from TE. But some of the parts such as the 2 position connector are a USD1.65 each.
I’ve looked over the JST ranges: XA, XH, SM, PH & RCY but they see to be W2B only.
Is there anything out there??
Molex SL will satisfy your requirements – not sure about AWG22. That might be pushing it. Will definitely do AWG24.
Quite similar to Mini-PV but has different crimp tool, housings and contacts.
I thought about buying into SL a few years back but realistically couldn’t justify it.
Thanks for the detailed article!
I was wondering if the knipex 97 49 44 “for rolled contacts”[1] would work for the Mini-PVs.
If the matching crimp system pliers qualify as a generic tool, could be this is
the answer to your question for a generic tool in the Mini-PV section.
Any experience or thoughts on this?
[1]: http://knipex-tools.com/index.php?id=1023&page=art_detail&parentID=1299&groupID=1449&artID=3827
If you purchase one, and provide pictures of satisfactory results, I will post it up here.
If I buy it I will do that. Unfortunately it is a little expensive to just try it out.
When I say ‘Generic’ I guess I also infer readily available and inexpensive.
Probably not worth considering then. Genuine tools come up cheap on eBay fairly often.
Harwin makes their own version of the Mini PV connectors that they call M20 connectors. they also have their own crimp tool for them called Z20-320 which is “reasonably” priced at $445
Just found another tool for Mini PV pins, the Berg HT-114, it’s an odd looking tool, apparently a set of wire cutters with an 22-26AWG Mini PV crimp die built into the handle.
Good find – I’ll order some large contacts.
I have a spool of #18 thinwall insulated wire, rated UL1061.
Insulation measures 0.064″. That’s close to generic #22 insulated wire I have which measures 0.060″.
Anyhow, the #18 Insulation slips into a ‘clone’ Mini-PV shell with clearance.
Matt, you mentioned “for the most part I don’t buy original Molex parts” above, and I was just wondering what your preference was when sourcing (e.g.) Mini Fit Jr. type housings .
Matt, thanks for the great writeup. I’m also curious about the type of corrosion you saw with tin-plated terminals, as I’ve read warnings on other websites about tin corrosion, but I’ve never heard of someone who actually observed it. Did you see oxidation or fretting (or both) on your tin-plated terminals?
Also, regarding gold terminals for Mini-Fit Jr (for PC power connections), I’ve read that it’s very bad to mate gold-plated terminals to tin-plated terminals (male to female, or vice versa). Google “mate gold to tin”. The claim is that gold-mated-to-tin can actually speed up oxidation of the tin-plated terminals. And since both my PSU pins and motherboard power pins are non-gold plated (probably Tin, based on the color), I’m concerned that if I go with gold-plated terminals on my power cables, that means I will have gold-to-tin connections and it may make the oxidation/corrosion worse versus all tin-plated cables connecting to tin-plated PSU/motherboard power pins.
So I was curious if you had any thoughts on the subject, since you’ve actually observed corrosion issues with tin-plated terminals? I know your corrosion was on signal connections (which tend to be more sensitive than power connections), but I’m curious if you have any thoughts about gold-plated versus tin-plated terminals for PC power cables?
The corrosion I observed was a small strip of black crud. Barely visible to the naked eye. The more visible change is having to spray them with contact cleaner to make them work again, after which they failed again 2 months later.
Never tried tin-to-gold. My high school chemistry knowledge says this should be no worse than tin-to-tin.
As a failure analyst I’ve seen numerous issues with dissimilar metals. Any difference in electronegativity (in the galvanic series) greater than 0.15V is considered to be prone to corrosion unless in a controlled environment, in which case the difference can be as high as 0.5V. Unfortunately tin has a 0.6V difference from gold, making the tin sacrificially acidic; it will corrode over time, exposing the brass/bronze base metal. The base metal is prone to corrosion with oxygen, sulfur, and other substances in the air. The corrosion by-products can be dark red, dark green, shades of blue, and black/brown, so a black “crud” isn’t unusual.
If the mating contacts carry enough current, the localized heating can accelerate the corrosion process. I have seen quite a few “charting events” due to dissimilar mating materials, so maintaining a low galvanic potential between these materials is key.
Just found the identity of another common connector type, this one took me ages to track down. These are commonly used on RC servos as an alternative to Mini PVs (more servos in recent years seem to use these instead of the Mini-PV). They originally showed up on JR Propo servos and then spread from there. They are superficially similar to Mini-PV terminals but the “latch” is lower on the housing and they are designed for a double D crimp die. The male side of the connector has a shroud that snaps over the housing.
http://php2.twinner.com.tw/files/goodjob/TY5081,2,3,4series.pdf
I don’t think these are the original JR connectors but rather a copy of them, for one thing they have Futaba style housings with a polarity key.
Addition to the above, I mean they have futaba style housings available for these terminals in addition to the JR type housings. The main difference is that JR housings have a beveled corner for polarity pritection where the Futaba type have a flange on the side of the housing.
Genuine Futaba terminals are yet another 0.1 terminal type, they have two “tongs” that grip the male pin on either side. So far I have not been able to track these down.
@Fythios I have an HT-102 and it works perfectly for Mini-PV male terminals. Does yours have the terminal holding device? I’ve seen a lot of modified or flat out incorrect tools being sold on Ebay as HT-95 or HT-102s.
@Atomic Skull apparently I dun goofed and got that backwards. The HT-102 is fine, but the HT-95 anvils wire crimp area are too long and crush part of the contact. Both have the terminal holders, the 102 has the male holder and the 95 has female holders.
I also have an HT-95 and it works just fine with the female terminals. It crimps the terminals exactly as shown in this picture http://techmattmillman.s3.amazonaws.com/wp-content/uploads/2015/06/minipvcrimped2-800×574.jpg
Yes the conductor crimp is longer than the generic crimpers, but it’s supposed to look like that, it is actually the generic crimpers that are doing it wrong.
With the Molex Micro-Fit 3.0 pins, do you use the PA-09?
I’ve been crimping with needle nose and finally had to give up with these tiny pins and sockets.
I don’t want to dish out $300+ for the official crimper, so I was wondering about whether an Engineer-PA09 would do the job.
Thanks for the info.
The Sargent tool is a pretty good universal style crimper for wraparound style insulation wings, just crimp the wire and insulation separately. About $50-$55 USD. Works well on AMP Superseals.
Sargent CT 1026 for the superseal and CT 1027 for D-Subs.
@Scott Evans very good tip! It’s a bit more than that now (£45-ish in UK), but compares to Engineer PA-20/21. And should be a good investment should one standardize on Molex and doesn’t go below 24 awg.
Also, it might be nice to see Deans T connectors, XT60/90, and Anderson PowerPole covered. Pretty common for hobby RC stuff.
@Evidlo Deans and XT60s are not crimped connectors, Powerpoles are though they aren’t small wire to board connectors.
Nice article. Though i am a beginner it helped me a lot while differentiating between the connectors. I will be glad if you can put few images of those connectors where they are used. That will make me more clear when i will use them actually. I am working on a project where the device consist of sensors, steppers, stepper drivers, switches, power supply and arduino mega. I would need to figure out few connectors but want to know which connector will be exact fit for the place where i am going to use it.
There is one more helpful article on this. Please refer below link:http://dangerousprototypes.com/blog/2017/06/22/dirty-cables-whats-in-that-pile/
Did the Knipex 97 49 44 do the job for the DuPont style connectors?
I was really hopeful that the PA-09 would do the Molex KK 396 series. Will have to keep looking.
Here’s another Mini-PV crimper, Rennsteig 616 006 3 1. Costs around $350 brand new. Apparently it’s fairly recent, Farnell is the only place that carries it and Rennsteig US doesn’t have it listed at all. It seems to have come out around the middle of last year. Farnell’s SVHC listing for it (no SVHC) it is dated 7/7/17.
http://uk.farnell.com/rennsteig/616-006-3-1/crimp-tool-26-22awg-socket-contact/dp/2802987
Thanks for the overview and comparison, this is really valuable information. You didn’t mention which crimp size your used in most cases. I’d be particularly interested in the Mini-Fit Jr. and if the PA-21 can properly manage the 16AWG, some articles/forms posts have reported mixed results… it doesn’t seem to be rated for 16AWG crimps though. At 18AWG it’s not an issue, but since the Mini-Fit Jr. can go as big as 16 I was wondering if the Engineer can manage.
agreed, I use Mini-Fit Jr. with the Engineer PA-21 pliers and 16-gauge wire (thousands of repetitions), and they DO work well. I use the 2.5 tooth for 16-gauge insulation and the 2.3 tooth for 16-gauge conductor (CCA in my case)
I agree
Tentatively, this BCT-1 is identical to the Sargent 1026-CT. For example:
https://www.greatplainselectronics.com/proddetail.asp?prod=1026-CT&cat=138
It seems to be quite popular in the pinball community:
https://www.google.com/search?q=BCT-1+site:pinside.com
You can currently find it on eBay for $32 with shipping.
Update: I would not recommend the BCT-1. It did the job well enough, but the lack of a spring in the handle is killer. This tool is pretty heavy and the action isn’t exactly butter-smooth. You’ll have to open it back up manually after every crimp, and you’ll definitely be feeling it after a dozen or two crimps. I imagine the same goes for the Sargent 1026 CT.
Usable for one-off projects, but probably not for high-volume ones.
I assume you mean putting the die’s from the HT-95 into this tool? If so, I don’t think you’ll manage that. There are eight pieces per tool (4x Anvils & 4x Dies). Each one costs about US $80 new. Very rarely seen second hand.
This is a great guide to the beginner like myself but it doesn’t go quite small enough for what I need; I need to crimp some (100) HIROSE DF20 rectangular crimp socket contacts on AWG30 wire for a touchscreen interface cable. The HIROSE tool is over $1000! I looked at the Engineer PA-09 but I am wondering if the IWISS IWS-3220M would be a better fit. Any thoughts?
DF20 with the PA-09? – Forget it. The terminals are too tiny.
The Engineer PAD-11 does these fairly well. A tool I have, but have not covered here (yet), but will get around to at some point.
Here is a DF20 crimped with the PAD-11:
http://techmattmillman.s3.amazonaws.com/wp-content/uploads/2015/06/df20_crimped.jpg
Thanks for the reply. The crimp from the PAD-11 looks good but what does it’s width measure? I ended up ordering the Iwiss IWS-3220M just to give it a try but the crimps came out to 1.15mm, too wide to fit the housing. The original crimped contacts measure 0.75mm.
The crimp from the PAD-11 is the correct width – about 0.7mm as stated on the die.
That said, crimping each terminal is pretty darn fiddly.
I just wanted to stop back in here to thank you for the recommendation. The Engineer PAD-11 did the trick nicely. As you mentioned, it was indeed “pretty darn fiddly” since each contact had to be individually cut from the strip, pre-bent parallel to fit the die on the PAD-11, inserted rather precisely into the die, and crimped multiple times including lightly crimping around the insulation in the 1mm die then lightly crimping in the 0.7mm die and lastly test fitting each contact in the housing and re-crimping as required. This over the 100 individual contacts plus several test crimps and bad crimps. Needless to say, it took a long time. lol.
Unfortunately, the first go with the new harness was not fully successful. After much [more] fiddling, 100% continuity testing, 100% resistance testing and a little extra help from people smarter than myself on web forums it appears that I must now extract many pins and twist together some wire pairs (for proper “timing”?). I will begin that process today. Since I don’t have a proper removal tool, I will just use a fine needle to remove them. I am not quite sure if this will be much less efficient than using a real removal tool but tests so far indicate it will be slow but doesn’t seem to harm the contacts. I’ll let you know how it goes.
Thanks again!
I congratulate you for the detailed tutorial. I wanted to ask you if any of you know the terminals that mount the cable AXI I2C 800mm PMBus Cable (Corsair Link PSU connector):
http://forum.corsair.com/v3/attachment.php?attachmentid=13280&d=1380017291
http://forum.corsair.com/v3/attachment.php?attachmentid=13282&d=1380018961
These terminals are the same as the Micro-Fit (Molex) very common in the power cables CPU and VGA, but its size is half of small.
I have asked the Corsair brand and they have not even bothered to answer me. I believe that being the owner of a power supply of that brand, I am entitled to know it…
I have Molex crimp tool 63811-1000, that I purchase many years ago. There seems to be so many different types of terminals. I note that the molex data sheet for the tool lists terminals that are compatible with this tool. Do you know if that list is exhaustive, or can I use the tool with any terminal that fits in the range of conductor and insulation sizes listed on the tool?
One of my favorites is Pancon (Panduit) Mas-Con. they are 0.1″ IDC style connectors. I used them in arcade and pinball games. If you have the pistol grip hand tool (not the cheap T shaped push tool) you can make cables really fast, with the right parts you can daisy chain. In a pinch you can jam them on most other 0.1″ connectors.
https://panconcorp.com/product-category/pancon-connectors/mas-con-100-idc-wire-to-board-connector-system/
Very informative pages. I have just bought a replacement LCD screen for my laser engraver which has a hirose 14pin header. Some fow I need to connect it to a 14wat ffc ribon cable. Any suggestions very welcome.
Really like this page. Very useful.
A couple of great additions would be the JST-SH 1.0mm pitch connectors (which I don’t like very much), and JST-GH 1.25mm pitch connectors (which are awesome). They’re both used heavily in smaller/racing drones.
My Engineer PA-09s are the best solution I’ve found so far.
Bloody awesome page. I’ve been doing lots of electronics in the last couple of months and connectors we’re always my achilles heel. Your guide helped me alot, thanks mate!
I have that tool (different brand but the exact same tool). I got mine from an R/C hobby shop. It’s quite challenging to get the terminal lined up with the wire compared to the official tools and it tends to bend the terminal slightly. I never use it since I got an HT-95 and HT-102.
Mini PV terminals are used extensively in R/C hobby wiring, though most servos now come with a very similar terminal that is designed for a “double D” crimp die. The connector box is also better designed. The housing is similar to the generic Mini-PV type except that the “latch” is lower on the housing and some have a Futaba style polarization key (a lot of companies don’t bother with the key because the positive lead is in the middle with the signal and ground on either side so if you plug something in backwards it merely doesn’t work). I call these TYU connectors due to the “TYU” printed on many of the housings however I suspect that they are made by several different manufactures. Took me forever to track down exactly what these things are:
http://php2.twinner.com.tw/files/goodjob/TY5081,2,3,4series.pdf
I’m still trying to figure out what exactly Futaba servos use, the terminals look like a milligrid terminal except it’s 2.54mm spacing for compatibility with the pin headers on hobby R/C equipment. Picture of the mystery Futaba connector here:
https://www.helifreak.com/showthread.php?p=7351711#post7351711
Molex 64016-0201 will also work with SL terminals as well as a few other Molex connector families, it is a “service grade” tool and costs about half the price of the other two more expensive tools. The difference is that it has a simpler design for the terminal locator and it does a “double D” insulation crimp instead of an “overlap” crimp. Apparently SL terminals are designed to work with either crimp style though the overlap is considered superior.
Hello!
I am working with CGRID-III connectors frequently, so I bought 69008-0985 crimp tool. I got it used for 100€ on e-bay. I had to clean and lubricate it with silicone oil, and it works fantastic for several years now. It is light and easy to use.
The downside of CGRID-III is that they don’t have male wire connectors. So I followed this guide and chose Molex SL for male-to-female wire connections. For crimping, I bought the “Service grade” tool 64016-0201. Unfortunately, this crimp tool is not very good. It is heavy, gets slightly stuck in open position, so when squeezing, there is some static friction, and when it finally moves, it goes several clicks high speed, hard to control. Also, it comes with contact clip that is supposed to help keeping contact in place during crimp, but at least my tool with SL male connector 16-02-0109 did not align well with the crimp die – contact was too low relative to crimp die base! The contact kept slipping away from its position. So I ended up not using it and putting contact directly in die and doing 4 clicks for retention, then inserted wire and crimped completely. Also, I had to keep switching hands for contact insertion from left side, then wire insertion from right side.
Then I thought to myself – how different could SL and CGRID contacts be? Let’s try crimping SL with CGRID tool! I did it, and it actually crimped contacts perfectly, as far as I can tell! CGRID-III tool 69008-0985 looks weird, but it is actually very ergonomic. It is light, thin, so when I insert contact, I can view tool from front, and see through it that contact aligns perfectly in die position, while inserting contact from back side. CGRID-III contacts have special shape that sticks into tool without holding them, whereas SL connectors are slightly more narrow and wiggle around a bit, so I have to hold them in tool and do the first click. But then wire stopper wall shuts and keeps the contact in place. Then I can insert wire from front side and crimp the contact fully, without changing hands. The crimp looks perfect, with wires being snug, but not too choked. The sleeve is wrapped in O shape firmly, even better than double-D made by Service Grade tool. Finally, I took pliers and tried to pull wire out of contact with force. It did not slip out, but instead after strong pulling, the copper wire broke off at crimp location, between sleeve and contact crimps. So the crimp is stronger than the wire. I tried the same thing with Service Grade tool crimp, and the wire broke at the same location, and I would say that it happened earlier.
So I would say that CGRID-III 69008-0985 crimp tool crimps 24-26AWG wires to SL male contact 16-02-0109 at least as good as “Service grade” tool 64016-0201, except it is much lighter and more ergonomic. So I recommend you NOT to buy service grade tool, instead buy 69008-0985 crimp tool.
A good alternative for Mini Fit Sr. are Anderson Powerpoles and SB50 connectors (they both use the same terminals). The PP45’s are single terminal housings that can be stacked and the SB50’s are two pole keyed housings. Both are hermaphroditic which might be a problem in certain applications. While the official tooling is very expensive Powerwerks makes affordable third party crimp tools for them. Also while the PP45 terminals claim 45 amps maximum they are actually very underspecced and can take a lot more than that. I’ve seen them used on large electric helis with 10 gauge wire that pull 50-100 amps continuously and spike up to 200 amps for a split second periodically without any problems. The amp rating on the terminals seems to be based on the wire rather than the terminal e.g. the PP15 terminals have the exact same contact area as the PP45 terminal, it’s just designed for a smaller wire crimp (PP15s and PP45s both use the same housings)
They would! I did some more digging later and found the 75653 range Amphenol Mini-PV male crimp – I bought them as a cut strip under the part number 75653-002LF from Mouser, waaaaay more reasonably priced. Current price was 0.181 NZD per (at 500+ price break), converts to about 0.093 GBP at time of writing.
The “high contact force” version of the female Molex SL terminals are not for use on wire to wire connections only with square header pins. The reason why is that round crimp terminal pins can slide sideways out from between the two contacts because the end of the connector box on the high contact force terminals are open at the top and bottom. On the datasheet it says “TERMINAL TO BE USED WITH (0.64)/.025 SQUARE PINS” but doesn’t explain why this is and it’s easy to miss.
Actually after some experimentation I think the high contact force SL female terminals are ok with SL male pins, just not with mini-pv / dupont connector pins due to how those terminals can wiggle around in the housing where the SL pins can’t
After some further experimentation I’d say the high contact force SL female terminals are also ok with the male dupont crimp pins, provided they fully mate with the pins. The thing with the high contact force SL terminals is that the top and bottom of the connection box is open in the middle and if the pin does not reach the back of the terminal where it is constrained on all sides it could in theory slide out from between the two contacts if the housing were to become skewed at an angle.
Another tool for mini-pv / dupont terminals recently came to my attention, the FCI SP1552B. This tool has a round die on BOTH crimp barrels. I found it worked well with genuine mini-pv but not so well on *some* of the knockoffs. The ones I have from Hansen Hobbies (which I think are actually Harwin M20 terminals) work great, the cheap ebay terminals I had laying around not so much (wire pullout force was lower). Currently this tool is being sold cheap on Ebay as NIB surplus by a couple different sellers, the actual retail price appears to be around $300. The locator is a gate style, the one I had needed the adjustment nut on this gate to be tightened slightly as it was a bit sloppy. Crimp height adjustment did nothing as the die fully closes with the default setting. The correct way to align the terminal seems to be with the back end of the connector box lined up against the gate.
Where does the offering from Pololu amongst all the choices
See
https://www.pololu.com/category/70/crimp-connector-housings
Would be very interested in your opinion. Thanks
These are the exact same cheap connectors that any eBay seller is flogging. They work fine but tend to become unreliable after about 20-30 mating cycles due to loss of spring tension in the contact. If you need something durable and reliable you have to look at originals or a different family which of course is going to cost more.
Re. Molex Disk Drive connector tool 63811-7000: it’s a currently available product (04/2019), you can buy one under $300, so not only you can see one, but you can afford it, too 🙂
Thank you sir, this was extremely informative and I wish out found this article months ago it would have saved me hours of searching, cross-referencing, and quite frankly guessing as to what the hell I was looking for.
This is a good source for quality dupont terminals, these guys specialize in selling servo connector supplies to the R/C hobby.
http://www.hansenhobbies.com/products/connectors/servoconnectors/
These are NOT the same cheap noname terminals a lot of Ebay vendors well, I’m pretty wire they are actually Harwin M20 series terminals. If you need generic square housings then do not buy the servo housings as these are either keyed ion the case of the Futaba type or have a beveled corner in the case the the JR type.
I will also say that the Hozan P-706 works better than the ratchet crimper they sell (which is a generic “double D” type crimper). You can get a P-706 off Amazon for around $45.
I have some odd looking crimp connectors, flat, forked blade with a normal wire crimp looking tangs on the wire-side.
Cannot find them anywhere, but I’m sure you would know what the application is.
Would be glad to email a pic…
THANKS!
It looks like I had a pair of the HT-213 generic crimpers mentioned by @dzeez. I’m new to crimping, but the crimp looks really nice. However, the 28 AWG wire is not held by the wire crimp nor the insulation crimp.
Pictures: https://imgur.com/a/BmhMxNY
The problem might partially be due to the size of my wire. The wire gauge is 28 AWG but the OD is only 0.6mm. However, I would have still expected it to the crimp the wire portion correctly but even that was very loose.
When I crimped 24 AWG it looked nice (but 24 AWG is a bit large for Mini-PV/Dupont so the wire bulged out the sides a bit).
R/C servos use dupont connectors and standard sized servos use 22AWG leads so I wouldn’t say that 24AWG is too large.
The HT-213 and the other similar design dupont crimpers have an issue with die alignment on generic 0.1 “dupont style” terminals, you can correct this by putting a washer under the terminal holder thick enough to align the terminal correctly with the die. The HT-95 and HT-101 don’t have this issue and will work equally well with genuine of knockoff terminals with no modification.
I find myself today working with some TE NanoMQS connectors, which are downright pathological in their crimp dimension tolerances. The official crimper is $800 so that’s out of the question.
My trusty 63811-1000 doesn’t even rank. Its narrowest nest is 1.4mm and that’s simply too wide for the cavity, the terminals won’t even start to insert.
What’s working best for me right now is crimping the wire-grip with the 1.3mm nest of a PA-13, then gently hitting the insulation-grip with the A nest of an AMP Service Tool I, then returning to the PA-13 to gently narrow the insulation-grip in the 1.3mm nest. (Crimping it directly in the PA-13 bananas it badly.)
The root problem here is that the PA-13 has the right X and Y dimensions of its crimp cavities, but the Z thickness is way too thin. The other automotive-style crimpers have the right Z dimension, but they don’t go nearly small enough in X and Y.
Does ANYONE make a generic Service Tool type crimper with narrow nests, say 0.8, 0.9, 1.0, 1.1, 1.2, 1.3mm, but a nice thick (say, 3.5mm) jaw? The Engineers are all thinned to 1.0 or 1.5mm in the nests I care about, and that makes banana crimps every time.
Those both look pretty rare or expensive. I myself certainly don’t mind sourcing tools like that however the majority of people reading this are usually looking for something cheaper / more common. The bounty is for a cheap Chinese tool. Still have not been made aware of one!
Regarding the Mini PV Male crimp, I noticed that the part numbers and corresponding images noted on this thread, namely 47792-003LF and 75653-002LF, don’t match the data sheet for these parts:
http://techmattmillman.s3.amazonaws.com/wp-content/uploads/2015/06/minipvmale.jpg
And
http://techmattmillman.s3.amazonaws.com/wp-content/uploads/2015/06/minipvterminals-800×654.jpg
The difference being the following on the data sheet for the noted part numbers:
https://cdn.amphenol-icc.com/media/wysiwyg/files/drawing/75653.pdf
1) Data sheet notes the base of the tip has a wings/barbs (images don’t have this)
2) Data sheet notes flange/wings for insulation and bare wire crimping contact points (just as the images note), but there are two flange lock guides just above the pin on the images but not on the data sheet.
Am I missing something ? Could someone point me to the data sheet for the images noted in this thread for the Mini-PV male crimp?
Thanks
Are you looking at genuine Mini-PV or “mini-PV style” terminals such as Harwin M20 series terminals and the countless noname Chinese ones?
@ Lucas Edwards For the Mini-PV terminals I’d recommend a Hozan P-706 over the Engineer PA-09. The PA-09 makes a mess of them while the P-706 does a job almost as pretty as the HT-95 (and equally strong crimp)
I prefer the VH connectors over the molex; the jst contacts are a box style and their housings are clearly marked for pin position. However while the headers and contacts could work together the plastic locking parts of the two systems are not compatible and will not get out of each others way until something breaks.
Excellent page btw!
One tip I can provide is that the price per contact of many of these connectors is often much higher if you buy them “loose” vs on a strip, so always check the prices on the strips as well when looking to buy from distributors like mouser et al.
You need to be very careful before buying terminals on a strip, for example, Molex KK.100 terminals on strip need to be cut with a special tool – doing so with pliers or scissors is so difficult that it isn’t worth the savings.
Good point about separating them sometimes not being worth the trouble. I forget that the last time I did a bunch of these things I was using one of these to cut them loose.
https://www.harborfreight.com/throatless-shear-38413.html
Several steps above scissors (: and a great upgrade from tin snips for it’s intended purpose.
Concerning the XH (JSD) crimping. You pointed out that when XH connectors are crimped with the WC-110 tool it produces a rounded/rolled effect on the strain relief wings i.e. the crimp does NOT cut or smash the wire insulation. Is there an alternative tool that will do the same?
Very unlikely. To get a result like the tool has to have tolerances within thousandths of a millimeter which wouldn’t be the case for a generic tool.
I also recently got a Preciva PR-3245. It does a great job properly rounding the insulation crimp on Dupont/Bergstik connectors.
However, as with all the generic crimping tools in the pictures, it didn’t squeeze the wire tight. I found that I could only get a 24 or 26 AWG wire to pass the pull test if I stripped about 1/2″ of insulation and then folded the wire end twice (resulting in four layers) to get an 18 or 20 AWG equivalent thickness before crimping. And that only worked properly if I made sure the wire coming directly out of the insulation was on the bottom of the connector, with the folded wire piled on top, before crimping.
I have no idea if this is a reasonable technique or how long it will last, but at least it’s giving me a solid connection in the short term.
Here’s a picture of the double-folding technique with the Preciva tool that I mentioned in a previous comment:
http://clawsoon.com/images/Preciva-PR-3254-26AWG_v8-low-res.png
I’d be glad to get feedback on the idea.
Consider the image public domain if you want to post it. High-resolution image available by request.
Now https://bandc.com/product/open-barrel-crimp-tool/
How quality of crimps for JST PH 2.0 from WC-240 compared with something like SN-02BM/SN-01BM/SN-2549? Which generic tool would be better for it?
Hi, I have a German radio in which the wire-to-board connections for the speakers to the chassis are standard (?) “blade” or “spade” connectors – female on the socket side, arranged four in a row, with the blade recepticles parallel, like | | | |. I have been unable to find a replacement housing of this type. Do you know if there is a common name for this type of socket so I can search for it more effectively? Thank you.
Regarding Molex C-Grid III: perhaps this sentence needs updating?
> Very similar to the SL series mentioned above, except comes in a two row configurations.
I’m seeing that Molex SL comes with dual row configuration as well, example below.
So, comparing C-Grid III to SL, I can spot only one difference: C-Grid III appears to be twice cheaper, based on sample point of 1 pair of analogous housings on Mouser. Beyond that, no point to bother with C-Grid III, is there?
22552041
2.54mm Pitch SL Crimp Housing, Dual Row, Version A, Non-polarized, 4 Circuits, Black
Series: 70450
Overview: SL Modular Connectors
https://www.molex.com/molex/products/part-detail/crimp_housings/0022552041
Interesting. I’ll have to buy some and have a look. It does seem absurd that they market two types of connector which are so ridiculously similar.
You 100% need to check out the MDPC CTX3 Crimper. It is the most popular crimper in the PC Cable Sleeving Community!
It claims to be able to perfectly crimp “2.54 grid DuPont” style terminals, Molex Mini fit jr Terminals, Molex Sata power Terminals, Molex KK 254 (Fan Terminals) and the “Molex” Disk Drive Power Terminals or more widely used TE Mate-n-Lok (5.08mm pitch) Terminals.
Actual MDPC website with the CTX3 Crimpers:
https://www.cable-sleeving.com/crimping-tool
UK Reseller of the MDPC CTX3 Crimpers:
https://pexonpcs.co.uk/collections/diy-tools/products/mdpc-x-crimping-tool
Am aware of it. It’s very similar to several of IWISS’s tools, and doesn’t have the correct jaw for DuPont terminals.
I see, so you wouldnt reccomned it for Dupont terminals then?
Also I was wondering if you could give your advice on whether the Mate-n-Lok (5.08mm pitch) will work fine for this style of connector which is used (Unsure which specific brand is used but they are widely known as “Molex connector”) on PC internal devices like fan controllers, or RGB controllers etc or would you reccommend somthing else?
And whether the Mini-PV, “Dupont” Knock offs, Molex CGrid III & Molex SL are all suitable for PC motherboard headers, USB & Audio? or would you recommend another Terminal?
The SN-025 is a better bet for DuPont terminals. The IWISS SN-28B will do Commercial Mate-n-Lok terminals just fine. The MDPC CTX3 looks like a re-badged SN-28B for double the money.
Your Previous comment which I think was deleted made me laugh! 😀
Also do you have any recommendations for what I mentioned in my previous comment by any chance? or which ones you think are the best ones to use in the mentioned applications or if I was completely wrong haha!
I deleted the comment because it was so amusing that I decided to promote it to my front page: http://tech.mattmillman.com/a-load-of-doubtful-marketing-bollocks-lands-on-my-crimp-tool-page/
Using SL in a PC would be a bit odd. They will work but probably a bit high end for this kind of application in my opinion. CGrid III would be a better bet, but the terminals require an ‘O’ type crimp tool like the SN-025.
Thank you, I will be sure to take a look at them terminals and that crimper then!
So regarding the “Molex Style” Terminals that everyone calls them in PC’s is it infact the Mate-n-Lok (5.08mm pitch) that is used? or should be used when creating cables?
Also Regaridng the MDPC CTX3 on your front page I beleive you have linked the reseller and not the actual MDPC website https://www.cable-sleeving.com/crimping-tool not sure whether this was intential or not but thought I would mention it just in case.
Thank you for all your help BTW with my questions and this amazing page!
AMP (now TE) themselves refer to them as “Commercial Mate-n-Lok” – a stupid name. It’s a huge family of connectors which includes the 4 position type found on disk drives. https://www.te.com/global-en/plp/commercial-mate-n-lok/X25kxTd.html
While they are commonly found on expensive name-brand servers and workstations, and Apple computers, for example – for average consumer use, completely overkill. No need to splash out on them. There’s zillions of Chinese manufactured look-a-likes which are of sufficient quality.
Thank you so much! Appreciate your help with this!
You know so much about terminals and crimpers it’s AMAZING!!!
Hi,
For the KK 254 Connectors from Molex. Do you happen to know the difference between 2759 and 6459 series linked below?
https://www.molex.com/molex/search/partSearch?pQuery=&sType=s&query=2759
https://www.molex.com/molex/search/partSearch?pQuery=&sType=s&query=6459
The obvious difference jumping out at me is Brass vs Phosphor Bronze body material
Yeah, that’s what I saw too but I thought it was strange that they put them in a whole different series just because the body material is different, so I thought something else must be different between them.
However it does indeed look like that’s the only difference. Hopefully anyway ?, soon find out when I order some.
Hey,
I need some help identifying a connector, I understand your probably busy so I understand if you cannot help, but if you can that’d be awesome.
If so is there somewhere I can send you pictures of the connector to see if you have seen it before? If not, again it’s totally fine I understand 🙂
My email is on the about page
Are the KK 254 Unofficial male contacts, the same as dupont clone contacts, or are they shorter than the dupont clone contacts?
Trying to summarize the great wealth of information you provide, and price within reason aside, if one is looking for a general purpose crimping tool for some of the more common wire2board connectors: dupont/mini-pv, molex SL, Minifit jr, KK 254/396, jst-re/ph/xh/vh at gauges awg27 – awg23, as of end 2020, would your first choice still be be the Hozan P-707?
I assume, but may be wrong, the lower conductor half of the P-707 could be used for smaller AWG terminals requiring a B-shape crimp for their insulation, as f.e. I suspect the JST to require?
Thanks very much and stay safe
Thankyou very much for this guide, I have not found anything like it and it is EXTREMELY helpful. Your effort is appreciated!
After spending too much time trying to work out with random 0.1″ contacts I finally ended up on standarizing Molex SL for all my PCBs and general connector stuff; definitely an almost do-it-all range for my use.
I ended up with a 2 generations removed crimper, 11-01-0208, from eBay for $100 new-old-stock and it makes perfect crimps. I think I’m finally happy with my connector situation.
I’ve added 11-01-0208 to the list of SL tools on this page. It looks to be the predecessor of the 63811-8700 tool (a rarely used oddity). There must have been a predecessor of the 63811-8800 tool too (the most commonly used). I had a bit of a look around last night but couldn’t uncover it. Did you ever come across it?
The aptly number 11-01-0209 is the predecessor for the 63811-8800 I believe 🙂 I’ve never seen it on the used market.
I’m also apparently blind, since I’ve now found a number of the 0209s, haha. My bad.
Iwiss added an exact copy of the Hozan P-707 to their catalog) Model IWS-1442L.
ps. Matthew Thanks so much for your work!! I’ve been following this page for several years
Where do people prefer to buy the Molex SL modular connectors from? Is it possible to get a kit with the various housings, contacts and tool?
I just buy the connectors, housings, and contacts usually as needed from Digikey. I have about 200 male and female contacts, then a bunch of 2 and 3 position connectors. I’ll buy the PCB mount housings separately depending on what my PCBs ending up looking like.
I find keeping around some two and three position ones are usually a good investment.
For tooling, I used eBay for the crimpers but Arrow for the insertion and removal tools; they were a decent amount cheaper there. The insertion/removal tools definitely aren’t needed but they make things a little easier but you can use some dental picks to do the same task. The insertion tool is really only useful if you’re using very small gauge wire or silicone super floppy wire.
Good work using the insertion / removal tools. I have both of them too… and…
I can never be bothered using them. Instead I end up using my Fluke TP88’s for both tasks, and rightly deserved to be slapped for it.
I restore old cars and need a decent crimp tool for PIDG insulated terminals, as well as non insulated Faston terminals, and lots of other terminals commonly found on older cars.
Have you ever used the Pressmaster MCT or know if it is capable of making good looking solid crimps with the proper dies?
http://www.pressmaster.se/product/mct_frame
I cannot afford to buy tons of tools for every situation so am looking at a system that will suffice with decent quality, is modular, and won’t totally bankrupt me.
Just thought I would add my experience your recommended budget tool.
The rachet crimper IWISS SN-2549 is great does the job to a reasonable standard.
Out of the non rachet crimpers the engineer PAD line up is by far my favourite. I tried the Hozan P-707 but I cannot get good crimps out of it at all unlike the Engineer PAD-11 where I get good crimps everytime.
I am now just using the Hozan P-707 for the O shaped insulation crimps as all of the B style insulation dies keep folding the contact wings into a dodgy O shape or sometimes it forces the two wings to collide and causes fatigue on the bottom of the wings where they meet the acutal contact.
Which connector type are you having trouble with the Hozan on?
The only types I have tried are Molex Mini-Fit Jr and JST PH.
The main issue is on the insulation crimps, however the conductor crimps do not seem as “tight” as when using the Engineer PAD line also.
Yeah I found it was a little big for PH. Conductor crimp on larger types is its strength so for example if you are crimping M/jr with something else, then come in and tighten it with the Hozan afterwards.
Ahhh, I see. That saves having to muscle the crimper using the Engineer PAD :D.
I will give that a try and hopefully add it to my process if the extra force is needed 🙂
I would like to mention, having the O dies individual for the insulation is just amazing to have. Can actually crimp KK 254 insulation properly, well as good as it gets using non official tools.
Also for anyone who wants to get their hands on the Hozan P-707, Plaza Japan has some amazing pricing!
https://www.plazajapan.com/4962772067079/
Hey,
I have got hold of a Molex 63819-0900 for mini fit Jr contacts, however I have noticed the 20-24 AWG die crimps abit differently than the 18 and 16 dies on the insulation.
It seems to still not peirce the insulation (what I expected) but does a weird wrap around rolling of the wings instead of just wrapping them around like the 18 or 16 dies.
Please could I ask if you’d be able to take some pictures using 24 AWG wire in the 20-24 die with mini fit Jr contacts?
Just want to check if this is normal behaviour or not 🙂
That sounds correct. It does that to “waste” the excess length on the insulation crimp as these terminals are too large for this wire size.
If you want nice AWG 22+ crimps you’ll need to use 39-00-0047 terminals with the 63819-1000 tool.
Ahh I see, didn’t even realise they existed to be honest 🙂
On another note, what tool do you use for the pull tests as with my tool being a used one, I want to make sure the preload is set correctly on the setting wheel.
So I need some kind of tool to test the pull weight so I can adjust the preload until it meets spec.
39-00-0047 terminals in the 63819-0900 may also yield a better result. I don’t have any at present. I’ll put it on my list of things to try.
I was using a cheap luggage scale for the pull tests. Probably pointless playing with that wheel. Whatever you set it to, you aren’t going to get a pull. All my new-gen Pressmaster Molex tools are set to 3.
I set mine to 0 and it won’t pull from the terminal without breaking the wire so I think that is fine haha.
I am soooo glad I got the molex tool though, it’s just ALOT easier to crimp with the locator and just overall is a much better to crimp with, don’t regret it one bit 🙂
One downside,I don’t wanna go back to using generic tool like iwiss or engineer for other terminals now,I need the official tools lol
Glad you’re sorted. Don’t end up like me with 80+ original tools.
Today I was creating a new sleeved cable extension kit and while fiddling around with my sn58b I noticed that it does an exceptional job on 18 awg wire (2,1mm Outer diameter).
When I pre-crimp the terminals in the 1,5mm² die (4 clicks, one level underneath full force on the little gear) the insulation wings wrap around the insulation similar to the original molex tool.
Hard to see but it doesn’t bite into the wire, it wraps around it:
(the conductor crimp isn’t as loose as it looks) https://imgur.com/a/1IEAswR
There is a minor extrusion on the underside of the terminal obviously because the die is so small but nothing that I would call a fatigue point or similar.
Just thought I’d let you know that with a little bit of patience and practice the tool does an exceptional job.
I am planning to order a spool of 1,5mm² wire (2,6mm OD) and I am so curious if this pre-crimping would lead to a similar result! The only difference should be that I have to fully compress the wire in the 1,0mm² die since the 1,5mm² one is way too big for actual 1,5mm² wire.
The more I use the 58b, the better it gets! Planning to test the iws-3220 next for kk.254, picoblade, jst xh and such. Looks quite good, doesn’t offer a round insulation crimp though.
Ok so right after writing my comment I thought I’d try the same thing out with knock-off JST SM terminals on 0,25mm² wire and it had the same effect! I precrimped it in the 1mm² die until the insulation wings resembled a circular shape (if that makes sense) and then used the 0,25mm² die to fully compress.
I am stoked 😀 Here is the result: https://imgur.com/a/dVI6I9N
Ah man I wish these tools would provide a slightly stronger conductor crimp, it would be a perfect result for 20€.
Heck it probably is, it’s not like fans and LED in computers demand high quality connections.
Hi,
Great content! Thanks for clarifying all the common connectors. As a new person to EEE, I have been suffering from the pain of finding the correct connectors to use with some electronics and reliable but small form factor wire-to-wire connectors. I have been studying JST and Molex catalog for some time and until I found your guide, I almost wanted to write an article on this myself.
I see you missed out JST SM series (https://www.jst.co.uk/productSeries.php?pid=94). I personally like these wire-to-wire connectors as they feature a lock and relatively small footprint. Any chance that you can add them to your article?
Matt, hadn’t been here in a while, you redid/updated your page–great job and many thanks!
This is great info – thanks! Do you have any recommendations for crimping FASTON connectors with larger wires (down to 14 gauge)?
The red and black wires I’ve shown are AWG 14. I’ve listed the tools I used for those. I don’t have any budget tool recommendations for these at this time.
Hi,
You said all dies of the IWISS SN-58B are larger than the IWISS SN-2549. But these are the die sizes according to published information from IWISS:
SN-58B: 1.6/2.0×7.0(24AWG) 1.8/2.4×7.0(20AWG) 2.2/2.9×7.0(17AWG) 2.8/3.5×7.0(16AWG)
SN-28B (non-EDM): 1.6/1.9×7.0(28-24AWG) 1.9/2.6×7.0(22-20AWG) 2.1/2.9×7.0(20-18AWG)
SN-2549: Same as SN-28B, plus 1.2/1.5×4.0(28-22AWG)
(There seems to be no information on the SN-48B.)
So according to that, the 3 smallest dies on the SN-58B are very close in size to the 3 largest dies on the SN-2549. Is the information from IWISS wrong? Are there other size differences not captured by these specifications?
The smallest die has only a 0.1mm difference in insulation crimp, but on the SN-28B it’s specified for 28-24AWG while on the SN-58B it’s specified for 24AWG only — does it really make that much of a difference?
Another commenter said that the SN-58B, or indeed any cheap ratcheting crimper, is no good for 1.5mm (ie, 15AWG) wire. Is the largest die on the SN-58B actually usable for anything?
What is the story with “XHB” connectors like this?
https://lcsc.com/product-detail/Wire-To-Board-Wire-To-Wire-Connector_BOOMELE-Boom-Precision-Elec-C38301_C38301.html
https://www.aliexpress.com/item/4000502453714.html?spm=a2g0s.9042311.0.0.24c94c4dbElEtp
These are single row, fully shrouded, have two keyways cut into one face roughly lining up with the outermost pins, and have a ramp detent on the key side. Took me a while to find info on them, and I’m not sure what pins or crimpers they need. They’re kind of similar to JST XH/XA?
Hi. I use the Molex Mini-fit Jr range a lot. Is there an or similar equivalent range which does not use nylon, and has higher mating cyles? The Molex has a max of 30 cycles.
Molex has a High Mating Cycle (HMC) version of Minifit Jr called Minifit Plus – it’s rated for 1500 cycles
Uses the same crimp tool as Minifit Jr, fits in the same housings.
I guess that doesn’t help you with the nylon though.
Good luck!
Here’s the link to Minifit Plus HMC
https://www.tti.com/content/ttiinc/en/manufacturers/molex/products/molex-mini-fit-hmc-femail-terminals.html
need 39-00-0039to order 20 #
Thanks for your super useful reference page! Helped me to figure out which connector pins to purchase for a 24-pin Molex 5559 power connector (motherboard) and how to crimp them (I’ll use the Hozan 707 tool).
After some more research realized I should use tin-plated pins to match what seems to be tin (silver color) material in the connector I’m mating to. Gold-tin mating is a no-no (corrodes over time), so gold is not always the right option when mating to non-gold.
One mystery – Molex lists “Mini-Fit Male Crimp Terminals” and “Mini-Fit Jr. Grounding Pin” as options for a 5559 housing. Since some of the pins in a 5559 connector go to ground, I was trying to figure out whether to use the “grounding pin” for the ground positions. The only difference I can see in the data sheets is the grounding pin is a little bit heavier, and lists plating min. only on the mating, while the “regular” pin lists plating min. on both mating and termination. Maybe it’s a corrosion consideration of some sort for the grounding pin vs regular pin. Since for my simple project I’m only making a simple 2 pin connector to turn power ON on a PSU without a motherboard, don’t think it matters.
https://www.molex.com/webdocs/datasheets/pdf/en-us/0039000127_CRIMP_TERMINALS.pdf
https://www.molex.com/webdocs/datasheets/pdf/en-us/0304902012_CRIMP_TERMINALS.pdf
The third pin option they list, “Mini-Fit Plus HCS Crimp Terminals”, are higher-current options, “13.0A per circuit can be achieved using 16 AWG wire”.
Perhaps the grounding pins are a little longer? I’ve never used one. Couldn’t find a detailed drawing of one either.
Thanks, spot-on insight! The regular pin has a total length 16.7 mm (~4.8 mm for the mating part), while the grounding pin has a total length 20.2 mm (~8.3 mm for the mating part). Since I’m mating to a “normal” connector with all female pins of the same length, I’ll use the normal pins for all positions, not the grounding pins. Could be the grounding pins are used for some specific “grounding” connections, no idea.
One aspect that’s not discussed is solid vs stranded wiring. Electrical/physical pros and cons are discussed in many other places, but specifically with respect to crimping would be good to know if one is preferred. Most of the photos on this page seem to show stranded wire. I’d guess that esp. with bad crimping tools, solid wire might pull out easier than stranded as it’s harder to crush solid wire and harder to get a high friction grip on it.
I don’t discuss solid wire here because it’s highly unlikely that anyone reading this page would be using it with any of the connectors I’ve discussed.
Hi,
Would you know if JST PH (2mm) and Molex Micro-latch (2.0mm) are compatible?
For example, would a Molex micro latch plug fit into a JST PH socket?
Regards,
Mike
They’re not compatible
Have you had any experience with one of these inexpensive ($250) air-powered crimpers? They’re all over Amazon and elsewhere:
https://smile.amazon.com/IWISS-AM-10-Pneumatic-Terminals-Ferrules/dp/B00K0EQ6W2/ref=sr_1_4?crid=19HO6XJRT8ZLA&keywords=pneumatic+crimper+wire+crimping+machine&qid=1638464159&sprefix=wire+crimper+pneumat%2Caps%2C150&sr=8-4
They give you dies for just about any connector series you can think of.
No but I couldn’t see the benefit of those machines unless you want a large number of crappy crimps.
If you wanna splash out on a Chinese automated crimper have a look at the more serious models: i.e. https://www.aliexpress.com/wholesale?catId=0&initiative_id=SB_20211208084959&SearchText=semi+automatic+crimping+machine
They make a lot of different machines which are more like those offered by connector manufacturers’ applicators, and generally have dies which crimp fairly close to spec, unlike the dies for the one you’ve linked which tend to be pot luck.
Can you recommend a “starter kit” of connectors that someone learning basic electronics and microcontrollers can pick up? Something to use to learn how to crimp and and build basic projects without costing a fortune? Thanks.
I can actually:
https://www.amazon.com/Crimping-Preciva-Ratcheting-Connectors-0-1-1mm%C2%B2/dp/B07R1H3Z8X/ref=sr_1_15?crid=839SLYC38ET4&keywords=Preciva&qid=1642065002&sprefix=preciva+%2Caps%2C140&sr=8-15
For the money, it’s alright. The tool is one of the better cheap generic types I’ve come across. I wrote it up here:
http://www.mattmillman.com/a-new-budget-dupont-crimp-tool-is-bought-to-my-attention/
Looking at photographs (not diligently reading specifications and technical drawings), Molex’s Micro-Fit and TE’s Micro MATE-N-LOK appear to resemble each other. I wonder whether they’re similar, are they inter-compatible? The Molex “Micro-Fit” is already in this guide. My request, suggestion of what connector system to cover next, is the TE “Micro MATE-N-LOK”.
Thank you for this guide. I appreciate you.
Something about Molex SL that apparently is not written down anywhere (it might be in Molex training materiels but I’ve never seen it) is that the crenelations on the back side of the housings are there to allow you to catch the edge of the insulation crimp and press the terminal down into the housing. The crenels are clearly meant for this purpose because when you push the edge of the terminal all the way to the bottom of the crenel the tab pops into place. Without this it can be difficult to get the terminal to seat because they don’t just slide in like a dupont terminal does. There may be some specialized tool for this but a small thin bladed screwdriver works fine.
HTR 8519B is an old Molex SL crimper that shows up for cheap on Ebay a lot because nobody knows what it is and Molex’s site has no documentation on it (they do have a cross reference though which is how I discovered this) It seems to be meant to do 22-28 AWG SL and C-grid terminals and cross references to 4 other tools two for c-grid and two for SL.
Nice list of medium sized crimp based electronics connectors, with an awesome realistic approach to crimping. Unfortunately, I came here looking to identify a tiny soldered SMT connector that has 6 pins on a 2x3mm mating head, so not really the right scale.
For the benefit of non-US readers of your list of crimped plugs, it would be nice if you included metric (IEC 60228) wire sizes in descriptions, not just American Wire Gauge. If you are unfamiliar, standard metric wire sizes are identified by their cross section in square mm, and this goes all the way from tiny 0.01mm2 signal wires to 2000mm2 (2″ diameter) heavy duty aluminum rods. Some cheapo resellers state wire diameter in mm, which is not the standard way. 1mm2 is approximately 2 kcmil, but the standards list reference sizes that are mass produced as power cables. Such as 0.5mm2, 0.75mm2, 1mm2, 1.5mm2, 2.5mm2 etc. etc. (Which seem to approximate US sizes from AWG 20 to AWG 14 or 1 to 5 kcmil)
Thankyou for the comment. I am quite familiar with metric wire measurements as I live in a metric country (well it is about to revert to imperial measurements but that is another story).
Despite this I’m not likely to start talking about metric CSA on here. Here is why:
1) Electronics crimp tools are always marked as AWG or AWG/CSA. CSA only in a tiny number of scenarios
2) Small gauge hook up wire is manufactured to common AWG sizes, then retrospectively specified in metric CSA, usually only on the datasheet. The physical wire typically only is marked as AWG
3) If I start listing CSA and AWG for everything on here, the page would get even longer and more cluttered than it already is adding little value
4) If you really have to work with metric CSA, conversion charts are readily available
5) The majority of the readership of this site is from the US, even though I don’t live there
6) I myself have to be consistent with other hobbyist websites which typically use AWG
CSA is definitely more relevant for electricians (in fact it is the only measure) however the stuff I’m covering here isn’t really from that realm.
Thanks for a great and really helpful page when trying to navigate the forest of Molex crimp tools which all seem to cost 300-400 quid. Recently came across the 35044 series board in connectors (which confusingly seem to have metric pitches like 2.0 and 2.5 instead of say 0.1in). There are at least four Molex crimp tools for the 35044 pins….
Could you also cover connectors on PC motherboards in more detail? For example: USB 2 or 3 internal headers, power switch connector or 4+4 CPU power.
Could you also add a part number for micro fit extraction tool? Also some recent graphics cards are switching to Micro-Fit Jr. e.g. Nvidia 3080 FE uses 12 pin double row variant. Also, is there a reason for Micro and Mini Fits being so far from each other on the page?
What are my options for double-row 0.1” wire to wire?
I can’t thank you enough for your page. I’ve read and re-read it so many times over the years. Seemingly this is The page for connectors and crimpers across the whole internet.
I sort of have covered other PC types. I do have a page for PC stuff specifically – https://www.mattmillman.com/info/crimpconnectors/pc-modding-crimp-connectors-and-tools/
Not sure if that is any use. Mini-Fit and Microfit are far apart because it’s most popular connectors first. Microfit is still fairly uncommon.
Do you recognize this connector for this fan by any chance? (Hopefully)
I have not been able to identify it looking through your connector page.
shorturl.at/ceK45
shorturl.at/otXYZ
Second link looks like PHD
That’s the one, thank you.
I thought it’d be done jst connector, it looks like the one in the first link is the jst PhD too, but a custom version by HPE.
Hi, I have a Generac generator that runs well but I recently serviced it and in doing so I inadvertently pulled the fuel gauge wires from the control board. I am unsure of how they connect to the control board as the wires terminate in a plug that is solid plastic on the bottom where it would connect to the board. The metal contacts in the connector have no way of meeting the contacts on the board. I am sure this is by design to prevent explosion but are you familiar with how this might connect?
Hello Matt!
Thank you so much for this thorough tour. I’ve been looking for this exact digest for over a year! I just now ran across it, from a link on YT video (posted by a popular sarcastic electronics disassembler).
I like your comment “SL (Molex), AMPMODU MTE (TE Connectivity) … If I were to start over, I would probably use these connectors in place of several others”. This type of opinion from a position of experience is extremely valuable to me. I also noticed in general you don’t state your preferences about connector types in this article, aside from where a standard is entirely unusable.
Do you have any other posts about preference or fit-to-purpose of different connector standards, basically so I can use your preferences as a starting point for my personal projects? Or can you recommend another information source for that?
I’d also be willing to exchange compensation for a brief discussion of the same. I’ve already wasted time learning the ropes on the topic.
So much information on here. So many of the questions I had answered. The mfr part numbers are exactly what I needed to put my order together. The linked page on Mini Fit Jr was also very useful. No question for you, just a thank you.
Hi, I’ve found a molex crimping tool with the part number 63819-1100B. Would you have any idea what sort of terminals this could be used for?
It is for traditional “molex” connectors. See the one labelled “MOLEX” in this picture:
https://en.wikipedia.org/wiki/Molex_connector#/media/File:Amp_and_Molex_Connectors.jpg
Just want to thank you for sharing your wealth of knowledge. I’m in those early fumbling around stages with electronics connectors and this webpage is incredibly helpful.
Curious if you have any strong opinions about crimp tools for wire ferrules — I think I see at least one six-sided tool in your collection.
It would be nice to have such a tool on hand, but I wouldn’t ever use it enough to justify spending $200+ on it. Iwiss has a reasonable looking one but it seems almost too cheap to be decent…
this was super helpful thank you
This is amazingly useful for a newbie like me just looking to get in to building my own connections – thank you so much.
I respect your knowledge.
But my problem is not solved so I have a question.
1.DIGKEY=SSH-003GA-P0.2
2.MOLEX=503765_0098
3.HRS=DF52-2832PCF
I want to clamp (crimp) the three parts by hand.
i have hand tools
1.MOLEX 63811-5200
2.MOLEX 638191500C
3.JAPAN PA-09
My three tools don’t match the standards and I can’t work.
So I bought it on EBAY.
1.EBAY_Shipping=AMP 58342-2 TYPE F 32-28 AWG
2.EBAY_Shipping=MOLEX 638190300 28-32,26-28,26-28,28-32 AWG
Will the newly purchased hand tool have the three PIN clamps mentioned above?
With your knowledge, can you recommend 3 types of PIN clamping tools?
1.DIGKEY=SSH-003GA-P0.2
2.MOLEX=503765_0098
3.HRS=DF52-2832PCF
There is this connector floating around for led strip installation. It’s also used by Ikea for their cabinet led system.
Chinese sellers only call it “dupont” but I can’t find it sold seperately. Only pre-crimped with cable or as part of a product. It seems to have a 2.5mm pitch. It looks similar to SL (Molex) but where it meets the cable it gets wider. See image:
https://i.ibb.co/f45Vjy1/mystery.png
What is this?